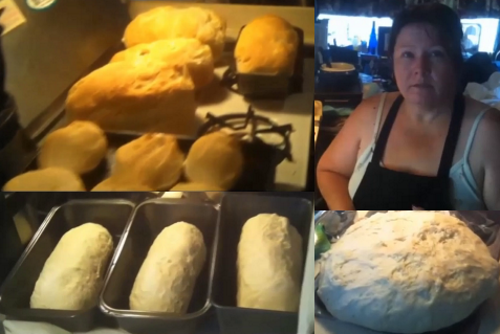
howtopam Country Style Baked Bread

Why Bake Your Own Bread?
It seems as though baking homemade bread is a tradition that like many other fine crafts of the past has lost its once popular appeal to the hectic lifestyles of the modern family. Who has the time anymore to practice an art in the kitchen which can consume hours of a day when schedules are already crammed with work and other necessary activities? Today the baked goods section of the supermarket shelves are piled high with plenty of varieties of commercial baked breads for only a few dollars per loaf so why bother to bake your own?
What Do You Think?
Do you have time to bake your own bread?
Baking your own bread has a few advantages over commercial baked breads that makes the alternative worthwhile considering. The foremost advantage is the quality of the ingredients that go into the bread. The consumer has very little control over the quality of the products utilized in the commercial bread baking process. Making your own bread allows you the choose healthy grades of products like flour, yeast, sugar, salt and vegetable oil that you desire to use and eat in your home baked bread. As the baker you also can control the amounts of each ingredient that goes into each loaf of your home baked bread. Secondly, cost is a significant consideration. Shopping wisely for bread baking ingredients and buying in bulk has allowed me the bake homemade bread for as little half the cost per loaf of the commercial breads that fill the supermarket shelves. Finally, taste can not be left unacknowledged. The taste of the freshest baked bread hot off the oven rack at the local commercial bakery just cannot compare to the aroma and flavor of the bread that comes out of your own oven at home.
howtopam's Country Style Baked Bread
Need Bread Baking Pans?

What You Will Need To Bake Your Bread
The first thing that you will need before you begin to make homemade bread is a few culinary utensils. One of the most important utensils is the bread baking pans. These pans are shaped and sized to contain your bread as it rises and is baked in the form of a loaf that once sliced at the correct width will easily fit into most toasters. Bread can be baked in any shape or form that you desire, but if you desire a uniform standard loaf you will want to have the proper baking pans. Use caution though when purchasing your bread baking pans and be certain to get pans that have some quality because the very inexpensive pans do not distribute heat evenly and usually cause the bread to stick and burn to the pan.
Baking Utensils

The other important utensil that is necessary when baking bread is a large glass or stainless mixing bowl. I say necessary because the yeast that you will be using is a live bacteria which likes to react with any contaminants that it comes in contact with. Plastic bowls often contain trapped contaminants in the pores of the plastic which can cause a reaction with the yeast destroying its ability to cause the bread dough to rise. So you do not lose your ingredients and your hard work it is much safer to use a sterile glass or stainless steel mixing bowl. Finally, you will need a good sturdy mixing spoon. Once you begin to add flour to your liquid in the mixing bowl the dough will get very thick and heavy and tough to stir and a light or fragile mixing spoon will only bend or break as you are working the dough.
The Ingredients

The Ingredients
There are many different recipes for making homemade bread and I have tried many of them over the years. Not being completely satisfied with the quality of the bread produced from many other recipes I eventually combined elements of a few and came up with my own. My quest was to produce a homemade bread that was healthy, tasted good, rose nicely and baked well, and required few ingredients. The bread recipe that I was finally satisfied with is quite simple and requires only water, flour, yeast, sugar, salt, and vegetable oil.
Large Stainless Mixing Bowl?

Making The Bread
The recipe that I am going to share in this lesson will make four average sized loaves of bread. If you only desire to make two loaves of bread just cut all the ingredients in half or if you desire only one loaf then divide the ingredients by four. Likewise if you would like to make more than four loaves of bread increase the ingredients by multiplying them. Though the measurement of ingredients is important it is not critical for this recipe. For the purpose of this lesson I will provide accurate measurements, but each ingredient can be varied slightly without drastically harming the quality of the bread. When I make this bread for myself I rarely measure any of the ingredients - I just use my practice and make an educated guess to estimate all of the ingredients.
Setting The Yeast

Step One
Setting The Yeast:
In your large glass or stainless mixing bowl pour one cup of lukewarm water. Remember that the bowl is likely cold glass or steel so the heat from the warm water will dissipate quickly into the bowl until the bowl is warmed, therefore, make this first cup of water a little extra warm.
TIP: You can heat your bowl first by running it under the hot water faucet.
Yeast does not like HOT water so be certain that the water you use is only lukewarm. After you have your one cup of warm water in your bowl mix into the water one teaspoon of granulated white sugar. After the sugar is completely dissolved add into the sugar water four level tablespoons of quick rising yeast. Just sprinkle the yeast gently on top of the water covering the entire surface, allowing it to float on the water for about ten minutes.
TIP: Each loaf of bread in this recipe requires one level tablespoon of yeast and we are making four loaves of bread. If you buy your yeast in convenient pouches, then you only need to add three pouches of yeast because because each yeast pouch contains one and one quarter tablespoons of yeast. Three yeast pouches equals three and three quarters tablespoons which is close enough to four tablespoons for this recipe.
Mixing The Yeast Into The Water

A Heavy Duty Mixing Paddle

Step Two
After the yeast has floated on the warm water for about ten minutes with a wisp or a mixing spoon mix the floating yeast into the water until it is completely dissolved, leaving absolutely no tiny lumps of yeast floating in the mixture. Once the yeast is completely dissolved into the water add five more cups of warm water into your bowl.Then add one teaspoon of salt.
TIP: The type of salt and the amount of salt is strictly up to your taste. If you add a little extra salt or a little less salt or no salt at all, it will only affect the taste of the baked bread and not the dough rising result.
Next add into the warm water mixture one half cup of white granular sugar and one half cup of vegetable oil. After all the ingredients accept the flour are added to the warm water solution mix everything together until all ingredients are completely dissolved.
Mixing The Ingredients All Together

TIP: The type and amount of vegetable oil that you choose to use is strictly up to you. Like the salt a little extra oil or a little less oil will not affect the dough rising. The type of vegetable oil that you use will affect the taste of your bread only. In this tutorial I am using Olive Oil, but I prefer to use corn oil. Sugar as well can be substituted with other sweeteners if you prefer and add a little less or a little more sugar if you would like to. Slightly increasing or decreasing the the amounts of vegetable oil and sugar will not affect the bread dough rising - it only affects the taste of the bread.
Adding Flour

Step Three
After the warm water mixture is completely homogenized you can begin to add the flour into the solution. Add only about half the flour that you require before stirring it into the solution. This recipe calls for about ten cups of flour so add in only five cups to begin with and then mix the flour into the mixture.
TIP: The type of flour that you choose will affect the outcome of the bread. I find that when using whole wheat flour, because it is heavier, I need to add extra yeast to get it to rise well. This recipe is using All Purpose white flour and if we were to use Whole Wheat flour we would increase the amount of yeast by one tablespoon to get good dough rising results.
After stirring the five cups of flour into the mixture add only two more cups of flour and then stir the dough again.
Add Five Cups of Flour

Add Two More Cups of Flour

After adding adding the the seventh cup of flour stir the dough again. At this point the dough will be getting very thick and difficult to stir. This is where the sturdy mixing paddle becomes a valuable culinary utensil to have in the kitchen. The paddle will allow you to lift and fold the heavy dough as you continue blending in the remaining three cups of the flour.
After you have blended the seventh cup of flour into your dough add the eighth cup of flour and blend it in. At this point we will only add one cup of flour at a time and then blend in into the dough.
TIP: At this point of the dough blending you may find that you will have greater success by just using your hands to do the working [kneading] of the dough.
Add The Eighth Cup of Flour

After the eighth cup of flour is kneaded into the dough add the ninth cup of flour and continue kneading.
TIP: Using your hands to knead the dough lift the dough up from the edge of the mixing bowl and pull it to the center and push it down. Then rotate the mixing bowl one quarter turn and repeat the process of lifting from the edge, pulling to the center, and pushing down. Continue this kneading technique until the dough is evenly blended throughout. The kneading process could take a good five minutes between adding the remaining amounts of flour.
Measuring Cup?

Add The Ninth Cup of Flour

After the ninth cup of flour is completely blended into the dough add the tenth and final cup of flour a little at a time. If the dough is still quite moist and sticky add half of the tenth cup of flour and continue kneading. As the dough becomes less sticky add less flour before kneading each time.
TIP: You may not need to add the entire tenth cup of flour or if your dough is still very moist after adding the tenth cup of flour you can add a little more flour. Ideally you want your dough when you are finished kneading to be moist, not dry and clumpy, but not sticky. The finished dough should be tacky, but should NOT stick to your hands.
Adding The Tenth Cup of Flour

Step Four
After your dough is completely kneaded with enough flour that it no longer sticks to your hands lift the dough out of the mixing bowl and form it into a ball in your hands. After forming a large ball out of the dough set the ball of dough into the mixing bowl and cover it with a light cheese cloth or paper toweling and set the bowl in a warm place in your kitchen.
TIP: Brush a thin coating of vegetable oil over the top of the ball of dough to keep the dough from drying out and crusting on top as it rises. If you want to speed up the rising process, you can set your oven at about 160 degrees fahrenheit and put your mixing bowl with the dough into the oven to let it rise.
Let the oiled and covered dough rise in a warn area of your kitchen for at least one hour or until it has risen and increased to about three or four times in size.
The Dough Has Risen

Step Five
After the dough has risen to three or four times it original size remove the cloth or toweling and punch the dough down again. Just punch it down in the center and then once again lift the dough from the edge of the bowl and pull it into the center and push it down again. Turn the mixing bowl a quarter turn and repeat this process a few times until the dough is a smaller ball much like it was originally.
Punch The Dough Down Again

Cut Dough Into Loaf Size Pieces

Step Six
After the dough is punched down and formed into a ball about its original size cut about one quarter of the dough off of the ball with a sharp carving knife. Take the piece of dough that you have cut off from the ball and form it into the shape of a tiny bread loaf about the diameter of a large coffee mug and twice as long.
TIP: To shape the dough into a tiny bread loaf with two hands squeeze it gently as if you were wringing water out of a towel. Once you have the diameter and the length that you want tuck the ends into the roll. This technique takes a little practice to develop, but it get easy after you have made a few loaves.
Put The Tiny Bread Loaves Into The Bread Pans

Step Seven
Once you have formed your tiny bread loaves lay them in the bread pans and again cover them with a towel and set them in a warm place to rise for about one hour again.
TIP: Coat the inside of the bread pans with a thin coating of vegetable oil to prevent them from sticking to the pans while rising and baking.
The Bread Making Quiz
view quiz statisticsReady To Bake

Step Eight
After the bread dough has risen for about one hour in the bread pans it should be the size of a baked loaf of bread. If the dough is not the size of a regular baked loaf of bread let it rise in the bread pans a little longer.
TIP: Do not let the dough rise too much longer than one to two hours because after that the yeast will eventually lose its reactivity and your bread will begin to deflate and the dough will shrink.
Once the dough has risen to the desired loaf size you are ready to put the bread pans into the preheated oven at 400 degrees fahrenheit for about twenty minutes.
TIP: Always preheat the oven so that baking time can be calibrated accurately.
Put The Bread Into The Oven

Put the bread pans with the risen bread dough into the oven and bake them for about twenty minutes. After twenty minutes the baked bread should appear a nice golden brown in color. If after twenty minutes the bread color is still a little pale leave the the bread baking in the oven for a few minutes longer, checking it every one or two minutes for the desired color. Once the desired color appears remove the bread from the oven.
TIP: Be sure to set your oven rack to the center position in the oven so that the bread bakes evenly and not more on the top than on the bottom.
After removing the bread pans from the oven immediately remove the bread loaves from the bread pans. If you allow the bread to cool in the bread pans the bread will sweat and the moisture will cause the bottom and sides of the bread loaf to become damp.
All Finished Baking Ready To EAT and ENJOY!

Need A Bread Making Machine?

The Recipe for howtopam Country Style Baked Bread
BREAD RECIPE
| makes four loaves
| ||
|---|---|---|---|
Ten Cups
| All Purpose White Flour
| can subsitute
| Type
|
Four Tablespoons
| Quick Rising Yeast
| cannot subsitute
| can use 3 yeast packets
|
One Half Cup
| White Granular Sugar
| can subsitute
| Type and amount
|
One Teaspoon
| Table Salt
| can subsitute
| Type and amount
|
One Half Cup
| Vegetable Oil
| can subsitute
| Type and amount
|
Questions or Comments?
I welcome all your questions and comments as well as any suggestions or ideas of your own. Please contact me through any of my links with any input that you desire to contribute. I enjoy hearing from everyone.
Thank you
How To Pam


