How to Make Raspberry Freezer Jam


How to Make Easy Raspberry No-cook Freezer Jam
One of my favorite summer fruits is the raspberry so my favorite jam is raspberry jam. Although traditional cooked jam tastes good, I much prefer the great fresh fruit taste of freezer jam.
Freezer jam preserves more vitamin C and other valuable nutrients from the fruit that is lost when the fruit is cooked.
The bonus is that freezer jam is quick and easy to make and doesn't require sterilizing glass jars and lids or standing over a hot kettle stirring simmering jam on a hot summer day.
With this recipe you will see how quick and easy it is for anyone to make yummy homemade raspberry freezer jam
What's your opinion about freezer jam?
Do you make freezer jam?
Jam Containers

Select and Prepare Your Jam Containers
The first thing you need to do is get your containers for your jam. With this recipe, each batch of jam will make will make 5 cups of jam, so decide how much jam you want to make and calculate the size and number of containers you will need. The great thing about freezer jam is that since it doesn't need to be sealed airtight to preserve the jam so you can use many different types of containers.
You can use traditional canning jars, specially made jam canning jars, recycle any old glass jars with a lid or use plastic containers that are made to be used to store foods in the freezer. I prefer to use square plastic freezer containers. Although they aren't as cute or decorative to give as gifts, they are inexpensive and take up less space in my freezer because they stack on top of each other. After the jam is used the empty containers also take up less storage space because they stack inside each other.
To prepare the containers, you can simply wash them like you normally wash dishes. No need to sterilize! I simply wash my freezer jam containers in the dishwasher right before making my jam.
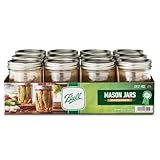
Freezer Jam Containers for Your Jam - My Favorite Freezer Jam Containers
These are the type of freezer jam containers that I prefer. They are inexpensive, durable, reusable and conserve space in the freezer by stacking nicely on top of each other. They also are easy to store when the containers are empty because they stack inside each other and won't break like glass containers. This particular size holds 1 cup of jam, so a package of 5 works perfectly for one batch of this jam recipe. Since it is recommended that freezer jam be stored in the refrigerator after thawing for only up to 3 weeks, select containers the size that will hold the amount of jam that you think your family will eat in that time frame. Or you can scoop out some of the frozen jam and keep it in another container in your refrigerator.
Here are some other types of containers you can use for your freezer jam
Here are some other sizes and shapes of containers that you can use for your jam. Some of these are more decorative if you want to give some of your homemade raspberry freezer jam as gifts.
The Utensils Needed to Make Jam

Kitchen Tools and Utensils You'll Need to Make Jam
Fortunately, most people will already have all of the utensils and tools in their kitchen that they will need to make freezer jam. Here is the short list of items that I use:
Tablespoon
1 Cup measuring cup
1 1-quart size glass measuring cup
1 2-quart size glass measuring cup
1 large bowl
Potato Masher
Spatula
Ladle
Freezer Jam Ingredients

Ingredients Needed to Make Raspberry Freezer Jam
After you have your containers and have all of the utensils you need, it's time to get your ingredients! Here's the short list of what you will need:
1. Sugar - you will need 4 cups for each batch of jam. That works out to about 5 pounds of sugar if you want to make jam from a half flat of berries. (A half flat will make about 3 batches of jam)
2. Lemons or lemon juice. You can buy fresh lemons and squeeze your own lemon juice or buy lemon juice. Some people use the "Real Lemon" brand bottled lemon juice or the lemon juice that comes in the little plastic squeeze containers that look like a lemon. I'm all about quick and easy, but I prefer to use frozen lemon juice instead of bottled lemon juice. It has fewer preservatives and tastes more like fresh-squeezed lemon juice so it seems like a good compromise between fresh- squeezed and the convenience of bottled.
3. Certo Fruit Pectin
4. Berries! To reduce spoilage and waste, get fresh berries at the last possible moment after you have all of the other ingredients. You can also use thawed frozen berries.

Certo Liquid Pectin - Fruit Pectin to Thicken Your Jam
Although there are many kinds of pectin that you can use to make no-cook freezer jam, I prefer Certo liquid pectin. The jam recipe included in the package is very simple and requires only fruit, sugar, lemon juice and the pectin. Some other types of pectin require using corn syrup in the recipe in addition to sugar. This Certo pectin is in liquid form so it is super easy to use and foolproof. There is no need to mix it with warm water, heat the jam or worry about your jam not thickening because the pectin wasn't completely dissolved.
Fresh, red, ripe and firm raspberries

Choosing your berries
Whether you pick your berries from your own garden or buy them at a U-pick farm, fruit stand, farmer's market or at the grocery store, it is best to get your berries early in the day.
Choose berries that are red, ripe and firm without any sign of mold.
Raspberries are more fragile than most berries and are easily damaged by heat and humidity. To prevent spoilage and waste from moldy berries, keep them cool and make your jam as soon as possible after they are picked.
Be ready to go with all of your containers, utensils and other ingredients before you get your berries.
See How Easy it is to Make Freezer Jam
IMPORTANT TIP!
Do not try to double the recipe - always make one batch at a time, carefully following the instructions in the pectin package!
Make Some No-Cook Raspberry Jam

Raspberry Freezer Jam Step-by-Step Instructions
1. Make sure your containers have tight fitting lids and are washed and rinsed
2. Prepare the fruit. Rinse the raspberries in cold water in small batches. Carefully remove any stems, leaves or moldy fruit. Also check for and remove any bugs unless you prefer "extra protein" in your jam.
3. Crush the rinsed berries one cup at a time using a potato masher. If you use a food processor, use the pulse setting to chop. DO NOT PUREE the fruit.
4. Measure exactly 2 cups of fruit. I prefer to use a large pyrex measuring cup so I can see that I have just the right amount.
5. Pour the crushed berries into a large bowl.
6. Measure exactly 4 cups of sugar and stir it into the crushed berries. It may sound like a lot of sugar, but don't reduce the amount or the jam will not set! Mix well and let the berries and sugar stand for 10 minutes with an occasional stir.
7. Measure 2 tablespoons of lemon juice and pour into the berry and sugar mixture.
8. Add the package of pectin to the bowl and stir constantly until the sugar is completely dissolved and no longer grainy - about 3 minutes.
9. Using a ladle or spoon, pour the jam into your clean containers, leaving 1/2 inch space at the top for expansion during freezing. Place the lids on the containers
10. Let stand at room temperature for 24 hours until set.
Important Note: Freezer jam doesn't usually set as solid as cooked jam, so don't be surprised if it is a softer jam.
Photos of making my raspberry jam - Photos with Step by Step Instructions
Click thumbnail to view full-size


STORING YOUR JAM
Jam can be refrigerated for up to 3 weeks or stored in the freezer for up to 1 year. (I've actually stored some for 2 years in the freezer and it was fine) Thaw in the refrigerator.
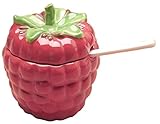
Jam and Jelly Serving Dishes
The plastic freezer containers work well for storing your freezer jam, but they are rather utilitarian in appearance for serving your jam on the breakfast table. My solution was to buy a this nice raspberry shaped jam jar and spoon the jam into it from the freezer container at mealtimes.
Home-Grown Raspberries

Make Jam From Your Own Fresh Raspberries
Grow your own raspberries!
Of course the best way to have fresh raspberries for your jam is to grow your own. Raspberries can be grown in most areas and they are not difficult to grow. If you have a yard, it doesn't require much space to have a small raspberry patch that will provide you with plenty of raspberries for jam every year.
More Recipes and Gardening Tips
You can find more recipes and gardening tips on my Willeth Farm blog.
© 2010 Vicki Green


