I Love My Tagine

I love my Tagine
The Tagine (or Tajine) is an elegant piece of crockery that lets you slow cook tasty dishes to perfection. Whether in the oven, on a stovetop, or over an open flame - as they do in the tiny villages of Morocco.
Find and prepare your tagine for cooking, pick from wonderful, aromatic recipes and enjoy the flavours of Moroccan cuisine.
What's a Tagine?
To start with, you pronounce the word: taa-ZHEEN (with a soft "jz" sound as in "asian").
A Tagine (or Tajine) is a deep circular dish made of crockery, with a conical lid. It is used extensively in Northern Africa (especially places such as Morocco) for slow-cooking food over a fire. It is the original crock-pot.
The deep dish holds all the juices of the succulent stew, while the innovative conical lid allows the food to be steamed and baked at the same time. All while cooking over a slow flame.
How does it work?
The unique shape of the tagine allows air to circulate above the food without escaping. There's usually a steam hole in the lid to allow some (but not much) of the water to evaporate, but it also keeps in most of the moisture. This allows your tagine to slowly steam and roast the food from above, while simultaneously broiling from the heat at the bottom.
This combination of cooking-methods allows the food to slow-cook from all directions to make a perfect, fragrant casserole.
Which tagine?
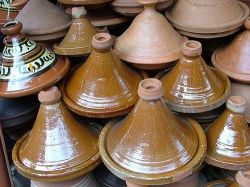
Tagines actually come in two kinds. The first kind are those used for cooking (such as those pictured here) - which are practical and hardy. They can also be decorated, but they are definitely functional.
The second kind are highly decorated, and are simply used for serving. They are often painted in bright colours, and may not be suitable for cooking, but look very beautiful with their decorative lids. They will keep the food warm at the table for a long time.
Sizes vary considerably, from tiny decorative tagines used for putting spices or salt on the table, through one-person-meal sized cooking tagines, up to giant multi-person meal sized monsters that are difficult to fit on your table. The majority that I saw for sale in Morocco, were of the two to four person size (as pictured here), with the bottom-section the size of a large dinner plate - and I found these to be the most practical for every day use. They fit on your stove, and will fit on your table
When you are purchasing a tagine - make sure you are buying the correct one for your intended use. You don't want to put a purely decorative tagine onto the stove or the base may split in the heat. That would be disappointing! Ask at the store to be certain which kind you have.
The heat is on...
...but it's a dry heat!
Buying a heat-mat is a good investment as it significantly prolongs the life of your tagine.
Whether you have a gas or electric stove, you will find that the heat is generally directed largely to a small area on the bottom of your tagine. Over time, the high temperature will cause the crockery to expand in some spots much more than in nearby areas, and will slowly cause minute stress-fractures in the pottery. This will eventually weaken the structure of your tagine - which is a Bad Thing.
To prevent this, always use a good heat mat. This will spread the heat out evenly over the bottom surface of your tagine and allow the tagine to heat up evenly. Incidentally, it also means less likelihood of your food burning in one particular spot of the tagine - an added benefit.
I personally use a SimmerMat which I find pretty darn good quality. It can be used on either a gas or electric hob, and fits perfectly under quite a large tagine.
SimmerMat on Amazon
This is a really good quality heat mat for use with your tagine.

Prepare your tagine for first use
give it a little love...
Tagines are pretty sturdy pieces of crockery, but they do require a little preparation to perform at their best. This only needs to be done once (when you first buy it).
It's a bit like preparing cast-iron pots and will extend the life of your tagine.
NOTE: not all tagines will require this treatment! Especially the decorative ones, but most cooking tagines will. It's not very common, but some cooking tagines are fully glazed with a heavy glaze, or made from stoneware so no amount of oil or water will get into them. These don't need treatment.
Why do tagines need treatment?
Earthenware clay (eg terracotta) is actually quite porous. This is because the particles in earthenware are only sintered together - with big gaps in between that allow liquids to (slowly) pass. Whereas stoneware is fired at a higher temperature, and the particles fully fuse together, leaving few, very small holes that do not allow liquids to pass between them.
If you use an earthenware vessel with food directly - the liquids in the food will soak into it and may impart flavours to future foods cooked in there - or may even go bad. The oil treatment described below simply fills in the open pores of the clay.
To test if your tagine needs treating:
If your tagine has any non-glazed surfaces (rough to the touch, like a brick), you will need to treat it as below. If not - then I suggest pouring a glass of water into the base and seeing if it slowly soaks away overnight. If so - it needs treatment... otherwise, you may not need it. The traditional terracotta tagines nearly always need to be prepared. The more modern stoneware ones don't.
Directions:
To start with, you need to soak your tagine (both base and lid) in water for 24 hours. This can be done in the sink or in a bigger pot. The water will slowly soak deep into the pottery. This changes the specific heat of the tagine and helps with the next step of the process.
The next day, put the tagine onto your heat mat on the stove, and pour in about half a cupful of cooking oil. Turn the heat on low, and allow the tagine to slowly "simmer" in the oil.
The water will escape from the pottery, and the oil will soak in instead - this will make sure that the tagine has a good layer against the food that you will later cook on it.
Warning: don't overdo it with the oil! yes you can fill it to the brim with oil and let it soak all the way through, but trust me, if you do - every time to you cook with it after that, the oil will soak out through the bottom of the tagine onto your stovetop and make a gucky mess (don't ask me how I know!) ;)
but if you follow the steps above, this preparation makes it easy to clean in future, and will help your tagine last a lifetime.
Tagine cookbooks on Amazon - Look for more great recipes here.

Tagine Substitute?
what to do when you don't have a tagine
I moved to England and now my Tagine is thousands of kilometres away from me :(
So do I give up my now-favourite style of cooking? Of course not!
So: what's a good substitute for a tagine if you find yourself without one?
To start with - the process of cooking that a tagine gives you is a combination of baking, frying and steaming. So your replacement probably needs to combine these.
My best solution so far is a deep-sided sauté pan with a heavy bottom and a well-fitted lid. The heavy-bottom will slowly-release the heat without scorching, and the high sides with a lid will allow the steam to sit on top of the food.
If your tagine recipe requires you to brown your meat beforehand - just do that in the pan on high before you drop the heat for rest of the cooking process.
If you don't have (and can't buy) a sauté pan, then just toss it all into a lidded heavy pot (so the food doesn't scorch) over a very low heat... or even use a crock-pot (a slow-cooker) to do the rest.
If you have any other ideas for alternatives to actual tagines - please share them below!

Recipe: chicken with preserved lemons and olives
A lovely, fresh, zingy recipe - this one is great with a side of couscous and some lentil salad.
Ingredients:
- Chicken - ~4 thigh fillets (or equivalent) diced
- Preserved Lemons - - ~ half a lemon (or to taste) - diced as fine as you can manage
- Olives - ~100gm
- 1 Medium onion (sliced in rings)
- Garlic - 4 cloves (or to taste) - diced fine or crushed
- fresh coriander (cilantro) leaves - ~1 cup finely chopped
- Ras El Hanout (mixed moroccan spices) - ~ 2 Tbsp
Method:
- Place heat-mat and tagine base on stovetop. Add three tablespoons of cooking oil.
- Switch the heat on low to allow it to begin to heat while you continue adding ingredients.
- Scatter the onions and garlic into the base, and scatter the spices and preserved lemon over this. We put these on the bottom so the flavours will filter up through the rest of the ingredients as they cook.
- Add the chicken pieces
- Cover the chicken pieces with the chopped coriander. This will enclose it so that it does not dry out - especially if we lift the lid later.
- Add the tagine lid and leave to cook for half an hour - or until thoroughly cooked.
Recipe: Lamb with prunes
A warm, luxurious recipe, this one will fill you up with delicious sweetness. Great for cool winter evenings when you want something earthy and spicy.
Ingredients:
- Lamb - ~250gm - large cubes
- Prunes - ~100gm - de-pitted
- Eggplant (Aubergine) - ~2-3 cups - diced into large cubes (1")
- 1 Medium onion (sliced in rings)
- Garlic - 4 cloves (or to taste) - diced fine or crushed
- Ras El Hanout (mixed moroccan spices) - ~ 2 Tbsp
Method:
- Place heat-mat and tagine base on stovetop. Add three tablespoons of cooking oil.
- Switch the heat on low to allow it to begin to heat while you continue adding ingredients.
- Scatter the onions and garlic into the base, and scatter the spices over this.
- Add the lamb and prunes
- Place eggplant so that it covers the lamb - this will enclose it so that it does not dry out - especially if we lift the lid later.
- Add the tagine lid and leave to cook for half an hour - or until thoroughly cooked. You do not need to stir it, but it won't hurt if you do... just don't spill any over the side if you do.
Photo Credits
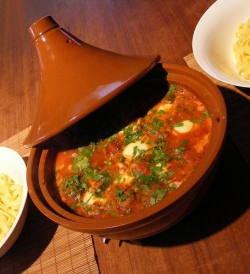
The title-photo of lamb tagine with quail eggs is courtesy of flickr user FotoosVanRobin.
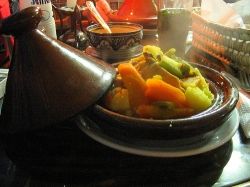
The photo of A Tagine with Cuscús con pollo y verduras is courtesy of flickr user mabel fiores.
The photo of Stacked tagines is courtesy of flickr user babeltravel.
The photo of Chicken Tagine with Olives in the accompanying recipe is courtesy of flickr user petroleumjelliffe.
 Pot versus French Casserole for Cooking Chicken")


