Dark Souls II Walkthrough, Part Seven: Heidi's Tower of Flame - Tower of Flame


We've explored. We've conquered a few bosses. We've seen the easiest stuff there is to see in Dark Souls II, quite frankly, and that's scary. This game is hard, and it's only going to get harder as you progress further into Heidi's Tower of Flame and discover just how hardcore its occupants can become...
Heidi's Tower of Flame
- After lighting the Bonfire, look for a kneeling woman nearby. This is Licia, and she'll sell you items best suited for Clerics - including a ton of spells. Ooooo, Miracles.
- Walk across the bridge up here to an adjacent tower. Go down the spiral staircase within, checking near the bottom for a corpse. It holds a Monastery Charm.
- Follow the passage ahead until it widens into a room. There's an armoured giant here with a sword. Pull back and pelt him as you get openings. Don't fight him in the room - there's another armoured figure on the opposite side of it, and you don't want to take on both at once. (If / when you get past this second guard, you'll find three corpses in a dead end. They collectively hold a Soul of a Proud Knight, an Old Knight Halberd, a Human Effigy and Dark Troches.)
- There's a staircase through the room. At the bottom you'll come to a small door leading into another area, and inside it another massive guard. Ranged characters can pick away at him at their leisure from the door; melee fighters will probably find it easier to move into the room and use the space to their advantage.
- There's a split in the path ahead, though it's a dead end to the left. To the right is another beefy soldier. Either pull him back to the previous room and take him down or slip past him. Behind is a room with a lift; step on the lift's plate to descend far into the ground.

- Ahead the stone is flooded, slowing your movement. Troublesome. Plow ahead. The first left is a dead end; the second leads to a soldier and more tunnel; the third is another dead end, but it sits beside a hole in the wall. The hole leads to another Bonfire, Unseen Path to Heide, as well as a dapper, unfriendly woman named Lucatiel. Speak to her enough times and she'll agree to help you when summoned.
- Return to the soldier you passed and take it on. The water makes this fight much more difficult than the previous ones, as your dodges and rolls are checked by the water. I suggest drawing the knight towards the lift; it's big enough to follow you, and you can either weave around the lift and get by or engage it with greater mobility.
- Beyond the soldier's post is a set of stairs. They lead up to a balcony. Follow the path left from the doorway to find a chest containing a variety of Knight gear, including Helm, Armor, Gauntlets, and Leggings. To the right is a wrought door through which you cannot pass, so don't bother trying.
- That's all for the Tower of Flame. Head back to the Bonfire and check out the warp spot you've just unlocked. As point of fact, it's not actually a warp to Heide's Tower of Flame - it's actually the jump-off point to No-man's Wharf, another area altogether. We'll come down here in another article. So what about the rest of Heide's Tower of Flame? Surely there's more.
- Zip back to the Tower of Flame or Heide's Ruins waypoint, your choice. Make your way along the path until you reach the room with the three guards. To get this far you've gone right; this time, you want to zip past the guard on the left side of the room. You're about to acquire a train of knights, so hopefully you know how to deal with these guys.
- Dash past and back outside. Two more knights are waiting; on a set of stairs to their left is a corpse holding a Divine Blessing. Run past them, up the stairs beyond, and follow the walkways until you arrive at a wide, circular platform where one final soldier waits. If you kill this guy, a switch here will pop up, allowing you to access yet another area: the Cathedral of Blue. This leads to a significant problem...
- ... how do you get rid of all these stupid knights following you around? They're tough, and in a mob they're near-suicidal to take on this early in the game. Your best bet is to weave past the guys, hurling ranged magical attacks at them as you move around the platforms. They're slow enough that you'll have plenty of lead time, and the chances are fantastic that a few will accidentally plummet off of the sides of the pathways to their doom. If you plan on taking one on, make sure it's a solo battle - lead the rest of them away first.
- Regardless of how you lose your pursuers, pull the switch. It will bring down a massive drawbridge. At the top is a chest containing a Ring of Binding and five Human Effigies, as well as a corpse holding an Old Radiant Lifegem. Enter the Cathedral of Blue... and, well, it's boss time. (He's optional, but, eh, why not?)
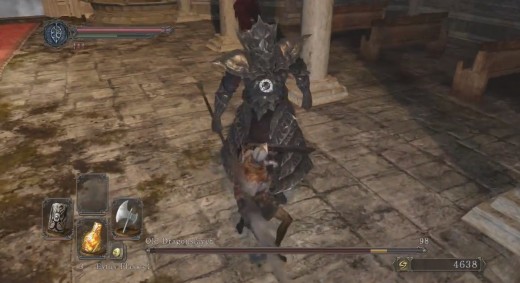
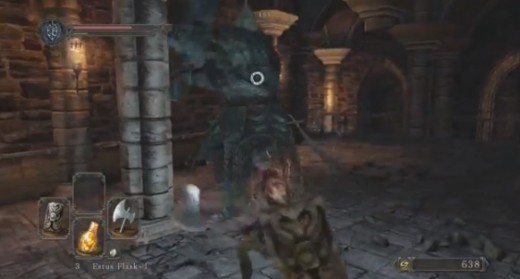
Old Dragonslayer
The Old Dragonslayer is a teensy bit easier than the Dragonrider, but not by a whole lot. Bearer of a massive pike and way too agile for anyone's liking, the Old Dragonslayer relies on mostly straight lines to deliver his attacks:
- First, he'll thrust. No surprise there. The length of his pike is such that you reeeeally want to dodge to the side. It's way too long to roll backwards. His thrusts are often accompanied by swift charges, and he can cover a lot of ground in a short period of time.
- Second, he'll leap upward and come down on you. Wait until he's actually in the air before rolling, as he'll change direction if you move prematurely.
- Third, he'll perform a sweeping combo of three hits. These have a much shorter range than the Dragonslayer's other attacks, but getting caught by one will probably doom you to getting hit by the other two.
- Fourth, as the battle begins to wear on a bit, the Dragonslayer will charge up his pike and send bolts of purple energy at you. These are slow and don't hit quite as hard as his weapon attacks, but are nevertheless quite dangerous because they home in on you. Wait for one to get close, then dodge to the side. You'll likely avoid all of them. Sometimes he'll also charge up, fly up, and do an area-of-effect attack, but this is pretty easy to see coming and avoid.
- And, fifth, the Dragonslayer will attempt to impale you. This looks about the same as his other poking attacks, though it's a single thrust that will put you on the end of his pike. If this happens you're pretty much dead.
As with most fights, how you deal with the Dragonslayer depends on your class. Melee fighters will want to stick relatively close to the Dragonslayer, rolling around his attacks and smacking him during his recovery time. Put up your shield whenever you're not taking a swipe, just in case. Ranged fighters will have a slightly trickier time; keep away from the guy, sticking near the edges of the room, and lob volley after volley of your preferred weapon at him. I found putting furniture and fixtures between myself and the Old Dragonslayer particularly useful in stopping his long lunges, though you will run out of stuff to break after a while. Just make sure you don't get caught on anything while you circle.
- Woo! Defeating the Old Dragonslayer will earn you the Old Dragonslayer Soul, the typical prize for bosses. Three down! You'll also earn the Old Leo Ring, good for spear-wielders.
- After defeating the Old Dragonlayer, go through the door he was guarding. At the rear of the Blue Cathedral you'll find Targray, bestower of the Blue Sentinels covenant. Upon his balcony you'll find two chests, one containing a Heidi Knight Iron Mask and a Tower Shield, the other three Cracked Blue Eye Orbs. Last, check the antechamber leading to the balcony to find a path down to the Blue Cathedral Bonfire. You can use this to quickly zip back to Targray whenever you like.