Dark Souls II Walkthrough, Part Twenty-Nine: Doors of Pharros - Royal Rat Authority


Aboveground, belowground. Aboveground, belowground. Dark Souls II can't make up its mind where it wants you to be, and the Doors of Pharros will send you into yet another interior area filled to the brim with deadly ruins and, this time, the kin of Lonesome Gavlan. Are you ready to deal with more Pharros faces than you'd ever care to see at one time...?
Doors of Pharros
- After a great deal of wandering through the narrow tunnel from the Scorpioness' den, you'll arrive at this new area. Ahead is an elephantine enemy that's slow, strong, and very vulnerable to magic. Beat it down before proceeding further.
- There are stairs ahead, and standing on them a Gyrm warrior. Again, slow but strong, though not nearly as bad as the elephant. Behind him on the stairs and to the left is a little guy fiddling with a chest; ambush and kill him, then check the chest for a Dragon Charm. The little guy drops a Large Titanite Shard the first time he goes down. (Can anyone confirm this? Or was I just very lucky?)
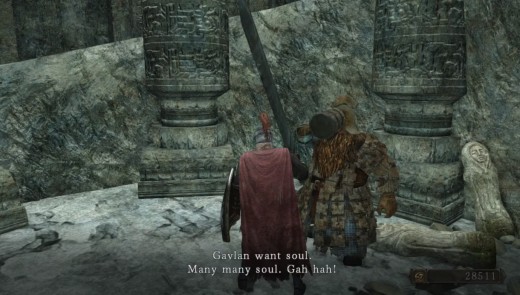
- There's a passage to your right. This leads to a section of the Doors of Pharros that we'll explore soon enough. If you feel like some wheeling and dealing before you go any deeper on your present course, check the next room down this path to find Lonely Gavlan, who will buy up your spare gear.
- Hop down into the water again. There's a narrow passage under the rock; to the right of it is a corpse that holds ten Prism Stones. Directly right of the passage is a chest, but it's actually a mimic. Kill it off and it will drop a Black Scorpion Stinger and Dark Leggings.
- Go through the passage. There's a Bonfire on your right, Gyrm's Respite. Past it is another hole in the wall. Go through and there will be another elephant creature in the next large room, and an invader will pop in to block your passage back out. You'll have to kill the phantom to leave. Once the area's clear, check the corpse in a far corner for two Amber Herbs.
- There's a gate here flanked by two Pharros' Lockstone faces and another underwater; only put a Lockstone in the underwater face to open the door ahead. Kill the elephantine warrior inside and check the chest behind it for a Santier's Spear.
- On the left side of this cave is a path leading to an overhead ledge. Up here is a corpse carrying a Gyrm Axe and a Torch. Hop down into the water beside the ledge and you'll see another Lockstone spot; ignore it completely. There's a single enemy behind it.
- In the top-right corner of this watery area is a passage into an adjacent room. It's watched over by two skulking rat-like creatures. Kill them both. Climb the ladder to their right.
- On the edge of the ledge to your left is a corpse carries a Twisted Barricade and a Soul of a Proud Knight. There are three Gyrm warriors on the path that twists ahead; move carefully as you engage each one to avoid falling. Be careful approaching the third warrior, as the wall to your right is spiked. Beside the third warrior is a chest containing a trap, a Titanite Chunk, and a Petrified Dragon Bone. There are two other Pharros' Lockstone faces here, as well. (Can't open. Will when I can.)
- Keep climbing. There are stairs ahead. On the left of them is a corpse carrying a Pharros' Lockstone and a Large Soul of a Nameless Soldier.
- Cross the thin bridge in the next room. Past two more Lockstone faces you'll find two Gyrm, one of which will hurl axes at you at a range. Pull back and wait for him to run out of axes before going on the offensive. There are tons of Lockstone faces ahead, and past them a corpse on your right that carries a Large Soul of a Proud Warrior.
- Cross the next bridge and kill the Grym ahead. There's a mist door here; ignore it for now and continue along the path to your right. You'll find another Gyrm to kill and, past him, a passage on your right. It leads to the Ordeal's End Bonfire, and just past it the other side of the fog door you just spotted.
Royal Rat Authority
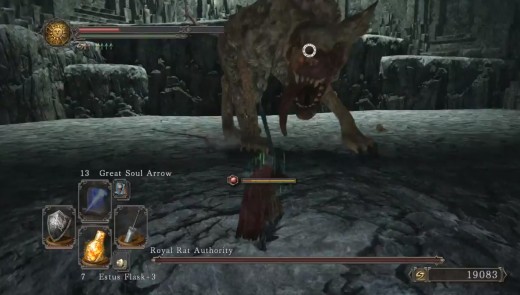
Upon first entering this room you may be confused to note the lack of a discernable boss. Indeed, there's naught more in here but a pack of smelly rats in the distance. Attack the four rats, though, and a massive big brother will leap down and join the attack. This is the Royal Rat Authority in all its glory - yet the big rat itself is not the problem. It's the small rats that will prove more tricksy.
The biggest problem here is quickly killing the four smaller rats before the big one can get to you. They don't deal a ton of damage, but they're a major distraction when you're trying to take on the Authority - and their bites inflict toxic. You do not want this to happen. Consequently, you'll want to pull out any area of effect attacks you have on hand, ones that you can unleash in the midst of the rats and kill them all at once. At most you'll want to have one rat left by the time the Authority leaps down onto your head... and that takes, oh, about five seconds. Make the most of them.
The Royal Rat Authority itself isn't too bad, regardless of your class, though you need to remain between its legs at all times. It's fast and vicious, and its attacks hit reeeeeeally hard. As soon as you get a target on the thing, run under its head or between its legs and start hacking away. Stay there and you'll avoid all of its attacks. It will occasionally leap away, but it's not too hard to get back under its belly and continue the fight. Keep slicing or bashing or whatever and it will quickly die. Fire makes this battle quicker, though neutral weapons will do just as well.
- When defeated, the big rat will drop the Royal Rat Authority Soul and a Rat Tail. Check the lit area in front of the large cliff for a Pharros' Lockstone, then make your excuses and depart. Back to the beginning of this area with you.
Related
-
Dark Souls II Walkthrough, Part Fourteen: Huntsman's Copse - Bridge Approach

Elementalist Walkthrough Guide in "Titan Quest AE" for Solo Self-Found Hardcore
-
"Dark Souls II" Walkthrough: Pate and Creighton
-
Dark Souls II Walkthrough, Part Twenty-Three: Iron Keep - Smelter Demon
"The Banner Saga" Walkthrough: Character Recruitment


