Darktopia Walkthrough


Evil, abandoned ruins are not the best places to explore, and this truth is quite apparent in Darktopia. A team of scientists has been separated under circumstances most vicious, and one of their number, the hapless Lorainne, has been separated from the others. She must survive the predations of hundreds of undead creatures, as well as a slew of high-tech traps, in order to escape this nightmare. Will she succeed?
Well. Maybe with a little help.
This article details all of the steps needed to not only get through Darktopia, but collect every item in the game. You can also consult this article for details on the game's equipment and foes. Onward!
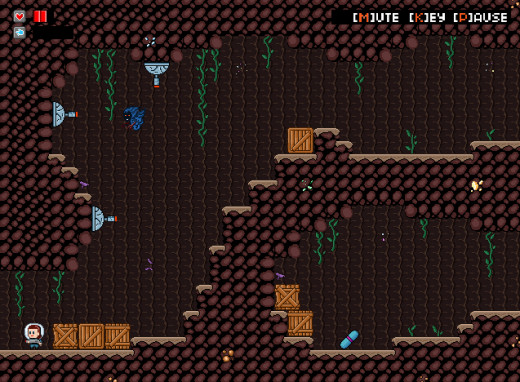
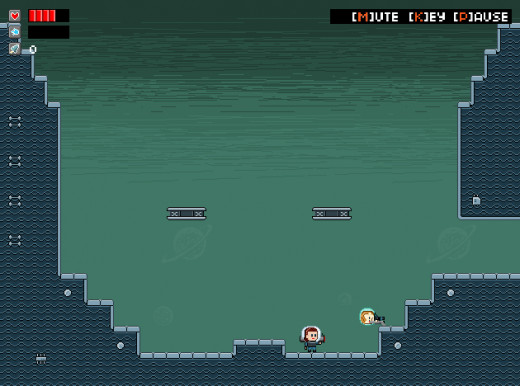
A1
Run left to get the Expedition Log.
A2
Continue left to find the Power Boots. These allow you to jump with the Z key.
A3
You can't currently reach the upper path. Go low.
A4
Save at the Checkpoint. Swim through the water and continue left.
A5
Hop over the spikes and continue left.
A6
Take the lower path and hop across the platforms. Avoid the patrolling buzz saws.
A7
More buzz saws in here. Fall down after using the Checkpoint.
A8
Hop up the cliffs quickly to avoid falling rocks.
A9
Grab the Accelerator. Hop up the left cliff to reach another Checkpoint. Using the Accelerator (Shift key), leap from the Checkpoint to the ledge on the right side of the screen.
A10
Use accelerated jumps to reach the exit it in the top-right corner of the area. Avoid the slow-moving enemies as you proceed.
A11
Make your way to the top-left corner of the area, timing your jumps carefully to avoid the downward fire of the cannon attached to the bottom of the top promontory.
A12
Loop around to the top-right corner of the room. Watch out for rocks above the upper platform. An accelerated jump that drops you beside the platform lined with spikes (but not ONTO the spikes) will get you through safely.
A13
Leap across the disappearing platforms to the right side of the room. You'll have to use accelerated jumps to reach, and escape from, the last platform; just keep your finger on Shift as you're leaping. Use the Checkpoint on the upper platform and keep going.
A14
Accelerate past the rocks on the lower level and make your way to the top. Waiting for you is a Green Keycard. Drop into the pit beyond.
A12 - A6
If you feel confident in your accelerated jumps, go through the green door in A11 using your Keycard and leap over the spikes and past the falling boulders to quickly reach A6. Otherwise, backtrack the way you came and go through the green door in A6.
A5
Leap over the spiked pit and grab the Blaster.
A5 - A9
Use the Keycard on the green door in this room.
B1
Snag the Expedition Log near the entrance. Time your jumps so you land safely between the active laser beams.
B2
Leap from floating platform to floating platform, landing on the Checkpoint in the middle as you head through the room.
B3
Destroy or avoiding the floating enemies in your immediate path. Drop down, past the laser beams, and ride the platform to the bottom-right. Ignore B5 for now.
B4
Leap onto the disappearing platform to reach the water. Float to the top of the room and use the second disappearing platform to exit the room. The easiest way to achieve this second jump is to accelerate off of the top platform and simply land on the platform rather than trying to jump onto it.
B3
You'll wind up beside a Jump Booster. Use it to get to the top of the room again. Use the top-left exit.
B5
Avoiding both enemies (watch out for the one that stalks you, it's persistent and durable) make your way to the top-left corner of the room via the platforms. Blow up the crates blocking your way with the Blaster.
B6
Hop your way up the room, pausing whenever the ceiling cannons fire. Be wary of the crates at the bottom, as the cannons will take them out and expose you to the enemies below.
B7
Hop onto the platform to avoid most of the perils after using the Checkpoint.
B8
Ascend one way, descend the other. The laser traps are the trickiest part of this area; seek refuge under the projectors when they're firing. Don't try to drop down when they're not active, as you won't fall fast enough to avoid damage. Note that using the Accelerator while underwater does indeed speed you up.
B9
Use the checkpoint at the top, then fall far, far down. Double jump before you hit the spikes to escape safely. You can use the vanishing platforms if you wish, but it's not necessary. Watch out for the rocks near the exit.
B10
Wait for the cannons to blow through the crate blocking you from the larger portion of this area. As soon as the crate is gone, and once the cannons pause in firing, accelerate and launch yourself between them and own to the bottom. The sooner you do this, the better - the blue floating enemy will otherwise tag your every movement and make getting through here difficult.
B11
Another blue guy. Sigh. Accelerate jump over the spikes and make your way up and through the tunnels as quickly as you can manage to outpace the fiend. In the midst of this area you'll find a Yellow Keycard. Use it to open the door in this same area.
B12
Hit the Checkpoint, then run across the falling platforms. Be prepared to jump right at the end, and try not to accelerate so you can double jump. If you have trouble with the enemies below, lure them to the right side before attempting to go across the platforms.
B9
Avoid the laser beams. Accelerated swimming really helps here.
B1 - B10 (OPTIONAL)
Retake the path from the start, back to the yellow door in B9. This is much easier to do when you can double jump. Beyond the door are Steroids. These increase your health by one. Not too shabby.
B1 - A11
Use the Yellow Keycard on the door leading into the water. Head right.
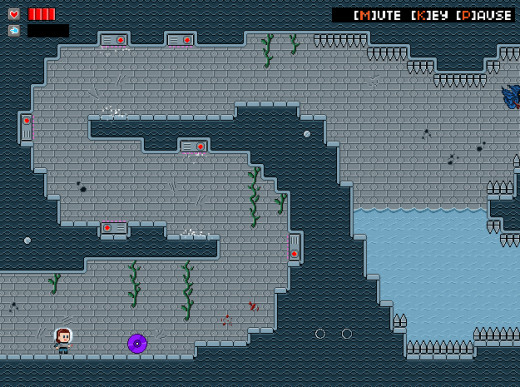
C1
Grab the Expedition Log. Be wary of the speedy laser traps, as well as the floating ghouls beyond. As soon as you clear the last laser trap, accelerate into the water and head for the right at top speed.
C2
Use the Checkpoint, then carefully leap your way to the top-left corner of the room to proceed. (Don't bother with C3 - it leads back to A3 if you go horizontally and to a dead end if you go vertically.)
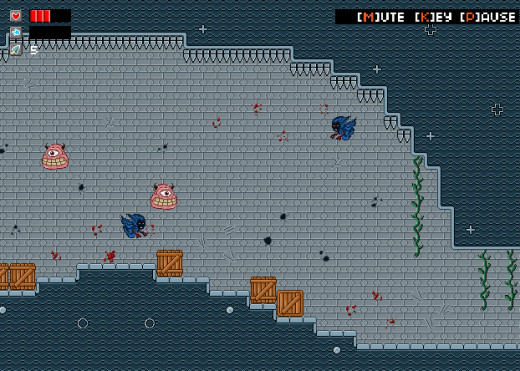
C4
This area is tricky mainly because you're haunted by blue ghouls at every step. The easiest way to deal with this is to lure them over to the crates in the bottom-left corner. Once they're there, leap over their heads and up the adjacent platforms to the disappearing platform and the laser traps. You should be able to outpace them enough that they'll stop following you.
C5
Use the gaps in the water to replenish your oxygen. In doing so you'll likely draw the creatures trying to stalk you down into pits - and, fortunately, they can't swim back up.
C6
Use the Checkpoint. Make your way onto the upper platforms, then lure the blue ghoul creature over to you. Trap it beneath the left-most platform so it can't follow you around. Use the upper platforms to reach the top-right corner of the room, where a Rocket Launcher waits.
C7 - C9
When you pass under the giant boulder it will fall down and begin to chase you. If it touches you, you're dead. Run to the left. (Note that you can jump up and touch the platform it's on with your head without taking damage. This will bring the boulder down, and it will harmlessly roll to the left… though when you enter the next map it will still be behind you.) Use the Rocket Launcher on the next two maps to blow up crates in your way. Don't bother targeting the enemy in C8, or you'll run out of ammo. Watch out for the spikes in C9, as they're easy to miss. Once you hit the left side of C9 the boulder will stop, and you can use the Checkpoint. Head right, avoiding monsters and cannon blasts, and use the upper platforms to reach the left ledge. On it is an Emergency Barrier. This increases the amount of time you're invincible after taking damage.
C10
Move along the platforms, avoiding the large buzz saws.
C11
Avoid the laser traps, time your jumps properly on the disappearing platforms, and make your way to the top. Outdoors!
C12
You have two possible routes here, both of them equally dangerous. Ultimately, though, you'll want to take the lower route, into C13.
C13
Continue to take the lower route here, so you wind up in C16.
C16
Make your way past traps and monsters to the bottom of the room. nothing you haven't seen before, though watch out for the buzz saw - there's only one small room where you can safely jump over it.
C17
Snag the Red Keycard. Use it to leave this room by the bottom-right exit.
D1
Use the Keycard to get into the water. Float up, past the laser traps, to an Expedition Log.
D2 - A4 (OPTIONAL)
Drop down along with the falling platforms in D2 to get to Steroids, adding one more point to your health. Fall into the pit to return to A1. Run to A4 and use the Keycard on the door in the water. Swim past the spikes (you'll need to accelerate to get through without running out of breath) and you'll find a Rebreather in the space below. Running out of oxygen underwater is no longer an issue with the Rebreather.
A4 - C14 (OPTIONAL)
Make the trek back to D1. (The yellow door in C3 will help.) Use the top-left exit to enter C section again. Ascend through the next few paths until you reach C14. Past a red door here are more Steroids, raising your health yet another notch.
D2
Leap over the falling platforms (remember, they'll take you back to A1 if you get stuck) and proceed to the right exit.
D3
Use the Checkpoint. There are two ways to ascend this room; the easier is to head all the way right, ascend the shaft with the buzz saws, and make your way back left. The blue ghoul probably won't follow you along this route.
D4
Falling rocks and a few pesky ghouls. Rush through here.
D5
Left to right to left. Pretty straightforward; just be patient.
D6
Lure the first ghoul you come across into the pit so it can't bother you. Otherwise, an easy room. At the top the path splits; take the left path if you want some optional gear, the right path if you don't.
D8 - D11 (OPTIONAL)
Optional, yes, but highly advised. In D8 you'll encounter a new kind of enemy, a pink, floating creature that zips in for a suicide attack if you get close. These creatures are your only means of killing the floating blue ghouls. Kill one with a rocket when it's close to a ghoul and you'll take out both of them. Head left through this room, and keep making your way left until you reach a watery section with a plain metal door. Inside you'll find Caleb, who's ready to kill you to get the Idol. Stand on the middle platform, jump as Caleb rushes by, avoid his shots with jumping, and fire back. Three missiles, or a bunch of Blaster shots, are enough to bring him down. Killing Caleb will grant you the Rune Shield, which scares ghosts away. Very, VERY helpful.
D7
D7 is relatively straightforward, though you'll need to do some tight steering.
D13
D13 is extremely vexing if you didn't get the Rune Shield, as there are tons of ghosts in the area. Keep calm, leap from platform to platform, and don't bother trying to lure the ghosts somewhere else. You'll likely just get spiked. Head for the top-right exit, and resign yourself to the fact that you'll probably get hit (if, again, you don't have the shield). This area is much easier to complete if you approach it from D9 rather than D7.
D14
This area isn't that bad, Shield or no Shield - but if you didn't get the Rebreather you might be hard-pressed to swim through in time. Head for the top-right.
D15
Almost to the end. Those floating eyeballs are back, and they're paired with ghosts. If you have the Shield, simply shoot at the eyes from below before ascending to the top area. If you don't have the Shield, lure the ghosts down to the bottom area first. It's extremely difficult to get to the top of this screen if ghosts and eyes are trying to get at you at the same time. Use the Checkpoint at the top…
D16
… and ready yourself for a rumble! The Idol is beyond, but as soon as you claim it a ghostly boss will appear to rain on your day. It spawns ghouls and eyeballs, and will drop rocks on you as it moves back and forth. Dispatch this ghost the same way you killed the other ghosts: wait for the eyeballs to get close to it, then blow them up from below. Hitting one can cause a chain reaction if there are others nearby, so it's wise to target groups of the things. Hit it four times and the ghost boss will go down. Go through the door afterward and you'll be headed to… glorious… freedom…? Well, at least you beat the game…
")