Game Development with Unity3D: Basic Concepts
Following in the well-tread footsteps of cinema, video games have become a legitimate entertainment medium. They’re bigger than ever, so it’s no surprise that more and more people want to get into game development. Fortunately, with this growing desire to make video games comes an increasing ease with which one can do so in the form of free-to-use game engines and “game maker” applications. Despite this, it’s still essential to understand the basic nuts and bolts in order to produce a good product, and in this hub we’re going to do just that.
Though we’ll be focusing on Unity3D, many of the concepts we will be covering are translatable into other game engines.
Let’s get started.

Projects
A project represents your game within Unity. Any assets used, any settings saved, all of this is stored as part of your project. The information saved may cover a range of things such as graphical settings, input settings, and much more. Unity assets are not pulled from external sources once imported, meaning every asset you use is stored in your project folder and it can get pretty big if you’re working on a particular asset-rich game.
Scenes
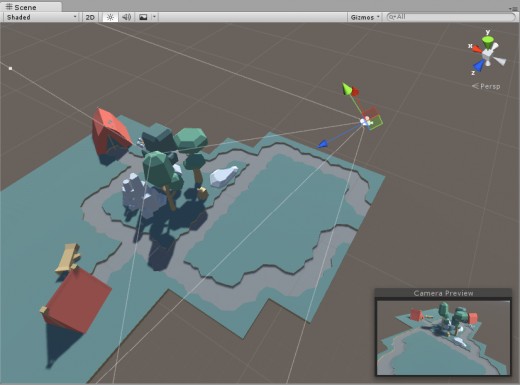
Much like the movies, a Scene in Unity is where a portion of your game plays out. To take a simple game design standard as an example, if you were to create a good old fashioned first person shooter such as Doom, or Unreal Tournament, each “map” would be its own scene.
The main reason for Scenes is resource and memory management. There’s no sense in loading your game’s entire asset library when the portion of the game currently being played only requires 8% of it.
Scenes are not limited to different levels, however. Things like the game’s main menu will often be placed in its own scene.
Transforms

Simply put, a Transform is the state of a GameObject, specifically it’s location and orientation in the game world. The most basic use of a Transform would be to move an object such as a player character. If the player presses forward, move the player character forward. Where the Transform really comes into play, however, is knowing which way forward is. Simply moving the player character along an axis (typically the Z axis is used as front-to-back in relation to the gamer) is great until the player turns to face another direction, then suddenly the axis that was forwards might become sideways, or something in between. That’s why Unity’s Transform class has a number of useful features such as the ability to get specific directional data, meaning you can find out the direction a Transform is facing, which way is up for that transform, and so on.
A simple way of moving an object forwards would be to add that objects forward direction to its position, thus moving it in that direction. Again, that is a very simplistic way of achieving movement, but more complicated methods are for another time.
GameObjects
A GameObject in Unity is, as you might expect, any object that can be moved, scripted, activated, and so on. A GameObject can be anything, whether it be a static 3D model of a house that simply sits in the background and does nothing, an animated non-player character, or even an object with no visual properties that is simply there to trigger events.
The concept of a GameObject in Unity is not a complicated one, however it is the relationship between those GameObjects that makes the game work. For example, if you have a one GameObject that is your player character, you could make it the parent of another GameObject that is your camera. Now wherever your player character goes, your camera remains in the same position relative to it, no code necessary. Another way of achieving the same result would be to place a script on the camera GameObject that moves it in relation a given object, and then drop the player character GameObject in there as a reference.
GameObjects do eat up resources, however. And while modern computers can handle a lot, you might find situations where it’s just not practical to give every “entity” its own GameObject. The most obvious example of that being in the making of a Minecraft-like game, where it is simply not feasible to make each “block” its own GameObject.
Prefabs
Technically a Prefab is just another GameObject. What makes it distinct enough to warrant its own section in this hub is the fact that it will often be a collection of GameObjects under the umbrella of a single one. Perhaps you’ve spent a long time crafting a non player character to get it to behave just right, and you want to duplicate it so you don’t have to recreate it all over again. Making said NPC into a Prefab not only allows you to copy that Prefab with ease, it also allows you to easily create new instances of the Prefab during game time, such as for spawning new NPCs.
Cameras
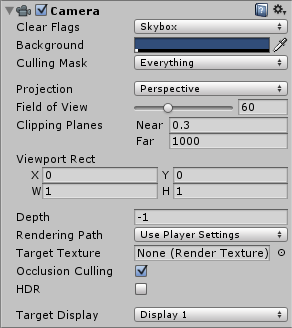
In the game world, your camera is your window, without it the player cannot see what’s going on in there and that makes for a dull game. The camera is a GameObject just like anything, else and as such can be manipulated and scripted in the same way. Where the camera differs, however, is in the range of options provided by the camera script for things like field of view, perspective, render distance, and more.
The direction of your camera object is, of course, the direction in which the gamer will be looking, so it’s on you as a game developer to ensure that the camera is always facing where the action is. Sticking with our theme of providing a very basic example, one could use a simple “LookAt()” command to have the camera constantly pointing at the player character. “LookAt” may appear to be a visual thing, but it’s nothing to do with the camera specifically, but rather the Transform of the camera object. Simply put, it orients the given Transform (the camera in this case) so that it's forward direction is pointing at the location you pass to it.
Lights
Though this shouldn’t need much explaining conceptually, it’s easy for those new to the game development world to overlook this essential component. Simpler (and older) game engines would actually require a lot of effort and resources to make things dark, but Unity has a good lighting system built in. Because of this, neglecting to add a light to your scene will leave your players finding it very hard to see what’s happening.
There are different kinds of lights for different applications. The main consideration when choosing a type of light is system resources. Lighting is one of the most resource-intensive things in a game, and placing a lot of light sources that update in real time all over your scene will bog your player’s gaming device down. Similarly, using pre-baked lights that don't interact with the game world in real time will give the world a sterile, fake feel. As with many things, the best approach tends to involve a mix of multiple methods.
The Editor
Before we leave it would be wrong to not at least touch on the editor itself, so here are some key aspects of the Unity3D editor interface.
-
Scene View - Think of this as an editor window. This shows you your game world from the all seeing eye of the game developer, able to move around at will, dragging and dropping things as you please.
-
Game View - As you might expect, the game view shows you your game as it will appear to the player.
-
Project View - The project window allow you to easily navigate through your game assets, such as models, scripts, materials, and more.
-
Hierarchy View - The hierarchy is similar to the the project window except that it only shows assets that are in the current scene. As the name suggests, it also shows the hierarchy of those assets.
- Inspector View - The inspector shows you the attached components of a selected GameObject. All GameObjects have a Transform, so that will be in there, but any other components such as Camera or Lighting will also be accessible through the inspector.
This hub could go on but we have to draw the line somewhere. Though this hub is by no means a "make your own game" tutorial, it does contain some of the foundations on which you will building your knowledge as you learn to use Unity.
© 2016 John Bullock

