- HubPages»
- Games, Toys, and Hobbies»
- Computer & Video Games»
- Online Video Games
How to Maximize Resource Production in Lord of Ultima

Placing resources in Lord of Ultima can be a fun math challenge. Every new city has a somewhat random distribution of resources and it is up to the player to maximize the productivity of the resources provided. There is no "one-size-fits-all" option, but with a good understanding of the mathematics, a wise player can figure out how to get the most from the city.
I should note that maximizing resource production is not always the most desired option. In fact, many players prefer well-balanced, self-sufficient cities as opposed to high-producing, specialized ones.
I find that the last few buildings are always the toughest. It is tough to make the decision to place three or four markets or a moon tower to distribute or purify. Those building spots come at the expense of producing more resources though.

Placement
Every resource has a base production. At level 10, the base production is 300 units. It that mine, farm, quarry or woodcutter's hut is sitting in the middle of a field surrounded only by grass, then the player would receive only that 300 per hour. While that's not bad, it can get a LOT better!
Let's explore the first decision - where to place the resource generating building. Common sense has it adjacent to the complementary resource. Look at the chart below and see the resources.
Resource Unit
| Resource
| Processing Unit
|
|---|---|---|
Woodcutter's Hut
| Wood
| Sawmill
|
Quarry
| Stone
| Stonemason
|
Mine
| Iron
| Foundry
|
Farm
| Lake
| Mill
|

Step 1: The beginning of the math
Let's assume that you place a mine next to one iron. The formula would be:
300 (your base production) + (50% x base production) = 450
In this case, you would receive 450 resources per hour instead of the measly 300 if it weren't adjacent.
The second through seventh adjacent resources will only have a 40% bonus.
Note: You can never have more than a total of eight bordering resources. The first one is worth 50% and each additional is 40%.
The formula for the picture to the right is:
300 (your base production) + (50% x 300) + (40% x 300) + (40% x 300) + (40% x 300) = 810
That's right, place the resource unit in a location where there are four adjacent resources and your output is significantly higher!

Step 2: Manpower Bonus
The first step makes sense, right? Place a resource producing building next to multiple resources in order to earn more. But, you also receive a bonus based on the number of cottages that surround the resource building. The more cottages, the bigger the bonus. Additionally, a level 10 cottage will provide a bigger bonus than a level 1 cottage.
Exactly how much of a bonus? Let's operate under the assumption that every cottage is maxed to level 10 (not a lot of reason to keep a lower level cottage). For every level 10 cottage bordering the resource-producing building, that building will see a 30% increase over the output from step 1.
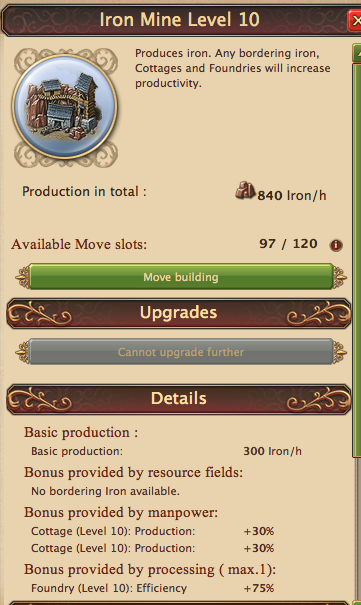
If you have one cottage, the bonus will be 30%. Two cottages will give a 60% bonus. And so on. Look at the picture to the right and see that this building has two neighboring cottages providing a 60% bonus to the production.
Step 1: 300 base production + (130% x 300 (base production)) = 690 resources per hour. (The 130% number is the 50% + 40% + 40% from the three neighboring resources).
Step 2: 690 resources per hour + (60% x 690 (resources per hour)) = 1,104 resources per hour
Step 3: Bonus for Sawmill, Foundry, Mill and Stonemason
Let's refer again to the picture immediately above. The third bonus is provided by processing.
Place a sawmill, mill, foundry or stonemason next to the resource-producing building to receive a third, stacked bonus. Don't underestimate the power of this last bonus! You will want as many complementary buildings bordering the processing building as possible.
Let's calculate the bonus for the example shown above. We know that the picture shows a unit producing 1,104 units per hour, but it also has a level 10 Foundry adjacent to it.
Step 3: 1,104 (resources per hour) + (75% x 1,104 (resources per hour) = 1,932 resources per hour.


Special Bonus for Farms
Farm production has a fourth bonus based on the irrigation that borders the farm. Look at the picture to the right and notice that there are two farms that are bordering two irrigation squares each.
Each irrigation square provides a 50% bonus. That is huge! Absolutely maximize the placement of farms and mills to take advantage of that. In the example shown, there is a 100% bonus provided!
Another complexity to the farm production is the number of fields surrounding it. There are always eight adjacent squares to the farm, but in both of the farms shown in the picture, I only received three bonuses for the actual fields. Of the eight fields available, two were used by irrigation, one was used by the mill, one was used by the other farm and one was used by the cottage.
Fields provide a 50% bonus for the first exposed field and 40% for each additional exposed field. Because this is in the step 1 calculation, the follow-on bonuses for the processing unit, irrigation and cottage may stack the overall production much higher.
Tips to maximize the bonuses
Now that you know how to calculate the bonuses, it is pretty easy to figure out how to maximize the production of your city. Here are some tips to help:
1. Never place a cottage to border only one resource producing unit. While it will give a 30% bonus, you would have been better off to place another resource unit in its place. Why limit the production to 30% when you could have had more.
2. If it becomes impossible to place your buildings next to the resource, then next best option is to place it next to a processing unit. See the picture below for an example. I ran out of ore locations, and found that receiving a 60% bonus for neighboring cottages and a 75% bonus for the processing unit would yield more than other locations.
3. I typically find that if I have only one building bordering a cottage or processing unit, then there is typically a better way to lay out the city.

Related

Death Cycle of Poverty and the Environment

ArcheAge trade route guide: all domestic and intercontinental routes

4 Valuable Life Skills You Can Learn From Video Games

Historical "Archeage": Gathering Guide for Archum Iris and Sunbite Wilds

Historical "ArcheAge" Gathering Guide: Rookborne Basin and Windscour Savannah