Xbox 360 Controller L.E.D. Mod
A comprehensive guide to lighting up your xbox 360 controller
--------------------------------------------------------------------------------------------------
Things you will need:
small Torx8 T8 screwdriver *
small LED lights * (color choice is up to owner) †
replacement clear triggers and clear buttons * (optional - only if wanting to light the triggers and make see through lighted buttons. If clear buttons are opted out, the LED will still shine through, but with slightly less intensity)
22 Ohm resistor *
26 gauge wire *
soldering iron and solder *
hot glue gun *
Tweezers ª
small needle nose pliers ª
* - required
ª - optional but recommend
† - I use white LEDs. If you decide to use multi colors, it will require a multi resistor setup because each different color LED requires a different ohm resistor to operate correctly
Step 1 – Remove the battery pack on the rear of the controller. Once the battery pack is removed, remove all of the screws that hold the two plastic covers of the controller together. There will be a total of 7 screws. There are 2 screws on the left and right side of the controller where your palms sit, 2 screws to the left and right at the top of the battery pack area, and 1 screw under the battery pack area. The screw under the battery pack area requires that you remove the bottom sticker when looking into the battery pack area.
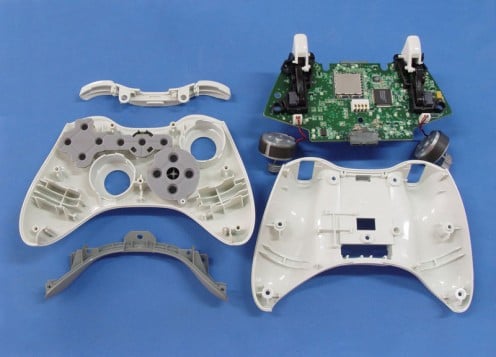
Step 2 – Remove the controller’s plastic coverings. These consist of a top and bottom solid color (white, black, etc…) piece and a small middle piece that is usually gray. This will grant you access to the controllers motherboard and other internal components. Lift the motherboard out of the controller face paying close attention to not disconnect the 2 rumble motors on the left and right side of the motherboard. These are both wired to the motherboard and should not be disconnected. Position the motherboard face-up (the way it would face the button side of your controller) on your work area away from the other parts.
Step 3 – Remove the A,B,X,Y buttons from the controller face. There will be 4 peg like pieces cast into the inside of each button. These must be removed.You will need to drill out these plastic pegs to ensure proper light casting of the LEDs through the face of the button. A drill bit slightly smaller than the inside diameter of the button usually works best. You want the drill out the button until you see no more sign of the pegs, and until the inside is completely smooth. Now you will want to drill just a bit further to punch through the now smooth white casing. This will expose the underside of the button face and leave the letter suspended to allow it to have a backlighting effect.
Step 4 – Now, fill the bottom of the button about ½ to ¾ the way with hot glue and submerge the LED in the glue. Make sure, once the LED is in the glue, to bend the LED legs at a 90 degree angle coming out of the bottom of the button. Next fill the button with glue until it is just under flush with the bottom of the button. This is very important because if not done properly, the button will not operate properly on its rubber reflex pad. Repeat this step for all the buttons and LEDs. Allow the hot glue to completely dry before proceeding.
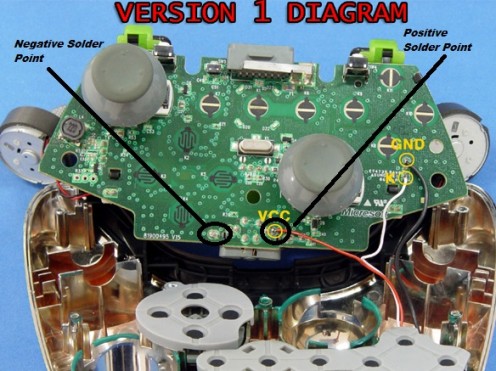
Step 5 – Take each of your LEDs and connect all the like legs together with a small length of wire, then connect a 22 ohm resistor at the end of the of the left over positive leg. Next, locate the headset jack. Directly above this point on the mother board are several copper points. 2 of these will be your soldering point to power the LEDs. The positive solder point will be the vcc point as shown in the picture. The negative will be a ground point also shown in the picture. Take the positive side of your parallel circuit (resistor side) and solder a wire between it and the aforementioned positive solder point on the motherboard. Next, take the negative side of the circuit and solder a wire between it and the ground point shown in the picture. Once the above mentioned steps have been completed, you may test the operation of the LEDs. Do so by placing the motherboard back into the bottom piece of the controller covers, placing the rubber pad back onto the middle home button, replacing the batter back onto the underside of the controller cover, and powering up your controller. If done correctly, the buttons should light up on power up of the controller. If the LEDs function correctly proceed to step 6. If the LEDs are not operating correctly, then back track through all your connections and make sure there are no splits, broken solders, burned wires, or disconnections. Next check that you have wired the LEDs the correct way, and make sure you did not mix up any positive or negative connections with their counterparts. Check your wiring of the positive and negative connections to the controller power and ground points. Make sure they are securely soldered and are soldered on the right points.
Step 6 – After conformation that all LEDs work properly, re-assembly of the controller is all that’s left. Install the mother board into the bottom piece of the controller covers. Replace the 2 rumble motors back into their mounting locations in the left and right side of the bottom cover.Place the rubber reflex pads back in their proper places and place buttons onto their intended places on the reflex pads. Slowly lower the top cover onto the bottom, guiding the buttons into their intended holes. I have found that a pair of tweezers helps out greatly in getting the buttons into their intended holes. Before completely closing the covers, replace the middle gray piece that bridges the gap between the upper and lower covers. Now fully compress the covers onto each other until they are flush all the way around the controller. Next, reinstall the retaining screws and test the operation of the controller and the finished LED modification. Once proper function is confirmed, hit the xbox live lobby of your choosing and starting playing in style.
