Let's Make A RPG Maker XP Game Guide: Part 001: How To Change Tilesets

Most people who love video games want to make a video game of their very own at one point or another. Of course, that can be difficult because coding is a complicated and hairy sort of thing to try to manage at the best of times. RPG Maker XP is a piece of software that handles all the behind the scenes coding, allowing you to make your own video game in a simple way. This is the first of a series of articles designed to walk you through the process of creating your very first RPG Maker XP video game. The program itself costs around 30 USD, though there is a free trial version you can use for 30 days or so.

How To Start A New RPG Maker XP Project
A new project is opened in RPG Maker XP by going to the 'File' menu and selecting 'New Project.' When you open a new project, you'll be
met with an interface much like the one pictured above. The left-most
window, the one with the tents and the trees, is your active tileset.
You can copy and paste items from the active tileset into any of the
three layers on the map grid (the large green expanse with the box
marked 'S' on it. For the curious, this box represents the starting
position of your player. This can be changed later on, as can the size of the map. First however, we're going to look at the tilesets that are used to create your game world.
How To Change RPG Maker XP Tilesets
As I pointed out just a moment ago, every map has an associated tileset. Now at first it might seem like there are very few options because all you have in the initial tileset is some grass, a few trees, a couple of logs and a ridiculously oversized tent. There are actually 50 different tilesets that come standard in RPG Maker XP, but only one of them can be associated with any particular map. The default tileset you see here is the Grassland tileset. If you want to choose a different setting, you can do so by going to the menu underneath the tileset and right-clicking the document labelled 'MAP001'.
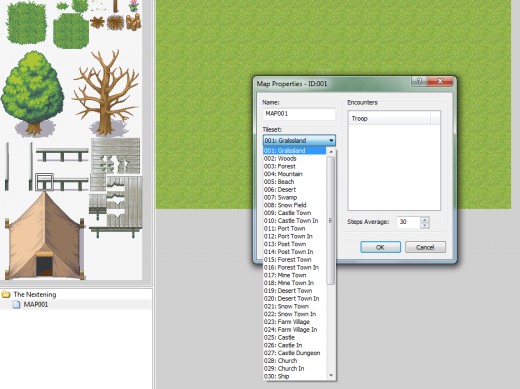
You'll now see a drop-down menu associated with tilesets. Choose a new tileset from the menu, and the tileset displayed in the left hand side bar will also change. Whilst you're in this menu, you can also change the name of the map. I advise doing this because you're going to be making a great many maps during the course of your game, and having them named in a way that makes sense is going to save you a lot of time.


")