Top 5 Hardest Boss Battles in Sekiro: Shadows Die Twice

Sekiro Overview
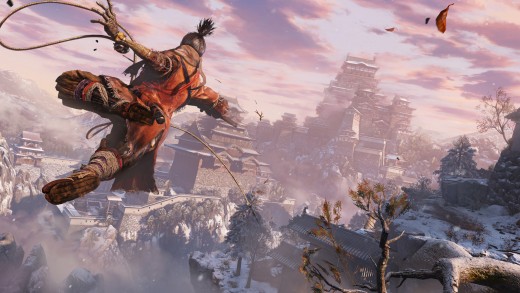
Sekiro: Shadows Die Twice is the newly released FromSoftware game which is proving even ore difficult than expected, this may perhaps be their most challenging game yet. Through the arduous, yet striking, combat system, players will have to learn to master the timings of slashing, parrying, jumping and stealth all just to feel comfortable. Each boss has their own weakness (and strength) that a player will have to realise and overcome if they wish to proceed onto the next. Equipped with mere skill and a few items you find along the way, you are left to fend for yourself against the foes in the FromSoftware world of Japan.
In Sekiro: Shadow Die Twice there are many many many boss battles, almost around every single corner! Anyone who loves a challenge will love this game, to the max. It's frustrating and even the areas that lead up to the bosses are sometimes near-impossible in first glance. In this article shall be listed the hardest game bosses in Sekiro so far (as well as a few tactics you could use to make it a little easier for yourself).
It should be mentioned that this list is compiled of my own personal opinion of someone doing their first play-through of the game. I will not be involving, or be biased, any bosses that are simply meant to be the most difficult, rather the ones I genuinely found to be.
Sekiro: Shadows Die Twice
Click thumbnail to view full-size
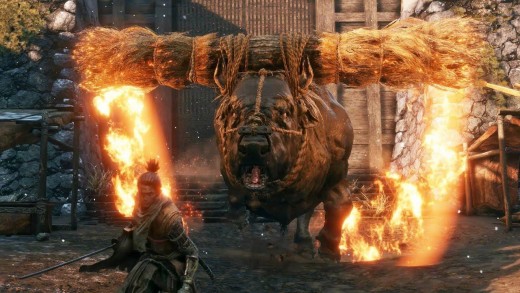
5. Blazing Bull
The Blazing Bull is exactly as it sounds.A huge angered bull that charges around with a flaming head. Following swiftly on from your fight with Gyoubu Oniwa (and after what seems like a long, strenuous path of enemies), you come face to face with this difficult foe.
This fight looks extremely hard the first time you try and beat it, since it looks to the player as if the bull literally has no pattern and just charges around smacking into you every time you try and get back up again. Before long, you're dead. You've been given almost no time to think and to observe this enemy, and now you're pissed.
However, under closer inspection (and countless deaths) the bull DOES actually have a pattern. An easier method to beating this bull is through the Shinobi Firecracker Prosthetic; every time he charges for you throw it down and watch as he stands tall in fear. Here you can hack & slash a few times and get a little bit of the health bar down. However, the Firecracker has limited uses, and when I fought this monster I had 2. You have to take it down the hard way.
Your best friend in this fight is your sprint button. In past fights you've accompanied stealth with dodges and parries to easily knock down your enemies defences, unfortunately that won't be of much help here.
When the bull starts its charge at you, you will notice the head movement it does shortly before it runs. This is a noticeable cue for you to prepare. Once it starts the hurdle itself towards you, sprint clockwise out of the way and watch as it runs into a wall. However, you don't have time to stand and watch, as your next move should be quickly closing in on the creature and getting one or two hits on its side, staying away from the head (as it will throw you away like trash). Keep doing this; it's long but it works a treat.
One more move the Blazing bull does is when it jumps up and down after you, this is relatively easy to avoid. Just step back and wait for your next cue.
JL Comfurni Gaming Desk Office Computer Chair Heavy Duty Reclining High Back with Lumbar Support,Faux Leather
- JL Comfurni Gaming Desk Office Computer Chair Heavy Duty Reclining High Back with Lumbar Support,Fau
A thickly cushioned and highly fashionable gaming chair ready for anyone who is looking for extra comfort as they go through their frustrating gaming endeavours. The cushions are adjustable, and the recliner goes back to 180 degrees. Easy to build.
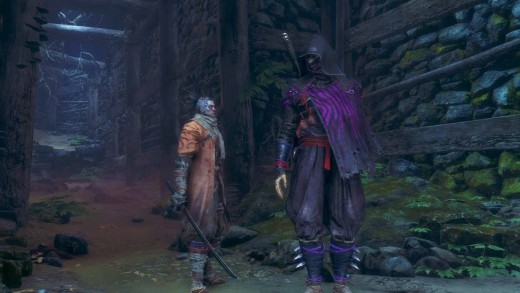
4. Lone Shadow Longswordsman
Lone Shadow Longswordsman hides out in the well of Ashina Castle. You can easily reach this mini-boss, by using the sculptures idol at Ashina Reservoir and immediately going left. Here you will see a drop, but look out and you can use your grapple to hook onto a branch sticking out of the wall. Grapple to this, and then onto the wall in front of you, kill the guard and quickly turn around to see another ringing an alarm. Kill him too. From here go pas the alarm ringer and you can grapple again. You will see a hole in the ground, the mini boss is right here.
This fight, to me, was so tiring to complete because of the location. You're holed up in a tiny well, with an awful camera angle, confronted by a quick, deadly and cunning swordsman, who can at this point slice you up in a few dire hits. Your blood will boil. This enemy can break your posture astoundingly fast, so this is something you'll have to be watching out for at all times.
The first tactic to to beating this enemy is getting the first tactical death-blow. Now, the first time you encounter him, he will be standing with his back to you and you can try to sneak up on him, but he sees you. You have an endearing conversation with him, before he turns and starts to murder you silly. At this point just let yourself die; killing both of his health bars apposed to one seems like a silly amount of extra effort to put yourself through.
After the first encounter, if you carry on walking past the first hole in the well, you'll find another hold, Look down here and you will see you can deathblow him in you jump on him, knocking him down to half health- marvellous! Now the real fighting begins.
(Before you fight, make sure you're stocked up on Prayer Beads and Gourds, as you will likely need a few of them. At this point in time, you will probably have around 5 healing Gourds).
Okay- onto tactics. Unfortunately, due to the very enclosed space you have to work with, you're going to have to play defensive. A good thing to do straight after the first deathblow is to use the Flame Vent Prosthetic while he his recovering, dealing significant damage to his posture (which is something that will help you tremendously in this fight). After that, this fight is just a case of dodging his kicks and parrying his quick combos. This fight, however, does have a couple of lethal moves. First off is his Danger Kick. If you're a risk taker, you can try to block this attack and deal some nice posture damage, following it up with a few more blows. However, if you want to avoid the risk then just dodge clockwise out of the way, hitting him while he prepares his next move. Another attack is his Danger Sweep. Before proceeding, a red symbol will show up warning you to MOVE or JUMP. Jumping over this attack leaves room for some mid-air damage, if you're cool like that.
The rest of the fight is a case of dodge, parry, attack repeat (and heal/resurrect a lot if you're anything like me). Use the long corridor behind you to heal if need be, but stuck to the big-ish area. A few mistakes in this fight can lead to your demise, so just breathe calmly and try again.
3. Lady Butterfly
To find this major boss, you will travel to Hirata Estate. After killing Juzou the Drunkard you carry on, meet an NPC, kill a few non-major enemies and find this lovely woman down a staircase. Seemingly harmless at first glance, she is a master at deceiving players.
Now, Lady Butterfly, I will admit, took more attempts and deaths than I care to admit. She is fast and has many different attacks that you're going to have to learn off by heart. She uses her enticing illusions to whittle you down, until you're crying into your pillowcase because you just cannot beat this woman. However, after too many perishes and a goodnight's sleep, Lady Butterfly crumbled under my sword.
The first optional thing that can help this fight be a lot easier are Snap Seeds. At this point in the game you should definitely have a few spare to use. Although not being essential for everyone, some people have found it much much easier. Me, personally, tried the Snap Seeds and found that it didn't really prove as helpful as first imagined. The Snap Seeds are used to disperse the illusions she creates in the second phase of the fight that will attack you if you grow too near.
Okay- so we were talking about being deceived? Yes, be ready, because any first time player that hasn't looked up this boss before-hand will be shocked and betrayed to realise that (although only one is shown) Lady Butterfly has 2 health bars, not one. The second is hidden until you reach it, which hopefully lead you into a false sense of security the first time around ;). The second phase is harder than the first one, she's faster, more aggressive and has countless illusions to attack you for her.
The first phase: Make sure that you have your Shuriken Shinob Prosthetic tool equipped, as this will prove helpful to attack her posture when she decides to fly up into the sky and throw her own Shurikens at you. Throwing one at her before she is able to will stun her and knock her down, leaving room for maybe 1 extra hit.
Unlike other bosses, it is much harder to get her posture damage full to deliver a deathblow whilst her vitality is still even mediocre. So, instead, vitality damage is extremely important in this fight. Something VERY important in this fight is parrying her attacks with well-times blocks, as this will stagger her and give you chance to get a few hits it. Lady Butterfly attacks swiftly and quickly, so be careful not to leave yourself vulnerable, as she can kill you exceptionally fast this way. She enjoys flying up into the air and throwing things at you, so if you aren't throwing tings back, make sure you're blocking, else you will get staggered. Attack, attack, block, block and retreat. You can find your own pattern of attacks within this, whether you choose to be more aggressive or defensive. Both ways will prevail if done correctly.
She has 2 perilous attack: One is a sweep whilst you are both on the ground; jump. A good tactic for extra posture damage here is to jump onto her head as well, getting a few hits in here. The second is a grab attack while she's in the air. DO NOT get hit by this, it is near enough lethal and will have you clawing your eyes out. After a few times it's relatively easy to dodge, and shouldn't cause you too much trouble.
The second phase: Okay, so once you killed her once, you have to kill her again. Quickly run to the end of the room by the statue and face back to where you came from, this is where she will reappear. Get about 3 slashes in here before she turns ultra aggressively towards you. Although for the most part she uses the same attacks, she's more aggressive and leaves you less thinking time to gather yourself.
However, she has a few new tricks. One is when she will summon some glittering butterflies to fly towards you, harmless at first look. NO. They damage you can can damage you without you even realising. You cannot block these, so just stay mobile and dodge out of their way. While she's summoning these devils in disguise, you can get a few free hits in, just make sure you're ready to move out of the way again. She will attack once releasing the butterflies, so keep this in mind.
Another summoning move she performs is when she flies up and clicks her fingers. This summons a lot of soldier illusions that fill the room and will attack you if you get in close proximity. This is where you use your Snap Seed, if you want to. On the other hand, if you like having your healing Gourd ready at all times, ignore this and do it the other way. RUN. keep circling the room, staying away from Lady Butterfly, as she will still try and attack you from the air, and staying away from the ghosties. If you choose not to get rid of the soldiers with the Snap Seeds, then you've created an extra problem for yourself. After a bit, they will all disappear and you think you're safe; you're not. Look towards where Lady B is and you'll see a cloud of those glittering butterflies ready to swarm you. Once they start coming towards you, run fast as you can out of the way. The pillars in the room prove very helpful for this, as they block the attack. Getting hit by the swarm is perilous and unforgiving, you will likely be left near dead and annoyed. Then the cycle repeats.
Stay alert and mobile and Lady B won;t stand a chance against you.
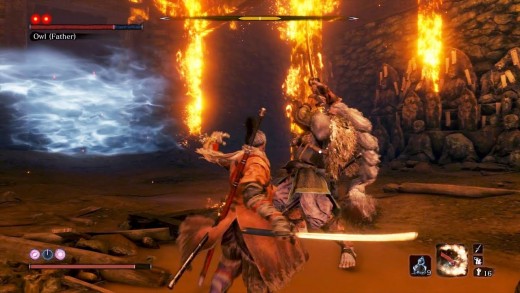
2. Sekiro Owl (Father)
Okay- so by this point in the game you've already fought your Father once through a formidable boss fight that likely left you close to tears more than once. You thought you were done? No, sorry. There's a secret boss fight you can unlock with your Father, only this time he is in his prime. The soul reason Your father's fight before this isn't listed is because they're relatively similar, just this one is a lot more punishing.
To find this secret fight:
- Follow to smoke signals to Isshin's room in the castle, after beating him once already.
- Eavesdrop on Isshin and Emma, then return to Lord Kuro's room and eavesdrop once again.
- Return to Emma after resting and talk to her about Kuro, making sure you agree with what she says. Rest.
- Old Grave Sculptures Idol and talk to Emma again, then go to the Sculptures Shrine and eavesdrop on her and the Sculpture.
- Confront Emma and you shall receive a bell. Use this bell at the Buddha Statue (like before) to return to Hirata Estate.
This fight is quite reminiscent as this is where you before (much earlier on) fought the late Lady Butterfly. Back then, you were much less equipped which is what made her fight so gruelling, this time you are very well-equipped (with around 10 Healing Gourds and a tonne of health) but the fight shall still be even harder.
Fighting your father is like fighting a bigger, more perfected version of yourself, which is quite demoralising. However, with hard effort and perfected movements, you will crumble your late father.
First Phase: The first phase is a younger version of your father. He will throw everything he has at you, from Smoke Bombs to Firecrackers (and trust me, there'll be a lot). To best this fight, you have to learn to overcome these problems, else this fight will be impossible. Your father, also, will deathblow you if your posture bar gets full, see what I mean? It's practically fighting yourself. Be very careful. His attacks are basically the same as in the first fight, and so I won't go into too much detail here and will rather focus on his new ins-tenses. One is the orb that prevents you from healing, which is self-explanatory. Just avoid this unless you are confident you won't have to save yourself for a bit. Your Father is a lot more reliant on Shinobi tools, like the Firecracker, in his prime than before, so keep watch. When he does throw them, watch out for the unblockable Kanji, as this will be a thrust attack through the smoke. Take advantage of this and Mikiri Counter him and do a bit of damage.
A combo that your Father will perform with the Firecrackers is when he throws a few of them down at once, causing a smog to appear. Be aware and jump away IMMEDIATELY as this is where he will slash you murderously.
NEVER go for a thrust attack. Remember what I said before- he is a perfected version of you. He will Mirki Counter you and it'll all be over. Stick to your usual blocking, parrying and slashing attacks, and also keep an eye out for his Shurikens, as he will also be making good use of them.
Another unblockable attack he has (yes, another) is a sweeping slash he will perform. This is volatile and you must dodge out of the way. He has a tendency to repeat this or execute an annihilating overhead slash that will track you. He will jump towards you and keep on, so when you're dodging wait until the very last second. This is hard to master, and it is strenuous, but you'll get there.
Second Phase: This phase is different altogether, as your father calls in a purple, spectral Owl to help him in his fight. Again, reminiscing the illusions of this room before-- yawn. Seemingly harmless and useless, the Owl flies around ignoring you. Don't let this fool you, though, as soon as your father decides to magically disappear or set the Owl alight. When father disappears, stay away from the Owl. Stay mobile, and away. He is going to try and reappear behind you; staying mobile and far off ensures this doesn't happen.
The second attack that involves the Owl is when your Father decides to beckon it with his left hand. In reaction to this, the owl is engulfed in deadly flames and will come pelting at you FAST. There's no time to think or gather your thoughts, just move- straight away. Dodge, and then focus on your Father. He will thrust attack you. If you're fast enough you can Mikiri Counter him and get a few good slashes in there, if not though just dodge and recuperate yourself.
They are the only new things that are in the second phase apposed to the first one, so just remember the tactics from the first as well as these new ones and you'll be fine. Sounds easy enough, but it's not. Keep at it and you will prevail.
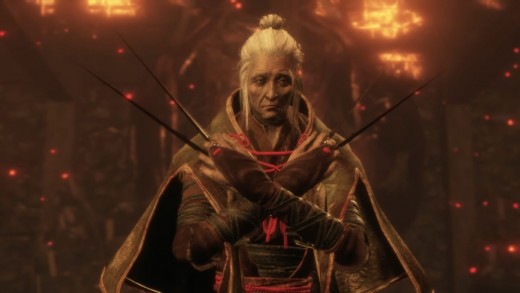
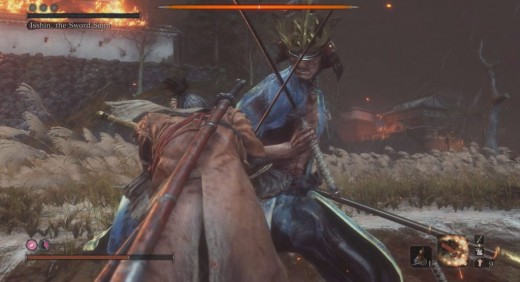
1. Isshin, The Sword Saint
Finally, the number 1 spot. The boss fight that ranks top of my list here is probably predictable; Lord Isshin, The Sword Saint. This fight takes place as the very last fight of the game, and is presumably the hardest. I'm glad they managed to make the last one the hardest, yet most rewarding to beat. (The last one, as long as you don't succumb to the Owl's offer). Some people like to think that this fight is technically four-parts, since beforehand you have to fight Genichiro, but the fight itself is just 3.To overcome this monster of a fight, you are going to have to be able to perfect going against a Spear, the second Mortal Blade, a Gun and even the Elements. What doesn't this guy have?? Make SURE you're stocked up on everything healing beforehand, those Gourds are going to prove more helpful than ever.
First Phase: Imo the first phase is made to lure the player into a false sense of hope and security, as it is manageable for a skilled player fairly. The way to go about this is to bait him, then attack ONCE before looking to deflect him. Learn this and the fight won't prove too difficult.
However, he does have a variety of other attacks that, if you perfect the timings and cues of, you can exploit to the highest point. One attack he does is an overhead strike, that he performs twice. This is best left dodged, so just stay away when you see him raise his arms. However, whilst he is attacking, you'll possibly be able to get in one or two hits, if you're quick about it and don't mind the risk.
A combo he performs is 3 hits, and is useful to take note that the second attack of the three is a tabbing notion. The third is where is really counts, as this is a full thrusting attack that, with good timing, can be Mikiri Countered, causing substantial posture damage.
When he puts his sword away s another cue for an unblockable attack that proves perilous. Wait, though, (like in the boss fight I mentioned before) until the last minute (after the symbol appears) before dodging. There is another way with this move, though. You can leap forwards and kick off his face, causing slight posture damage and leaving him open for maybe one attack. Not much, but it counts. Just do not get hit.
An attack to majorly look out for is when Isshin retreats and uses his elemental power to draw in the wind. In response to this, a player should dodge to avoid his wave attack. When I played, I almost always dodged left, just because a lot of the previous bosses had had the dodge left to avoid tactic heavily ingrained in me. However, there is a followup effect; sneak around to the back of him and get a slash in there while/after the second wave passes.
One final cued attack of this phase is a grunt that he will perform, giving you a warning to MOVE to the side straight away. This is cue for an extremely deadly cross-slash attack that you really don't want to open yourself to- ever.
Second Phase: The phase will start with Isshin bringing out his trusty spear, cue for you to panic as a player. What could he possibly smother you with now?
When you're close, his attack is learn able. The first close range combo there is to learn is a spinning attack, using either thrust or wind. Deflect his attacks if you can, then GO. Don't try and block or parry this next attack, as your posture cannot take it and it's not worth the risk. You have to play it safe. Again, the thrust can be countered using the Mikiri Counter, causing some nice posture damage. Sometimes he will sweep, with is just avoided by jumping over it. However, don't stress about this, as you are safer learning to Mikiri Counter him as this is what happens 99% of the time.
The second combo begins with a sword swipe, a slower spear swipe and then a deadly as f thrusting attack that you can time correctly and perform a gorgeous Mikiri Counter to.
Other than this, it is wise to stay far from Isshin as this leaves an opening for another one of his attacks that can be used to your advantage. He will perform a leaping attack, dodge to the left and attack. Use a learned skilled attack as you are going to have time, if you're quick. If not, just perform a normal few slashes. Run away again, though, don't let him start to combo attack you as your posture is easily hurt when he goes full Godzilla on you.
Did I forget to mention that Isshin not only has deadly thrust and elemental damage, as well as three health bars, but he also has a gun. This brings me memories back from the good old Bloodborne days. Anyway, Isshin's slam attack can sometimes be followed up with a variety of other attacks, one involving the gun. The cue will be a gunshot. Hit him when you can, only once though, don't get greedy else you'll die. When he's pelting towards you sometimes, when he fires his gun you can deflect the bullets, or try and run out of the way like you previously did with Lady Butterflie's glittering illusions. Whichever is easier in the moment, as you're likely already going to be mobile. After the gunshots he can attack with a leaping attack to get closer to you, as at this point you're probably too far from him and he's getting uncomfortable. He is a lot better in close-combat, so stay away and attack when you get the chance, before creating large distance again. You need space to heal and to think, although it still isn't a lot. This phase is likely going to take a while if you decide to take on my defensive technique rather than a more aggressive technique, however I liked to play safe. Playing aggressive always has more room for error, and error here will lead to unsettling amounts of sweat , blood and tears. Throughout the game, for the most part, went defensive.
Third Phase: Finally, you've made it.Your eyes are dry and your hands hurt from clenching, but we're not done yet. The third phase has a glorious pathetic fallacy effect where the lightning will intensify, terrifying you even more. Oh yeah, the lightning will start to strike the battlefield, so watch out for that. Stay VERY mobile, as staying still opens attacks from not only Isshin, but the sky now as well.
Here, Isshin gets a few new attacks, as well as all of his old ones. Try not to overwhelm yourself. Isshin's slam attack that i mentioned in the second phase will sometimes (most likely if you're hit first of all) by a second slam, and a gunshot (no promises there will always be a gunshot). In terms of the leaping slam, Isshin will now also have a lightning struck spear instead, so watch out for the intensified damage.
A massive chunk of damage can be taken away by being risky. Me, personally, did not do this more than once or twice as it sends my blood pressure through the roof, but many have found it useful when perfected. Wait for the lightning attacks then jump, just before he swings, and melt the attack button to send lightning back at him. If you fail to counter at this, though, you get the shock effect with is COMPLETELY very dangerous to your health. Too dangerous for me. If you succeed, however, he will be staggered for a little bit and open to more attacks from you. Take as much as you can, but don't get greedy.
Isshin, The Sword Saint is going to take a long and gruelling time to complete and perfect, but once you do the world shall be lifted off your shoulders. The fight took me a million deaths to complete, but trust me you'll get there. Perfect all of his attacks and your counter attacks, and LEARN that Mikiri Counter.


")


 - Part 1")