ammo reloading

Introduction to ammunition reloading.
Are you interested in learning the basics of ammo reloading? Do you like to save money, while still being able to enjoy shooting sports? Would you like to get even more accuracy from your firearms? If so, then ammo reloading may be for you. You will learn the basics of loading a "rimless" pistol cartridge here.
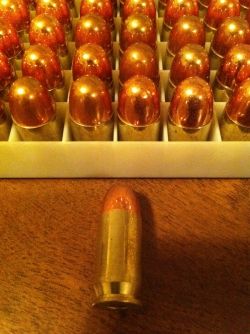
The picture here is of a load I did a while back using "plated bullets", they aren't "full metal jackets" or FMJ. This cuts the cost of reloading tremendously!
Reloading is potentially very hazardous. To do it safely, you must PAY ATTENTION TO DETAIL.
Now, past the disclaimers, a little about how and why I started loading. In 2002 or 2003, I saw prices beginning to climb for .308. I got online and started pricing components to load for this caliber, and found I could load them for around 10 cents a round. At that time, it was running about 30 cents a round for military surplus ammunition. My interest was mainly to save money. With the time I spent at the range, it wasn't un-common for a weekend to cost $100, even using surplus. After my first few loads, I also noticed that my loads were WAY more accurate than the surplus ammo I had purchased.
My initial equipment investment was around $150 to $200, and you could still get a basic configuration for around $200. I still use much of that same equipment today. I've upgraded some. And some I've found is just easier to have multiples of others. The demonstrations and pictures are all done with this basic equipment. I've loaded 10's of thousands of rounds with it, and I see no reason to change. The demonstrations here are done reloading 45 ACP. It is done the same for any "rimless" ammunition. And very close for any revolver. You will see the ammo reloading isn't complicated, but very rewarding in several areas.
Before each section, I will place products that I use for that stage (or similar to what I have, when it isn't available anymore.
Check in often, I will constantly update with more and new information!!!!!!!
All photos were taken at home as I ran through an ammunition loading session,,,,,with an iPhone 4,,,yeah really.
The cost for the reloaded ammo you see loaded here, cost $0.17 each.
Basic single stage loading press - What I still use
A solid single stage loading press is still the most accurate type of press available. Many competition shooter use one for their competition ammo reloading. I've never replace my very first one, it isn't available in the configuration of mine. But I ordered this one for my brother a few months ago. They make some types a little cheaper, but this will load anything up to 50 BMG. Trust me, once you start, you'll want to reload everything

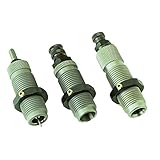
3 piece carbide pistol loading die set - This is the type and configuration of the loading dies I use in this lens.
If you are loading rimmed cartridges(for pistols), you will need a roll crimp die. I've never used one, so I can't give any recommendations on them. I've only reloaded rimless pistol loads. If you aren't sure, feel free to ask a question in the comments section at the end.


Step one: Brass prep - How the brass looks when I come home from the range

When reloading ammunition, brass preparation is the most time consuming part of the whole process. In this article, I'll briefly go over the steps. I will do another article specifically on brass preparation as time permits.
Here, you will see the different stages that brass goes through from the transformation of dirty, un-primed, and un-sized brass. To correctly sized, clean, and primed brass ready for loading.
I use a tumbler to clean brass before it gets anything done to it. - A tumbler isn't an absolute nessesity to start, I didn't have one in the begining.
After you've reloaded some ammo, you'll see why it was bought within the first 500 rounds I reloaded. Besides, everyone wants shiny reloaded ammo..

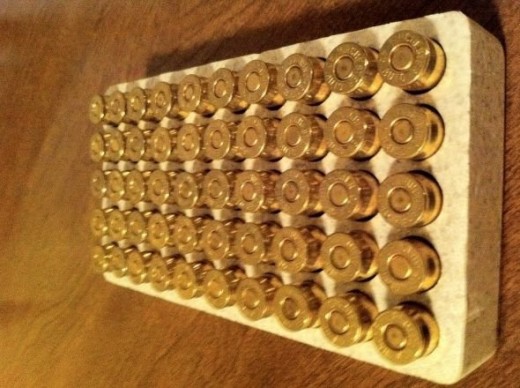
Sorted, cleaned, and inspected - I load in groups of 50, this keeps everything organized

Organization and detail is the key to reloading ammo.
I keep brass upside down throughout the brass prep stages. It keeps anything from falling into them. And also lets me know at a glance what stage brass is in.
I will often load groups of hundreds of rounds for practice ammo. If I look at a 50 round group in my closet with old primers, I know they need everything. If I have a group with the primers removed, then I know they have been sized and length cut (I don't always cut to length). If they are primed, then I know they are belled, sized, and primed.
Clean brass - Before it is run through the resizing die

I man differ from some re loaders in this step. I prefer to clean my brass before doing anything else to it. This way I don't end up with a dirty buildup inside my loading dies. I do use carbide pistol dies, but they do get dirty, and this could effect the sizing operation.
Another view of cleaned brass - Notice the fired primer here

Brass getting ready to size - And remove old primer

MAKE SURE this step is NOT with live primers. They WILL detonate when the de capping pin contacts it Don't ask how I know this.....
Resizing Brass - Notice the yellow arrow

A shot showing the brass fully into the sizing die.
The sizing and de capping (removing old primer) is the first step using the reloading dies. There isn't a real precise way of setting the dies up here. Just make sure the base and ram don't contact one another in the stroke. see the yellow arrow
A better view of the die used here - This is the de capping and resizing die

Resizing brass - This also removes the old primer

This is how the brass looks after this step. You won't really see much of a difference, other than the primer being removed.
Cutting to length - I actually use a drill for this, but here is the tool I use

Belling and priming - I do both at the same time

After I've confirmed the length, I go back to the loading press and bell the cases. Belling is a step that opens the mouth of the casing so it will accept the projectile easier. I hear many people saying not to do this step, while others do. The reason I do, I load a lot of hard cast lead projectiles. If you skip this step with lead, it will shave parts of the projectile when you seat it. It also seems to better center the other types of projectiles (notice intro photo).
The up stroke of the ram is where I put in a new primer. Some people use a hand primer. I hear good things about them, I just have never used one. I tend to follow the same practice every time I load. And this is just the way I do it.
The picture is with the caliper, just so you can see the mouth measurement. This measurement isn't a set thing. I gradually increase the amount of belling until the projectile's base just fits in the mouth of the case.
New primer installed
Brass ready for powder - A group done
This is how I have them when a group is ready for the next step.
Ready for powder!!!!!!!
I just have to do it.... - 9mm or 45
One of the most debated topic among pistol shooters..
Which do you prefer?
Preparing to drop powder - This is where you REALLY pay attention

These next few pics are the stages and steps I use for throwing the powder charges. There are many different ways of doing this, but the steps are all basically the same.
Powder, Funnel, and primed brass

Powder thrower - This places powder direcly into the prepared cases.

Using a powder measure (or thrower as I often call them), is fairly straight forward. Place the prepared brass casing under the funnel at the bottom. Lift the handle up, then pull it down. It dumps a specific amount of powder into the case.
You must be consistent in the motion, speed and force used. It will take practice to do this exactly the same way ever time. Once you master it, you will have much more consistent charge weights.
When charges are measured, they go here - This is the first step that brass is upright.

Well of course,,,,,,,,,they don't hold powder well the other way. You'll see at the end of this section, why I place cases like this. Besides, it's really convenient to carry.
Handle up - filles the measure

But I still hold the brass under it. And I have no clue why, I just do.
Handle down - powder into case

You really have to have the brass under it here. Other wise powder goes on the floor.
BTW, if you do spill some, it is ok. Smokeless powder isn't explosive. Any I spill on the floor goes out on the driveway for a spark show. I burn it, my daughter still likes to watch this
After I load the case - I weigh the charge

On a normal run of ammo, I'll weigh every 10th round. I only weigh every charge if I'm trying to produce a little more accurate load.
The weight for this load - This is were you should have already done your homework

THERE IS NO ROOM FOR GUESSING HERE You should have already cross referenced your load data at this point. You know the weight and type of projectile. And you know the top and bottom limits of that particular load. If this is your first time, you will also need to work up a load that works with YOUR firearm. The loads I'm making here are for MY 5 inch 1911. It seems to be the most accurate with this configuration.
I also check the manual (I have the Hornady) against the loading data posted online for the bullet and powder manufacturers.
Weight confirmed - Powder goes back into the casing

Here is a run loaded with powder - And another point I use to check myself

If you look over this group of charged cases, notice how full each case is with powder. You'll notice they all appear to have about the same amount of powder. Taking the time to visually inspect here, will prevent two of the most dangerous reloading mistakes.
This step saved me just last year. I had never had a problem, but I always inspected at this point. I managed to place an empty case in with loaded ones. Had I not stopped and checked before I went out to seat projectiles, things could have gone bad.
Look at the next two pictures, then look back at this group. You'll see what I mean.
What an empty case looks like - Yes, it seems silly

A missed casing will create a "squib" load. When fired, the projectile will become stuck in the barrel of the weapon.
A double powder charge - goes without saying

For your safety, and those around you, take the time to visually inspect all charges.
This isn't actually a double charge, I just filled the case. A double charge of Unique will spill out of a 45 ACP. For this reason, it makes a great beginning powder for this caliber. Other calibers may be different.
Seating projectiles - Setting length and crimp

This is how you configure the seating and crimping die. Once the die is configured, both steps are done with one pull of the handle. Again, there may be other ways to do this, this is how I do it.
While this part may look easy, it is critical to both safety, function, and accuracy of your hand loaded ammo.
You will need to confirm the measurements with your loading manual or bullet/ powder manufacturer. I will normally cross reference the material from both companies to come up with my final measurements. TOO TIGHT A CRIMP, TOO DEEP A PROJECTILE CAN BOTH CAUSE A HIGH PRESSURE SITUATION, MAKE SURE OF YOUR MEASUREMENTS
First, I set the depth - The dies is intentionally not set all the way down

With this type of cartridge, a "taper" crimp is what's used. The taper is in the body of the die itself, and getting a crimp at this stage makes it much harder to adjust things. So, here I'm just getting the correct length.
Notice the die body

And this is the depth or AOL adjustment on the die - But don't lock the nut yet

We aren't going to set the locking nut yet (not all dies have one, but these RCBS dies do). I'm just trying to set the AOL for this one cartridge.
Set, then measure. Set, then measure. Go slow, or you'll push it too far in.
Measuring lenth of loaded cartridge

Bullet puller - In case you seat too far

This had to come out this time. While adjusting length, I managed to seat it too deep. I use this tool to knock the projectile out of the case a little bit. The point is to not completely knock the projectile out, you only want to extend the OAL, so I can then back off the seating die. Take your time, and avoid this step.
Now ready to set the taper crimp - Back the seating portion of the die out.

Again set and measure.
Measuring the crimp - Measure at the very edge of the brass

Too loose, it won't hold the projective securely (and can cause failure to feed). Too tight and it creates a pressure spike. If you set this too tight with a plated bullet, it will strip the plating, and cause WILDLY inaccurate loads.
The last step not pictured
I've shown you how to adjust things, so you know the adjustment points. Once the crimp is set, you fully seat the bullet into the die. Then screw the seating part of the die down until it contacts the loaded round. Pull the round out of the die, turn the seater about 1/8 of a turn down and lock it. Then run the round back through the die, and measure length again. Also take a measure of the next round you load, the AOL and crimp should be right where you want them. If not, start the process over.
When I load a new configuration (change projectile type or size), I go through this process. It usually only takes me about 10 minutes total to set the die. And once they are set, you can start pumping out reloaded ammo.
Ready to go in - All adjustments made

Yep, right on target - I also check crimp periodically through out a run

This is one of the scientific parts of ammo reloading - Make sure the profile matches some factory ammo

Yes, I do it by eye. I'm just looking for the profile of the loaded ammo to look like factory ammunition.
Placing projectiles when all measurements are correct. - LAST chance to check the powder charge

And yes, I do look into each case again.
Learn a system of checks while reloading ammunition. It WILL keep you safe.
A group of 50 done - All done and loaded.

All done!!!!! Now it is range time.
This group would normally take me about 1.5 hours, in this case, it was over 4 (I had to take all of these pictures). This was a new projectile I bought, so I had to go through all these settings for this group, and the next 1000 I load like this. Well, other than the little bit of tweeking I do with any change in components. And that's where I find the fun in reloading ammo.
Remember to write down every thing you do to a load, especially in testing phases.
Basic tools you need - Just to get you started
Through out this article you've seen various tools and equipment. With just the basics listed, you are ready to start loading your own ammunition. For less than $200.
- Reloading press
- Reloading die set
- Powder measure
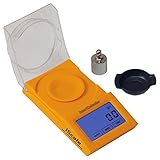
- scale
- Caliper capable of measuring to .001
I also like these older basic presses - Actually I like them a little more than the new ones.
The older Hornady or RCBS Rock chucker presses are indestructible. I don't know for sure how old my Hornady press is, I got it used. And still as straight and smooth as a new one, without the "new features", that add a bit of error in the process. Ebay is the only place I've been able to find them, check back as this selection changes. Look for the 2 presses I mentioned, they will still work great after many years of use (but not abuse). And if you are patient, you can find some really good deals on ammo reloading equipment.


")

