How To Make N Scale Scenery ...Grass, Trees and more!

Save $ Making N Scale Scenery and have a better layout!
Considering making your own N Scale scenery? Here are the tips and tricks you'll need to make an awesome layout. Why spend major money acquiring what you need when you can make N Scale Scenery for almost no cost. Better, by making things from scratch you'll have more fun, find the hobby far more rewarding, and you can do it without sacrificing quality, possibly even increasing it!
At this update point my N scale layout is getting extremely positive reviews from all who have seen it. But it's not costing near the $300 per sq. ft. some report spending on commercially available buildings, people, lights and such. Some tools were purchased but those will be good to go for multiple layouts or can be sold later.
As far as the scenery, buildings, poles, roads etc., nearing completion there's not $100 in the entire layout for supplies. $6,000 buying only commercially manufactured items vs. slightly south of $100 build-it-from scratch...take your pick.
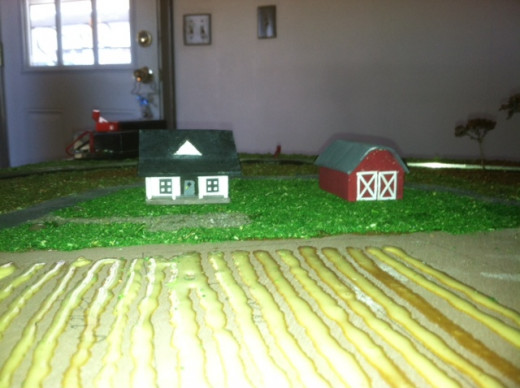
This little farm scene is all self-made. The "cornfield" is wood glue laid down in strips directly on the wood door base and allowed to dry thoroughly.
Scratch building your N scale layout scenery will be one of the most fun activities you'll ever be involved with!

The N Scale Cornfield In Progress
Paint and add the corn
Using stock brown paint purchased from the local craft store I painted the rows of glue as well as the door base still exposed between the rows. The glue takes paint but not very well so it turns the glue strips a very light, watery looking brown while the wood base turns dark brown giving an amazingly effective look of realism as if it were a field plowed into furrows.
The corn is the dried plumes from Pampas grass:
1. Spray with clear hairspray to preserve.
2. Cut to length.
3. Verify in a light source that the "corn ears" are pointing in the proper direction, reverse if necessary.
4. Pick up with needlenose pliers and dip the bottom end in "Quick Stick" adhesive.
5. "Plant" the cornstalk on the wood.
6. Repeat, putting each new stalk in a row about 1/16th to 1/8th inch apart.

What's An N Scale Model Train Layout Without A Tunnel?
I plan on having two!
Paper mache is your best bet as you can build easily and cheaply.
I started this smaller of my two planned tunnels with a used Crystal Light can made of plastic, slit lengthways up the side. I attached it to the wood with a few squirts from a hot glue gun then laid the paper mache over it and on out into areas around it I wanted to raise.
Make paper mache with a paste of water and flour. Dip in strips of newspaper and lay it out. Let dry thoroughly before adding the next layer!

Painting The Tunnel And Surrounding Areas
grass, shrubs, trees and rocks will be added later but first some paint was applied because some areas aren't getting grass, plus that bright white of the dried paper mache would show through thin areas.
First I spent a few minutes channeling my inner Picasso then I put a small dollop of green, white, black and brown slightly separated, then mixed just the edges with the brush to give an interesting non-boring color scheme. Mostly brown & green mixes for the bulk of it and black/white mixed to a light grey for highlights.

A Home Made N Scale Church
Just a wood block, a basswood roof, paper-punched windows and other details using thick spongey paper-foam as the medium.
Build the steeple from a pencil or other thin, long object.
That's the basic process for all the buildings made for this layout so far. A couple new procedures are being contemplated though. I'll update if they are successful.
Update: The woodblock buildings are great but unless you do some carving to hollow them out, they can't easily be lighted on the inside for night running. The successful procedure for making an easily-lighted building has been determined: Use styrofoam from egg cartons for walls. Cut & glue to the shape you want. Clear return address label printer paper makes great windows. The roof, dormers, etc. can be styro or any type of thin wood. You might choose something slightly translucent rather than clear for the windows if you want to light that particular building; the light will be more realistic and you won't see the light bulb or LED.

In Progress N Scale Tennis Court
The court surface is a thin layer of air dry modeling clay sanded, and painted dark green.
The terra cotta color is direct on the wood.
The white stripes are paper cutter produced strips of paper pre-painted white.
The toothpicks to hold the netting were inserted in holes drilled with a tiny drill bit and will soon be trimmed down some. They'll support the fence that prevents balls from escaping the playing area. If you don't have some preventitive in place those little people will have tiny green tennis balls everywhere!

The N Scale Tennis Court Is Ready For Play!

N Scale Railroad Crossing
This was built out of stir straws for the round parts, paper foam for the flat parts.
The red "lights" are tiny pieces of stir straw mounted on the foam and filled with red paint to suit. Later flashing red micro LEDS may be installed instead of the paint, but these are plenty good enough for now.

Scratch N Scale Grass and Trees
You can purchase commercially available grass or do what I do: make grass from sawdust. Gather it, sift it to get "fine" and "course" textures. Then you can either dye it or shake it in a baggie with added food coloring to create various shades. Not all grass is bright green. Lawns in town might be if they're fertilized. Some lawns might have brown in them indicating it's fall in a southern region and the lawn has Bermuda, Zoysia or some other southern strains.
Some lawns and most fields are more of a yellow-green color. Simply make yellow grass, then green and sift the two colors together. When you sit down at your layout to work on scenery you'll apprecite having many baggies full of various textures and shades available to achieve your artistic vision.
Dried Sedum tops (Sedum is a perennial flower sold at most nurseries) harvested after they go dormant in fall, separated out into N scale size deciduous trees, look fantastic in a layout. Hairspray will preserve them, Green paint will make them look like spring and summer trees. Gold, red, yellow and light purple paint on individual trees will give you a beautiful stand of fall color.
You can also use piano wire twisted into a trunk with many branches. Use modeling clay to create a trunk, paint it, then add glue to thye branches and dip it into a baggie of the grass mixture. The more branched your tree, the more realistic it will look.
Commercially Made N Scale Trees And Grass


PVA Glue For Model Railroad Scenery - Woodland Scenics PVA glue vs. Elmer's Glue All
The standard ready to use scenery glue is Scenic Cement made by Woodland Scenics which is a PVA based glue. Extremely thin, almost like water, it's definitely good quality, perfect for ballasting track or gluing miniature figures in place.
Here's a tip that might help you out: Good old Elmer's Glue All is a PVA glue also that can be thinned with water and does about the same thing. You can mix it about 50/50 glue and water. You can go thinner but you'll get less holding power as you add more water. Most who use it do so because they claim they're saving money.
The cautions? Elmer's is a bit more acidic and will break down paper over time so you might avoid using it for that application. And then there's cost. You'll generally pay about fifty cents to one dollar per ounce for Elmer's. Cut it 50/50 with water and you're at 25 to 50 cents per ounce. You get 16 ounces of Scenic Cement for about $8 so you're at 50 cents an ounce with no mixing hassle unless you want one, it cuts 50/50 with water too if you want to stretch it. One 16 ounce bottle will easily ballast an 8' x 4' layout with plenty left for other items.
Unless you find Elmer's for less than the typical price how much are you really saving?


N Scale Kayakers!
Yes, you can make the people for your layout.
These kayakers were made by creating a tiny frame out of wire used to hang Christmas ornaments on a tree. It's extremely maleable wire and can easily be twisted into bodies, arms, legs or even a kayak shape.
Once the frame is done oven-bake clay is applied and made to look as much like the object as possible, just slightly larger than scale.
Then it's a trip into the oven to bake the clay.
Sanding the object down to impart more detail and improve the shape is the final step before painting. A Dremel tool is invaluable during this step.
Finally, paint to taste and in this instance, voila, kayakers! The paddles were made separately using wire for the shafts and plastic for the blades. After completion they were glued into the waiting hands.

A Two Tank Load
And bridge!
The two army tanks on the flat car? Start with old Listerine Strip dispensers for the tank bottom, use air dry modeling clay for the turret, and a black stir straw for the gun.
The bridge? Round dowells for the upper structure, a thin piece of plywood for the floor. I looked at a few real bridge pics first then winged it. It doesn't look too bad for my first bridge ever, does it? I'm looking forward to making a far more elaborate second one.

N Scale Lighting!
The biggest challenge, in my opinion, for a novice model maker trying to save money, is lighting. But you have to light the layout, night operation with lights blazing is just way too fun.
But it's very hard to get easy-to-understand information. Volts, current, dropping resistors, parallel wiring, diodes, LED's and all can get way confusing.
And you'll find a single commercially manufactured pole light can cost up to $35, holy cow! Even a single tiny LED can be $5 and then you need to figure out all that volts, current, resistance stuff : (
LED's are actually diodes which will accept AC power (they'll light on each half cycle so fast they'll appear to light continuously). But LED's run best and last far longer on DC current so you'll need a DC source and the small, (unfortunately) expensive nano or micro LED's. Every LED must be operated with a certain value resistor in it's circuit to limit the current or it will fry immediately, which is where some knowledge of electronics helps to determine how to get the proper current for the LED you choose but a sales person at Radio Shack can help you figure out the needed value.
For light poles stir straws work well and they're inexpensive. Another route is to buy small aluminum tubes about the same diameter as stir straws at your local snobby Hobby Lobby as well as a pipe bender kit and a tiny pipe cutter. The bender and cutter will let you bend and cut the tube wthout crimping off the hole or sealing it up. Then you simply feed very small wire up through the tube to power the led. The resistor can either go at the top with the LED or at the bottom and possibly be hid in the base.

Hills! ...A Pond!
Waiting for the final layer of paper mache to dry

All Aboard!
The train climbs the hill made of paper mache installed over a woodblock frame

I'm Hungry!
Let's hit the drive thru and get some chicken nuggets!
Check it out!
- How To Make Your Own Civil War Reenacment Scene
You love the Civil War as much as you love your modern diesel-loco era layout but blending your passions would be weird, huh? Bridge the time frame dichotomy with a reenactment scene! - How To Make Your Own Miniature Stone Mountain
Stone Mountain Georgia features the world's largest bas-relief carving in the world. Learn how to build the mountain and imitate a bas-relief carving! - Make An N or Ho Scale Observation Tower
Very cool! Under three bucks in materials, full instructions, and FREE!

")


