How to run the Harmon Labs alert

The Great Harmon Heist
The criminal corporation ARGENT managed to bribe an employee at Harmon Labs, allowing the mercenary Warlord and his Shadow Army to take over the laboratories as they scour the place for prototype power armor components. The heroes are tasked to stop the Shadow Army, free the Hostages and defeat Warlord to save the day!
This article explains what this Grab Alert is about and how to run it successfully.
As of this time, this particular grab alert is not available to players, but it's not unlikely that it will be cycled back into the game every now and then.

Step 1: Harmon Labs
The first part of the mission deals with finding the head scientist of Harmon Labs. The Shadow Army has dug itself in with fortified positions, and is ready to stop the heroes from reaching Warlord before he manages to snag the loot. When you enter the alert, you find yourself in the lobby. You have to clear all of the enemies here and activate the elevator. Once the doors open, you can go downstairs into the subterranean level.
This is also where the first confusions come up when you have joined an alert as a random group. First off, while you think you'd have to save the scientists being threatened by the Shadow Army, you don't have to. You only have to get through the enemies to reach the head scientist.
Since all of the enemies are soldier types, they have grenades and rocket launchers, all of which do knockbacks. This means you have to be careful or you will be knocked all over the place and into other groups of enemies, pulling those into the fight as well. Keep your back to a wall and pull the groups one at a time.
Since you don't have to clear all of the mobs to proceed, you can actually leave half of the enemy groups standing there and reach the end. See the picture below for the quickest route to the head scientist and the groups of enemies you can leave alone.,
Quick route through Harmon Labs
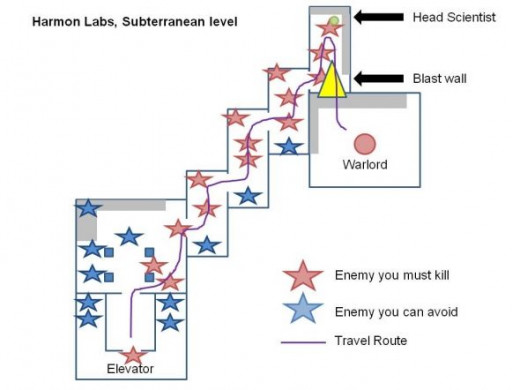
Red stars are enemies you have to kill - blue stars are enemies you can ignore.
Facts about the Harmon Alert
Some facts about the Harmon Alert to consider:
- The common enemies are more difficult to deal with than Warlord
- Enemies knock back, so keep your back to a wall, never to enemies
- Enemies drop Power Armor Protoype components (Devices)
- You do not need to save the scientists
- Fully half the enemies can be avoided
- Enemies drop boxes with devices in them, which sell to a vendor for a lot
- These prototype devices are also a lot of fun on non-power armor characters
- Warlord drops several highly desireable costumes (his head, feet, bracers and arm-gun).
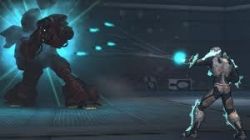
Step 2: The Head Scientist
Once you arrive at the last room, you will find that the head scientist is being threatened by the Shadow Army, amidst racks of power armor. Once you save him, you can talk to him and he will activate the power armors so you can pick one up.
At least one member of the team will have to equip the become device, activate it and walk up to the far wall in order to cave in the wall with a laser barrage. This reveals a large room with a walkway, with Warlord waiting down below. He will boast about how no one will be able to beat him, after which the real fight begins.
One thing to note is that (unless you are very low level or have a suboptimal build or archetype) the Become Power device you pick up here is inferior to just fighting Warlord. The one advantage it has is that it is ranged and has a minor self-heal, which may be an advantage if you are a melee character who doesn't have a heal (such as the Blade archetype).
The fight with Warlord is not complicated, but fully 3 out of 4 teams fail to complete the fight. This is due to a number of mechanics which can instantly kill a character, and if they recover, they cannot come back into the fight because the room is sealed off by a force field. This forces them to stand there and watch the team finish the fight.
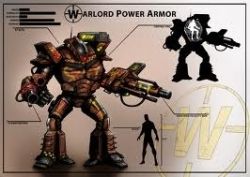
Step 3: The fight with Warlord
Warlord is standing at ground level, inside a grey metal square. He is a ranged enemy, and thus will not move from his spot. Even line of sight is not an issue, as his attacks can reach all over the room.
The tank pulls first, and it's wise to give him 5-8 seconds to build up threat. to avoid drawing aggro on Warlord at any time during the fight. The tank has to survive the big attacks, and keep Warlord facing away from the rest of the group. All others should spread around Warlord and not be close or in front of each other.
He has four main attacks:
* Shotgun Blast: A cone-shaped knockback attack
* Burst fire: A fast series of damaging attacks
* Flamethrower: A line of flame on his main aggro target
* Napalm Shell: Puts a patch of flame on the ground under the target
Shotgun Blast and Burst Fire can simply be mitigated by blocking; there's no real need to stack knockback resistance gear or the like. Since these are charged attacks (Blast attacks), Dodge is of more use to save yourself.
Flamethrower can kill you in seconds, but if you block the damage is negligable. Like the special attacks of Jack Fool, they are only dangerous if not blocked. Since he does this often, however, threat is often an issue for the tank, since blocking produces no threat. This is why it's wise to be careful with damage.
Napalm Shell is the killer, and he can use it after losing his first bar of health. He will first use a knockback on the tank, then place a patch of fire under his feet. You have to move out immediately, or you will die. Once you are knocked back, move a bit away from Warlord or to the side - if you charge in immediately after a knockback, he will put napalm down in melee range, making the fight much harder.
In this fight, travel powers and coming back in after recovery are disabled, so you have to avoid the fires with your own reflexes.
Warlord in a nutshell:
Block Knockback and Flamethrower
Avoid the fire patches
Do not overaggro the Tank
Tank must stay in melee range
Defeat means you are out of the fight
Tips and advantages
There are a few tips I can give you to give you a bigger chance to survive the alert - and complete it. Some of these imply that you take certain powers, and that may require a Retcon Token to achieve. But I can tell you from experience that after dozens of failed alerts, the retcon seems a mild price to pay.
Pet powers and Sidekicks
Sidekicks and Pets can give a great advantage in this fight, as they both deal damage while you run or focus on survival, as well as being able to take the heat from time to time as they are targeted by abilities. Steelhead Soldier and Renegade Viper Soldier are sidekicks that drop from the Whiteout and Aftershock adventure packs, and the Cryptic Store also has several sidekicks.
There are also plenty of devices that can summon temporary pets, such as golems, mind worms and gang members. Warlord will recuperate to 1 bar of health even if almost dead, if the last person fighting him is defeated. If pets are beating on him, you have the time to resurrect or use a resurrection item in order to continue the fight.
Resurrection powers and items
This fight is a walking advertisment for Triumphant Recovery devices, healing items and the Resurrection powers. Resurrection Serum is readily available, and isn't broken while taking damage. Redemption is interrupted by damage, but has the advantage of a much greater range and an advantage to bring back up to 4 allies at once.
When you are raised and you are in the fire, you take enormous damage. I am not sure if it is because of a mechanic that auto-kills you if you died to fire, or whether you simply take 2-3 ticks of it. Fact is that you want to rank up your resurrection power to max (75% health) with the 4-person-rez advantage to help them survive. It is advised for the people being resurrected to us their heaviest cooldowns and use a healing item while moving out of the fire as soon as possible.
In the end, one single person could tank Warlord and survive for several minutes (as long as you have an instant cast self heal or Heal-over-time) but eventually the room is filled with fire and you will make a mistake and die. This is why everyone should focus on their personal survival, which is the best way to defeat Warlord.

