Split a Tractor - Tutorial

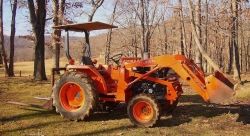
The best way to split a tractor is, get someone else to do it.
I have only split a couple of tractors. I do not have the experience
that you do. But seeing how this poor old man split this one might
make you feel better about the way you do it.
If for some reason you need to split a tractor for the first time, as
this one was for me, you might be able to pick up a few pointers
on doing it. That is, if you can't get out of it.
Helpful Hint
When I was a mechanic with one of the auto dealerships, I was in some of
the engines so many times I could have put them together if you brought
them to me in a basket.
But, this tractor was a different story. This was a first time into a tractor like this.
After much painful experience, over the years, I have learned to pray about
a new undertaking. Of course, you may chose to fight it out on your own.
But, the thing that might be of interest to you was one little trick that helped
me on this one. A CAMERA. That's right. A camera makes a great
instructor. It can help you remember how things "were" before you scattered
them all over the shop.
I took pictures of each step so I could refer back to them. This particular
project had to be worked in among many others. The result was it took about
a month. I do not need to tell you that I looked back at the pictures more than
once. In fact, they got me out of trouble five times.
Stick a camera in your tool box for charting unfamiliar ground.
Ready for Disassembly

Please pardon the poor lighting for these photos.
All these images had to be made with poor available
light, or the flash.
These are not photos I am proud of. But they do
show some of the things I wish I had known before
starting this project.
Left Side Before Disassembly

I took these pictures for my own good. If you ever take on
a new project like this one was for me, you may want to know
where things were supposed to be.
So I kept a cheap point and shoot camera in the shop and took
lots of pictures. Under the circumstances this job was down
for about a month .
Praise God for all the pictures.
Five times I had to go back and look at the pictures to see where
or how things were supposed to be installed.
Linkage Under 24 Years of Dirt.

Left side of transmission before split.
Oh Yes. the Brakes.
This is a view of the brake pedals looking from the floor up.
Look carefully at those springs. This is one place I made a
real mistake. If you ever have to split a tractor I hope this
can help you.
Obviously the brake springs have to come off to take the
floor boards off. This allows the brake pedals to hang down
until they stop by lightly applying the brakes.
The result was, I could not roll the transmission and rear end
back like I should have. And when reassembling could not
roll it into the engine properly.
After reassembling God helped one of my brain cells begin
to work. If I had tied up the brake pedals with a rope or a
bungee cord, the brakes would not have been dragging.
Tractor Undressed

View with the floor boards, fenders and cowling off.
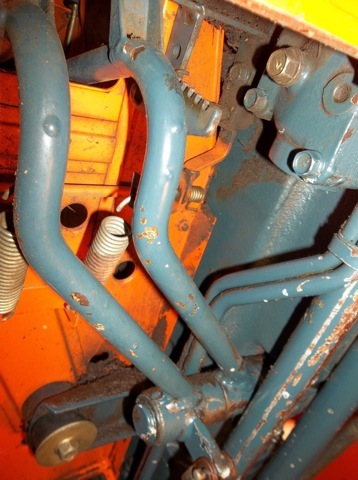
Bottom Side Up

Looking up at the bottom of the tractor. The two long blue "tubes"
have to come off. The one on the left with the rust on it is a hydraulic
line going from the transmission to the hydraulic pump.
The other "blue tube" is the drive shaft going to the front wheels on
this four wheel drive tractor.
The next photo will be removing the drive shaft, after the blue housing
is removed.
Held Together with Pins

These are the two of the pins that need to be pulled to remove the drive
shaft. The longer upper pin is pulled to allow the blue housing to be
slid forward.
After the blue housing is slid forward, the smaller pin can be driven out
of the coupling.
Then by removing the one bolt holding the housing to the engine oil
pan the housing can then be moved reward to allow the pin to be
removed from the front coupling. [That is, if you can get to it. The oil
pan "folds" down around it.]
Hydraulic Lines

Here are the three hydraulic lines that need to be removed. One,
the large blue line with the hose and clamps on it. And the two
smaller lines that go into the bottom of the pump. They have
the nuts on them.
The one smaller line that needs to be removed is hidden behind
the other line. These lines are held on with the nuts you see.
Where the Oil Spill Will Be

The large blue tube we have seen before is shown here. This
is the back end of it. It is held on with two bolts in it. This is
the other end of the line with the hose on it in the previous
picture.
Here comes the oil
On this tractor the transmission is also the hydraulic fluid
reservoir. When you pull those two bolts get ready to catch
the oil. In this case I caught about ten gallons.
If you don't catch it in a bucket or two, it will take a lot of
floor sweep stuff.
Right Side Split Point

This is where the tractor splits on the right side. Just below the
glass fuel filter and above the orange bracket you can see the
place where the engine and the transmission part. It shows one
of the bolts.
Left Side Split Point

Left side of where the tractor splits. The split is just above the "yellow"
looking bracket.
Saftey First

SAFTEY NOTES:
These tractors pivot on the front axle. When you split it at the
transmission the engine is going to lean over to one side or
the other.
Most fellows will jamb wedges in between the axle and engine
to keep it from falling over on them. GREAT IDEA.
In this case we left the front end loader on. So I put jack stands
under the frame of the front end loader to accomplish the same
thing.
Then for the transmission. I feared it might fall off the floor jack
we were using to push it back with. So I took 3/4" "all-thread"
and put through the floor mounts. I left them about 1/2" above
the floor. Had the transmission came off the jack, it would have
been caught by them - instead of me.
The Engine's Rear

View of the engine after the split was made. This photo was
shot a couple of days later is why the flywheel is so rusty.
Kubota did something here that was really appreciated. If you
look close you can see two studs sticking out of the flywheel.
When it came time to put the pressure plate on this was great.
All I had to do was start the pressure plate over the two bolts
and start lining up the clutch plate.
I was an auto mechanic for over twenty five years and never
ran into somebody this considerate.
The Tranny's Front

View of the transmission pulled back. At this point it is
supported by a bottle jack.
Filler Up

Cool feature.
On the left side of the transmission is a sight glass to
see the hydraulic oil level.


