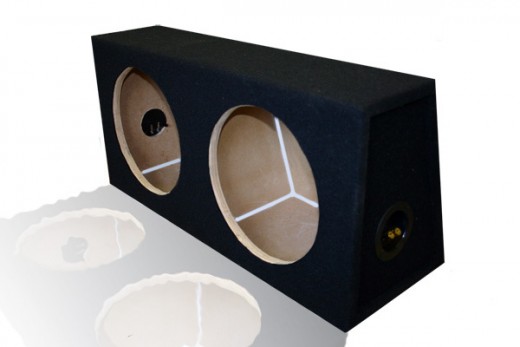
Guide to building a Subwoofer Enclosure

Building your own subwoofer enclosure can be fun and challenging for anyone with some woodworking ability. But, if you do not have prior woodworking projects under your belt, this may not be a good beginner project. It is important that your enclosure is sturdy and airtight in order to provide your subwoofer with an ideal working environment. An enclosure that is not airtight or is prone to heavy vibration will result in lesser subwoofer performance.
Box quality construction is not the only common problem that occurs with individuals who set out to build their own subwoofer enclosure. I often see enclosures that are improperly sized for a specific subwoofer; this also can result in poor sound quality. Every subwoofer is designed to function optimally in a specific environment. Every subwoofer needs a certain amount of cubic volume within its enclosure in order to function properly. Also, you will need to determine if your enclosure will be ported or sealed. Certain brands and types of subwoofers perform better in a ported environment. Ported enclosures often require less cubic volume, also. This may be a determining factor due to room constraints you may be working with. In general, a seal enclosure will be larger, but the sound will tend to be crisper, offering you a tighter bass. A ported enclosure will be smaller and lend itself to be louder, but a looser sound, and at higher volumes, will often distort.
Once you decide on your style of enclosure and your volume requirements, you can design your enclosure shape. The enclosure does not have to be perfectly square; it doesn’t even have to be perfectly rectangular. As long as you get the required volume, enclosure shape have very little to do with sound quality and can be manipulated to fit into the area you are building the enclosure for.
The material list for an enclosure is almost always the same. First is your construction material. I will always use ¾ inch MDF (medium density fiberboard) it is dense and very strong and it handles the vibrations created by subwoofers very well. It is fairly easy to work with and not overly expensive, it is the material I would always recommend, and ¾ thickness is also what I would always recommend, unless there are space constraints, but the thicker your material the better your enclosure will sound. I would always stay away from particleboard, it is not pleasant to work with, it tends to chip and crack easy and it lacks the elasticity that you get with MDF.
The other items you will need for your enclosure is, Wood screws. Try to use a screw length that is two times your material thickness. You will need a tube of silicone caulk, and some form of sound deadening material. You can use Dynamat, or even roofing tar. Some people skip this, but I really recommend it, if you are going to go through the trouble of making the enclosure, you might as well make it the best one you can. You will also need terminals for the enclosure, and you will need speaker wire for inside the enclosure.
After that, you will need to decide on an exterior covering for your enclosure. Depending on the application, you may use automotive carpeting, Formica, and wood veneers are a few options that come to mind.
Now it is time to start construction. Typically I recommend you just butt joint your pieces, there is no need to try to get fancy with mitered joints or dado joints, they tend to weaken the corners, especially after adding screws.


Cut out five of your six sides, leaving the face that your speaker
mounts to for later, but remembering to cut your hole for your speaker
terminal. Assemble the five sides, and install your terminal, using the
silicone between joints instead of wood glue, wood glue tends to become
brittle and crack, the silicone will stay pliable, offering a long
lasting seal. To screw the enclosure together, pilot drill for your
screws and also pilot for your screw head, to give you a flush finish,
evenly space your screws about every two inches. If you do not pilot
your holes in the MDF, it tends to split, so, good pilots are a must.
After
you have your five sides complete, run an additional bead of caulk
along the corners of the interior of the enclosure. This will ensure an
airtight seal. After your caulk has set, you can add your sound
deadening to the interior of the enclosure. Once this is complete,
measure your last piece to the actual box size. Saving this piece for
last will allow you to compensate for any out of squarness your
enclosure may have.
After you cut out your last piece, you will need
to cut your hole for the subwoofer itself. To do this, find the center
of where your subwoofer is going to be, on the wood and mark it by
drilling a hole. After you have drilled a hole, you can push a nail
into the hole and tie a piece of string to the nail. After this, you
will measure your hole requirement, remembering to leave material for
the flange of the speaker. Measure out from your nail and mark a point
on the wood that is half of the dimension, this will give you your cut
radius. Once your point is marked on the wood, you can take your pencil
and line it up with your mark, wrap the string around the pencil to
hold that distance from center, and draw your cut circle. You can then
remove your nail and drill the center hole bigger to give you a start
point for your Jig saw, to cut out your circle.
You can now
install your last piece, using the same method you did for the other
five pieces. Once the last piece is in place, you can install your
speaker wire. After your speaker wire is attached to both your
terminals and speaker, you can install your speaker. I do not recommend
using silicone for this, just in case you ever have to pull the speaker
out, it can be quite a mess. This will complete your subwoofer
enclosure. The only thing that you will have to determine on your own
is your exterior. Good luck, and good building!
")