There's a Volcano in my Kitchen: A Craft Project that Teaches Science

Creating Your Own Volcanic Eruption
One day, I had to entertain my 8 year old niece for several hours. She brought over her volcano making kit, which looked like a fun way to spend the day.
The kit included everything you needed to create you own volcano--except for someone to clean up the mess afterward.
It was an all day process. We built that volcano from scratch and then painted the final product. It was easy to do, but time consuming. My niece and I had a great time!
This is a great project for a cold winter day or a warm summer day. It will occupy your child for several hours.
Volcano Kits Come In Many Varieties
There are several volcano kits to choose from. Some come with a pre-made volcano. With other kids, you create the volcano from scratch. A pre-made one seems a bit lazy. It's more fun to make it yourself.
What Did Our Kit Include?
There are a variety of kits on the market. Some come with pre-made volcanoes that are ready for eruptions. All you add is the baking soda and vinegar.
Some kits include everything to make your own volcano. That's the kit we did.
The kit included:
Volcano Mold
2 Packages of Plaster
Mixing Stick
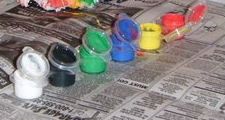
Paints
Paint brush
Recipe for creating an eruption
You'll want to use a bowl that you won't mind throwing a way. If you don't have one, pick a cheap one up at the dollar store. I guarantee you won't want to use it again especially if you don't wash it immediately.
Spread out some newspaper. This is a messy project!
Teaching Science and Having Fun
Science kits, like the volcano kit, let your kids have fun and learn something in the process. Kids like to make a mess and to see how things work.
Let's Get Started
As not to make a colossal mess of the kitchen, we laid down plenty of newspaper. Mix bags of plaster, a package of paints, and a 8 year old child and you don't even need the baking soda and vinegar for an eruption.
Once I was sure that the spills would be kept to a minimum, we snapped together the plastic mould. The mould is relatively easy to put together. Though, you may need some tape on the edges if the mould is not firm enough. This will ensure that it doesn't break apart as you are pouring the plaster.
Have you ever made a homemade volcano?
Mixing The Plaster
The kit came with two packages of plaster. We followed the directions and mixed it all up. My niece loved the glopping white mess she was making. The mixing stick is not enough for this project though. You may need an old beat up spoon to get the mixture to the right consistency.
I made the mistake of using a good bowl. Since any leftover plaster cements itself to the bowl, it was a goner when we were done.
Next, the mixture is poured into the mould. It takes a while for the plaster to set. Break time for a tired adult.
Time to Paint!
When it was time, we removed the plastic mould. Viola! We had our very own plaster volcano. I was impressed with how nicely it came out.
Then came my niece's favorite part: painting! I'm glad that I had an old t-shirt for her to wear. She had more paint on herself than the volcano, I think.
Painting took over an hour as my niece was determined to get every color in her paint set on that plaster volcano.
How Does It Work? - A demonstration of a homemade vinegar and baking soda volcano
What Just Happened?
You'll use two ingredients to create lava. They are vinegar and baking soda. This will be a very safe volcanic eruption if somewhat brief eruption.
What happens when you mix the two together? First, baking soda has the ability to neutralize acid. When it is combined with vinegar, acetic acid starts to react. This reaction activates the carbonic acid which is created when the two ingredients are mixed together.
The carbonic acid begins to bubble and it quickly engulfs whatever container it is and spills over the rim.
You can add food coloring to the mix if you'd like colorful "lava".
Don't Use Your Favorite Bowl
The plaster mixture is going to make a mess and it become hard rather quickly. Mix the mixture in a container you are prepared to toss out when done.
The Final Product
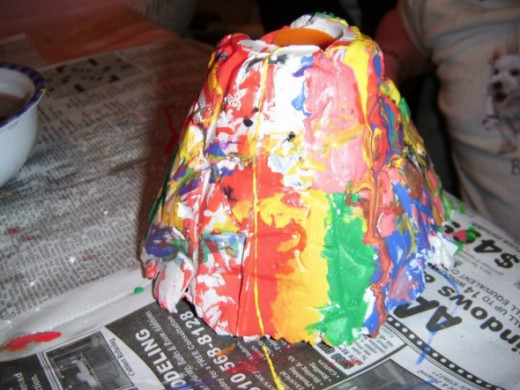
My niece's creation was a sight to behold! I bet you've never seen a rainbow colored volcano!
As the paint needed to dry, we weren't able to test out the eruption. At this point I was pretty tired anyway. But, I was a little disappointed not to see how it worked. It must have been pretty cool. My niece went through an entire bottle of vinegar!
Now This is a Baking Soda and Vinegar Volcano!
There's a Record for That!
The Guinness Book of World Records has a category for everything. Yes, they've got one for the world largest vinegar and baking soda volcano.
Who built this monstrosity? It was the students at Mt. Hood Community College Science Club who set out to get this record in 2008. Spectators came to see the the 20 foot volcano spew it's orangy lava over the tiny town constructed at the bottom (not a good place for a town, if you ask me!).
As with most records, it was meant to fall. In 2012, a Canadian team built one that was 23 feet 5 inches tall. Well, Mt. Hood College, looks like you've got your work cut out for you.
I hope this encouraged you to try a home made volcano.
Related

How do volcanoes cause tsunamis?
")
Montserrat Before and After Volcanic Eruptions (1997)

Christian Homeschooling Lessons on the Skeletal and Muscular Systems for Elementary-Age Children

Sunset Crater: Pictures of a Volcanic National Monument in Arizona

How to Restore Old, Broken Plaster or Cement Statues


