First Aid Guide for Parents

First Aid Kit Resource
- First Aid Kits: Essential Elements to Include
Find out what supplies you need to make a proper first aid kit. This essential supply list and other helpful first aid tips will help prepare you for that unexpected emergency.
One of the most terrifying parts of being a parent is watching one of your children succumb to sickness or become injured. It can be heart wrenching to see such a young and dependent person, whom you love, battle the fear and pain associated with sickness and injuries.
Because children are so dependent, they rely on us when they are hurt or ill to comfort and make them better. You may have already experienced, or you may experience a time when you as the parent feel helpless in being able to tend to your child during these times. The best way to overcome this feeling of helplessness is to become educated and prepared to deal with injuries and illnesses. The best thing to do is to become first aid certified. The next best thing is to at least be knowledgeable about what to do in different situations. As an Eagle scout, a person who has been first aid certified, and a fellow parent, I have put together a parent's guide to first aid.
Check for Danger
When approaching a hurt child or infant, make sure to check your surroundings to ensure that you are safe.
Be Calm and Reassuring
Before anything, it is important to stress that your demeanor as the parent during these difficult and painful times will make a world of difference. If you panic, your child will likely panic. Use some of these tips to assist you in remaining calm.
- Breathe - Take in deep breaths, and exhale slowly.
- Focus - Let your focus be the child, and not your personal pain and anguish. There is plenty of time to be sad after the ordeal is over.
- Remove yourself emotionally - This is tough and not everyone can or should do it, but having the emotional tie to your child can sometimes get in the way of providing proper and responsive first aid. When I have provided first aid I have viewed the task as nothing more than a task needing to be done, and completely made the person I was assisting devoid. Others may need the drive of assisting a human life to be able to complete the task.
- Use a normal voice - Though things may be shaky and nerve wrecking, keeping a normal voice in tone and volume will help keep the child from panicking, as they feel more a sense of normalcy.
- Keep their mind off it - This could be used in two ways, as a way to keep the child from focusing on the injury, and a way for you to gauge the severity of certain injuries. Ask questions of the child, like what they watched on TV, or what their favorite game is to keep the focus off the pain. For injuries like a concussion, you will want to ask them questions they typically know the answer to, as their response can help you gauge how severe the head trauma is.
- Give them praise - Giving words of encouragement may bolster a child's desire to willpower to get through a tough injury.
- Do NOT describe the wound or any procedures - Telling them how bad it is or what they will have to endure may result in one stressed child during an already difficult time.

First Aid for Cuts and Bruises Video
Treating Minor Cuts and Abrasions on Children
Cuts and abrasions are one of the most common injuries that children will receive. With a lack of complete understanding of consequences, small children often place themselves in precarious situations. Falls are inevitable as they learn to stabilize themselves.
Please note that when dealing with open wounds, it is best to put on protective gloves, for your safety and the safety of your child.
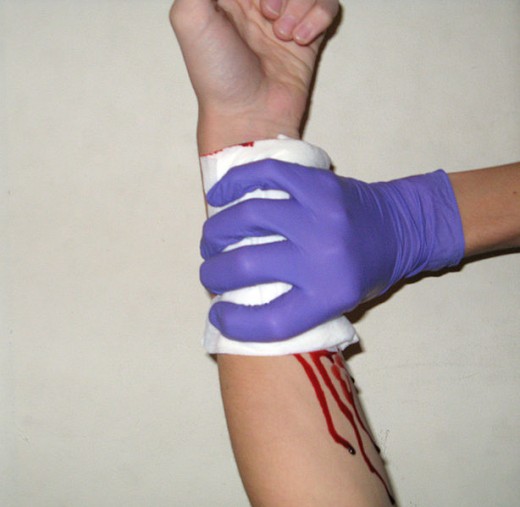
- If cut is bleeding, apply pressure using a sterile gauze, bandage, or cloth.
- If cut continues bleeding after ten minutes, go to a doctor immediately, as this is more than a minor cut.
- If bleeding stops after applying pressure, rinse wound under cool water or use saline solution with a mild soap.
- Check for any flecks of dirt, glass, gravel, or any other foreign object. Remove if found.
- Allow wound to air dry, letting it dry for several minutes. Make sure the child sits still to allow no foreign objects to touch or get into the wound.
- Apply disinfectant to the wound. Be mindful that using a disinfectant like peroxides will cause stinging, and may upset the child further.
- Apply an anti-biotic gel, such as Neosporin, or another type of antiseptic healing ointment to the topical cut or abrasion. NOTE: If it is an infant, consult your pediatrician before using healing gels and ointments. They can recommend what they feel is best for infants.
- Apply band-aid, gauze, or other bandage. Make sure bandage is secure, but not restricting blood flow. For abrasions, you may want to use a bandage that allows more airflow to the wound.
- Change the dressing regularly. You will at least want to change the bandage at least once a day, sometimes more. If you see that the dressing is becoming soaked through, change the dressing. If it is blood that is continuously bleeding through, you may want to consult a doctor, depending on the size of the wound. The cut may be deeper than you think.

Treating Major Cuts and Abrasions on Children
Dealing with superficial wounds is something you may already be familiar with, tending to your child's wounds already, or even your own. Dealing with a deep wound is quite a bit different, as it will require more of a level head due to the possibility of the presence of more blood. It will also require a visit to the emergency room or urgent care.
Please note that when dealing with open wounds, it is best to put on protective gloves, for your safety and the safety of your child.
For a deep cut:
- Apply pressure to wound and elevate above heart level. Use a clean cloth or gauze if available, making sure the piece is large enough to cover the wound.
- If bleeding is controlled within a few minutes, clean the wound using water or saline solution and a mild soap to avoid stinging. Cleaning may cause the bleeding to start again, just apply pressure again to stop the bleeding.
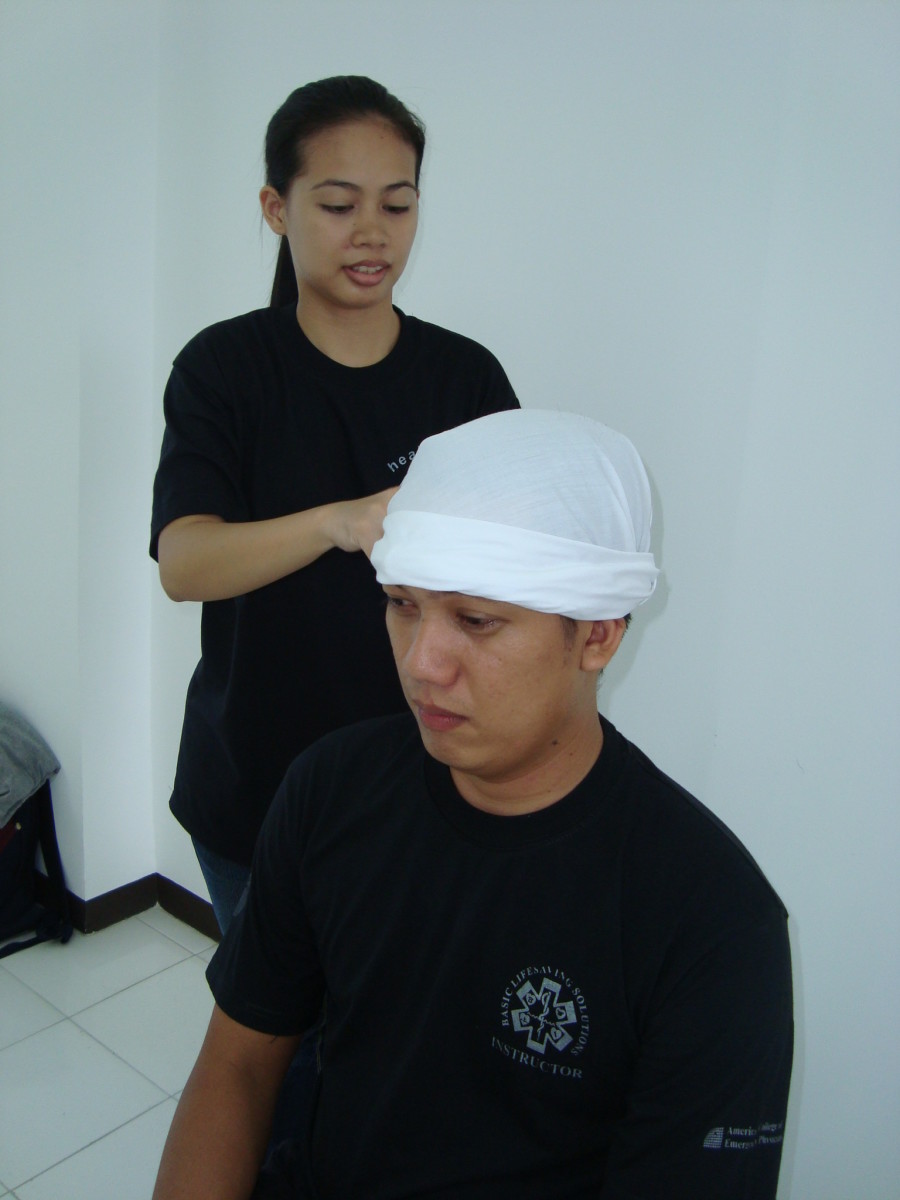
- If bleeding does not stop after a few minutes, take child to an emergency room. TIP FOR HEAD WOUNDS: Use a larger bandage, such as a kerchief to tie around scalp and bandage. This relieves you of having to continuously apply pressure, allowing the kerchief to do it, giving you a chance to tend to the child in other ways, like driving them to the doctor. You may also use the method of tying under the chin to the top of the head, as if the child had a toothache, depending on the location of the cut.
- If you cannot get the wound completely cleaned, seek a doctor. Do not dress a dirt wound, or dress a wound with dirty bandages.
- Once the wound is cleaned, pat dry or allow a small amount of time to air dry the wound.
- Apply a small amount of antiseptic around the wound, but not directly in the wound. Consult a doctor about continued use. A first time use will aid in minimizing germs and assist in fighting infection.
- Wrap, tape, or butterfly bandage the wound.
- Change dressing as needed, but at least twice a day.
- Consulting a doctor is always best, as their knowledge and ability to physically see your child's wounds will assist in your child's recovery.
Your child may experience swelling, tenderness, and possibly fever. Elevate and use ice packs at 15 minute intervals to assist with swelling. Depending on the age, you may use children's Tylenol or an alternative to assist with the fever.
For head wounds, please see the section below to monitor for any non-visible head injuries, such as a concussion.

"Normal" Concussion Symptoms
These symptoms may be considered normal for a concussion. It is always best to consult your pediatrician, whether in person or by phone.
- Headache and pressure
- Vomiting once (if this occurs, take in to see doctor)
- Sensitive to light and noises
- A little dazed and confused
- Cannot recall the events immediately surrounding incident
- A temporary loss of consciousness (a minute or two)
Call 911 if your Child Experiences the Following
- You cannot wake them
- Pupils are unequal in dilation size
- Seizures
- Vomits more than once
- Confused
- Weakness that only affects one half of the child's body
First Aid for Concussions
Treating a Concussion on a Child
A concussion can be difficult to diagnose, since it is sub-surface damage. Anytime a child suffers a blow to or fall on the head, you should monitor the child closely for any of the symptoms listed below.
Treat a concussion by:
- Having the child sit, but not lay completely down. Keep the child from being active.
- Apply a ice pack indirectly (by using a towel or some fabric in between) to the injury to reduce visible swelling.
- Monitor the child for 24-hours to determine whether symptoms are normal, need a doctor, or require emergency assistance.
See a doctor immediately if:
- The child is experiencing headaches, and the gradually worsen as time passes
- If the child seems to be experiencing different behavior problems, such as more irritable or overly tired.
- Blood, a clear fluid, or a mixture coming from nose or mouth
- The child loses consciousness - Even for few seconds, this could indicate head trauma that is not visible
- If the bleeding cannot be controlled after at least 10 minutes of pressure
- If the child fell from a height larger than 5 feet, or was hit with a large blunt force
- If the child is under a year - The cranium is still hardening for infants
- Dizziness, slurred speech, sleepy afterwards, confused
- You cannot completely clean the wound
- Loss of appetite
- Unsteady in walking
- Regular concussion symptoms persist after more than 4-5 weeks.
Kids at Higher Risk of Concussions and Problems
- Children under a year old
- Previous concussions or head trauma
- Existing neurological problems

Infant CPR Video
Child CPR Video
CPR on a Child and Infant
The best chance for survival for a child or infant who has stopped breathing is by immediately treating the victim. The longer you wait, the more time the brain goes without oxygen, resulting in either brain damage or death. Stay calm by learning the following on how to provide CPR to infants and children.
NOTE - If you are alone, provide at least two minutes of CPR before contacting 911. If you have someone else available, have them contact emergency personal immediately while you attend to performing CPR.
Infant CPR (for children under 12 months of age):
- Do NOT pick up the infant, leave them on their back, flat on the floor or a hard surface
- Check for response or breathing, typically by tapping or talking to the baby
- Using 2-3 fingers, place your fingers in the middle of the chest, slightly below the nipples.
- Complete 30 chest compressions, pressing quickly down about 1.5" - This rate can be achieved by singing "Staying Alive" and pressing to the beat.
- Tilt the chin back slightly, but not too far as this will restrict the airway
- Cover the infants mouth and nose with your mouth
- With your mouth over the baby's nose and mouth, give two gentle breaths (no more than 1 second). You should be able to see the baby's chest rise and fall with each breath.
- Continue a cycle of 30 chest compressions and two breaths until help arrives.
CPR on a Child:
- Place one hand on top of the other, interlacing fingers.
- Using the heel of your hand, place heel on the sternum of the child's chest.
- Complete 30 chest compressions, compressing about 2" down - Use the song "Staying Alive" to complete the 30 chest compressions to the beat.
- Tilt the head back slightly to listen for breathing
- If not breathing, while tilting head slight back, pinch nose and place mouth over the child's mouth.
- Give 2 breaths, about 1 second per each breath.
- Continue the cycle of 30 chest compressions to two breaths until help arrives.

How to Tell if Someone is Choking
- Cannot talk
- Gagging reflex with no noises or items coming from mouth
- Face or lips turning blue or purple
- Inability to fully cough
- Wheezy and labored breathing
- Loss of consciousness
- Gives the universal sign of choking
Teaching your Children About Choking
It is important to teach your children the universal sign for choking, and to only use it when they are really in trouble.
- The universal sign for choking is done by placing your hands over your throat, as if you were choking yourself.
Choking Infant First Aid Video
Helping a Choking Child and Infant
As someone who has both experienced infants choking on food, myself choking as a child, and has provided the Heimlich maneuver on an adult, I can attest that this one may be another more common occurrence as a parent.
NOTE - Much like performing CPR, if you are alone, assist the child for at least 2 minutes before calling 911. If someone else is available, have them call 911.
Also, if a child loses consciousness during the ordeal, move to the CPR steps.
Helping a choking infant (under 12 months of age):
- While sitting, hold the baby face down, straddling one of your arms. The jaw of the baby should be held between your thumb and other fingers.
- Angle baby so the head is angled down, while the bottom is slightly higher. The goal is to get the infant's head slightly lower than their chest.
- Using the heel of your hand, give 5 back blows (NEVER use abdominal thrusts, like that of the Heimlich maneuver on an infant)
- If back blows did not dislodge the item, flip the baby onto their back
- Using two fingers, place the fingers in the middle of the chest, slightly below the nipples
- Press down in fluid motions on the chest, at a depth of about 1 to 1.5". Complete 5 chest thrusts.
- If you are unable to dislodge the item using these methods, open the mouth to see if you can visibly see an item.
- If the item is visible, use a finger sweep by inserting your little finger in the mouth, and sweeping across from one side to the other, attempting to dislodge the item with your finger.
- If child becomes unconscious, perform infant CPR.
Helping a choking child (older than 12 months):
A child who is choking is assisted the same way that an adult is assisted, by using what is called the five and five approach.
- Use the heel of your hand and give five back blows to try to dislodge item
- Use the Heimlich maneuver to give five abdominal thrusts
- Repeat the five and five until help arrives.
- If loss of consciousness and breathing, provide CPR
First Aid for Choking Child Video
How to Give the Heimlich Maneuver
- Have victim face forward, with you behind them facing their back.
- Wrap both arms around the victim's waist, grabbing one arm with one of your hands.
- The free hand should be the hand up against the victim. Form a fist with this hand, positioning it slightly above the naval (belly-button)
- Tip the victim slightly forward
- Quickly press in and up with your hands, almost like you are trying to pick the person up.
- Complete five reps of these before attempting back blows.

Treating a Child for Poison
Kids are fast. You can turn your back for a few seconds and they are magnetized to the things they should not be getting in to. There will be a time in your parental life that your child will eat or drink something that they shouldn't have. Here is how to deal with it.
Call Poison Control: 1-800-222-1222
The best and quickest response is by calling this number. These people are trained for all sorts of poisons, from household cleaners, to animals and plants, to food poisoning. Let them be your guide.
Do not try to have them throw up, or feed them, or have them over drink. First call the number and tell them exactly what it was, and the symptoms if any, as well as the amount ingested.

What NOT to do
- Use butter, greases, or powders on the wound
- Pop blisters
- Use ice on the wound
Seek Emergency Care if...
You will want to seek immediate care with a 2nd degree burn, possibly even calling 911 depending on the location, size and severity. A 3rd degree burn requires a 911 call.
If you have a 1st degree that meets the following criteria, call emergency personal or take in immediately:
- The burn is on the face
- The burn is on a joint
- The burn is on the hands or feet
- A large portion of the body (more than 10%)
- The burn is located on the genitals or buttocks
Treating Burns and Scalds Video
Treating Burns on a Child
As a parent, I am saddened to say that I have experienced this with one of my children. And as a parent, I know that you probably will not judge me if I told you he touched a light bulb that burned his hand. You turn your back for three seconds, and....
From firsthand experience, I can attest to the following information. There are three classifications of burns, 1st degree, 2nd degree, and 3rd degree.
1st Degree Burns: Most likely treat at home
Symptoms - redness, dry, possible minor swelling, and pain.
- Put burned area under cool running water for 10 to 15 minutes. Make sure it is not too cold.
- Do NOT put ice on the burn
- Using a gauze bandage, cover the burn lightly. Avoid too much pressure on the affected area.
- Consult pediatrician about pain medications if child is in pain.
2nd Degree Burns: Take into doctor
Symptoms - redness and splotchy areas, pain, swelling, blisters forming
- Put burned area under cool running water for 10 to 15 minutes. Make sure it is not too cold.
- Do NOT put ice on the burn
- Using a gauze bandage or a plastic bag (to avoid sticking to the burn), cover the burn lightly. Avoid too much pressure on the affected area.
- Consult pediatrician about pain medications if child is in pain.
3rd Degree Burns: Seek immediate help by calling 911
Symptoms - charred and black, with possible complete white spots present. The nerves may be burned, which could result in a feeling of no pain.
While waiting for emergency personal, do the following:
- Make sure the victim is away from source of burn
- Leave clothing in tact, do not attempt to remove
- Do not immerse large areas in water, as the loss of fat and tissue could lead to hypothermia
- Ensure victim is breathing, if not perform CPR
- Elevate the affected area
- Use a clean damp cloth to cover the wound until help arrives


