Frozen Shoulder - Physiotherapy Treatment #3 - Mobilization Exercises Part 1

Introduction
Please refer my previous articles for the basic principles of management of the Frozen shoulder. In this article, I will be dealing with the regime of mobilization exercises, which I follow and have found to be effective.
I proceed with the following mobilization Exercises considering that the Frozen Shoulder is on the right side.
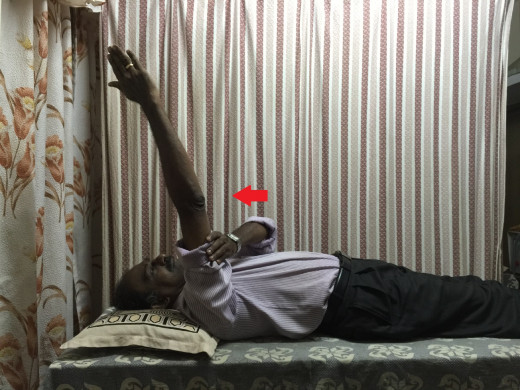
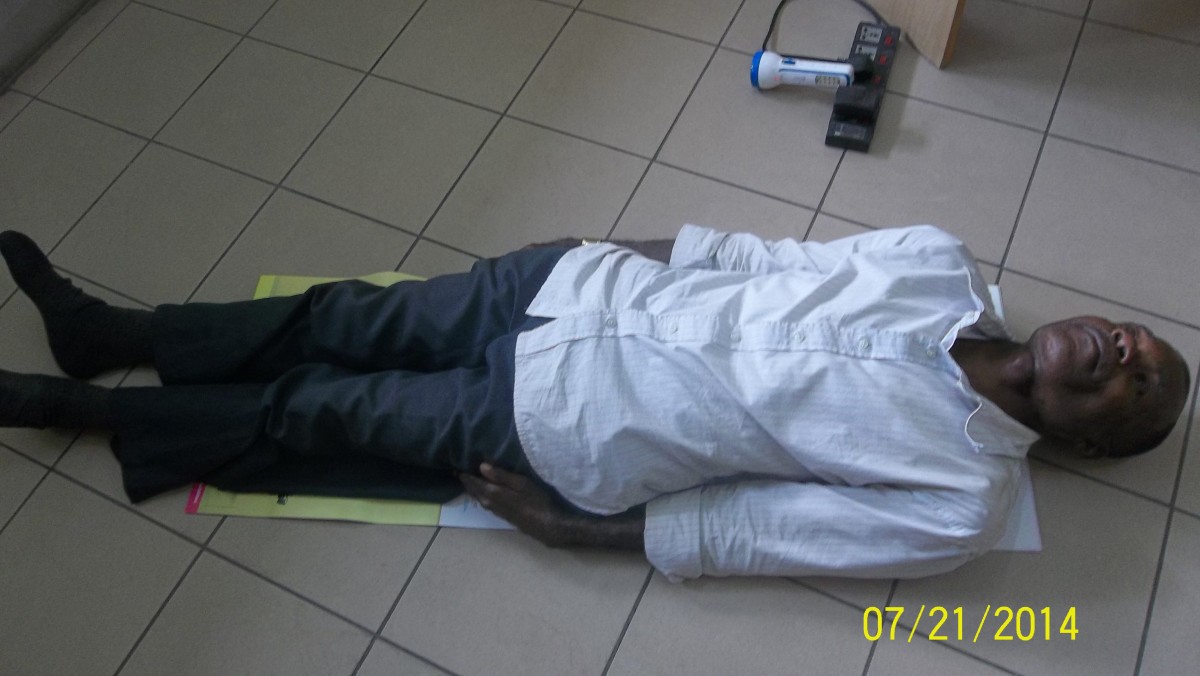
1. Starting Position- Supine lying on a bed with the extended upper limbs by the sides and the palms of the bands facing the body.
Actively lift the extended right upper limb upwards till a pain is felt on the shoulder joint. Now lift it further up till a stretch is felt and an end point is reached. Hold the already lifted up right upper limb at the middle of its upper arm with the left hand and a slow and gentle upward thrust or pressure of small amplitude is applied. This thrust or pressure is maintained for 3 -5 seconds. Now slowly and gently bring back the right upper limb to the starting position. Care should be taken that the thrust or pressure does not cause much pain or discomfort to the patient. Repeat the exercise 5 times (may be gradually progressed to 10 times), twice a week.
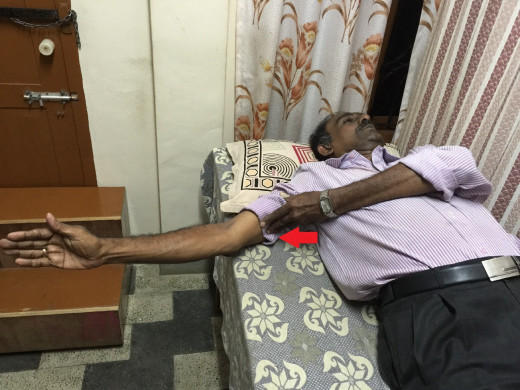
2. Starting Position –Same as above.
Actively take the extended right upper limb sideways (preferably sliding on the bed) till a pain is felt on the shoulder joint. Now take the right upper limb sideways further till a stretch is felt and an end point is reached. Hold the right upper limb at the middle of its upper arm with the left hand and a slow and gentle sideways thrust or pressure of small amplitude is applied. This thrust or pressure is maintained for 3-5 seconds. Now slowly and gently bring back the right upper limb to the starting position. Care should be taken that the thrust or pressure does not cause much pain or discomfort to the patient. Repeat the exercise 5 times (may be gradually progressed to 10 times), twice a day.
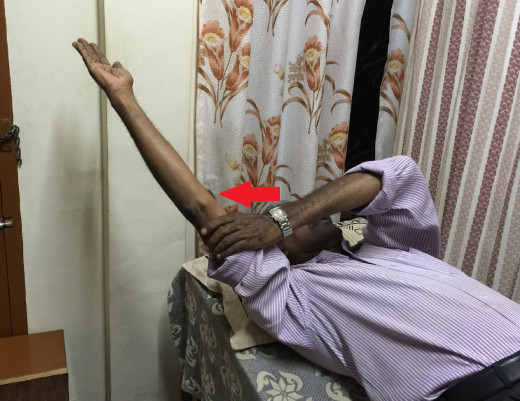
3. Starting Position – Same as above.
Actively lift the extended right upper limb upwards and then diagonally outwards till a pain is felt on the shoulder joint. Now stretch out the right upper limb further till a stretch is felt and an end point is reached. Hold the right upper limb at the middle of its upper arm with the left hand and a slow and gentle outward thrust or pressure of small amplitude is applied. This thrust or pressure is maintained for 3-5 seconds. Now slowly and gently bring back the right upper limb to the starting position. Care should be taken that the thrust or pressure does not cause much pain or discomfort to the patient. Repeat the exercise 5 times (may be gradually progressed to 10 times), twice a day.
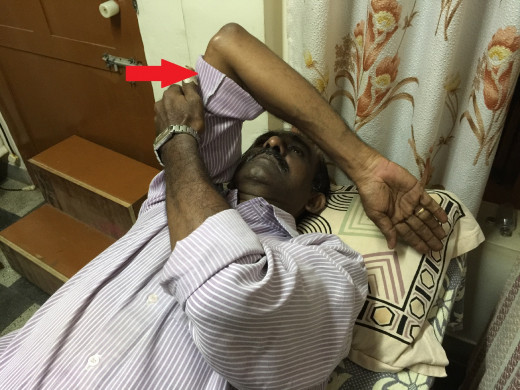
4. Starting Position - Same as above.
Actively lift the extended right upper limb upwards, bend it at the elbow and bring it across the face and try to touch the bed on the left side. Do this movement till a pain is felt on the shoulder joint. Move the right upper limb further till a stretch is felt and an end point is reached. Now hold the right upper limb at the elbow with the other hand and a slow and gentle thrust or pressure of small amplitude is applied in the direction of movement of the right upper limb. This thrust or pressure is maintained for 3-5 seconds. Now slowly and gently bring back the right upper limb to the starting position. Care should be taken that it does not cause much pain or discomfort to the patient. Repeat the exercise 5 times (may be gradually progressed to 10 times), twice a day.
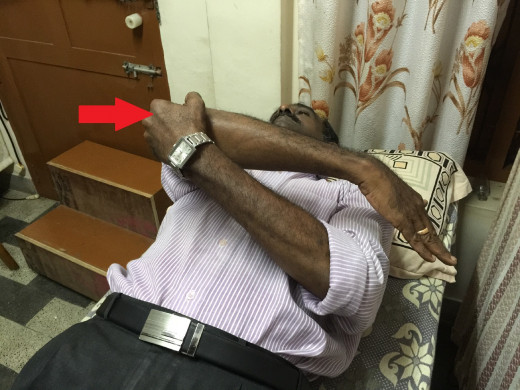
5. Starting Position – Same as above.
Actively lift the extended upper limb upwards, bend it at the elbow and bring it across the chest and try to touch the bed on the left side. Do this movement till a pain is felt on the shoulder joint. Move the right upper limb further till a stretch is felt and an end point is reached. Now hold the right upper limb at the elbow with the other hand and a slow and gentle thrust or pressure of small amplitude is applied in the direction of movement of the right upper limb. This thrust or pressure is maintained for 3-5 seconds. Now slowly and gently bring back the right upper limb to the starting position. Care should be taken that it does not cause much pain or discomfort to the patient. Repeat the exercise 5 times (may be gradually progressed to 10 times), twice a day.
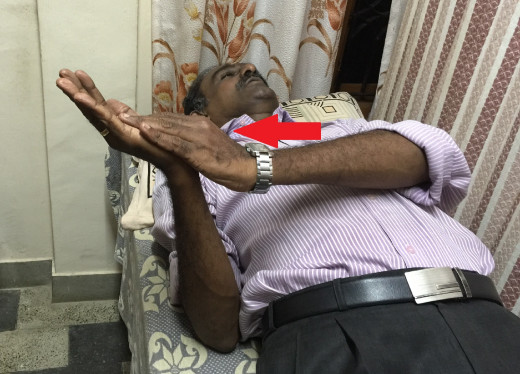
6. Starting Position –Same as above.
Actively bend the right elbow to 90 degrees in such a way that the palm of the hand still faces the body. Now rotate the right upper limb externally (rotating outwards) as if to touch the bed on the right side. Do this rotating movement till a pain is felt on the shoulder joint. Rotate the right upper limb outwards further till a stretch is felt and an end point is reached. Now hold the right upper limb at the wrist with the left hand and a slow and gentle thrust or pressure of small amplitude is applied in the direction of movement of the right upper limb. This thrust or pressure is maintained for 3-5 seconds. Now slowly and gently bring back the right upper limb to the starting position. Care should be taken that it does not cause much pain or discomfort to the patient. Repeat the exercise 5 times (may be progressed gradually to 10 times), twice a day.
This exercise can also be done in the opposite direction. That is, rotating the right upper limb internally (rotating inwards) as if to touch the body.
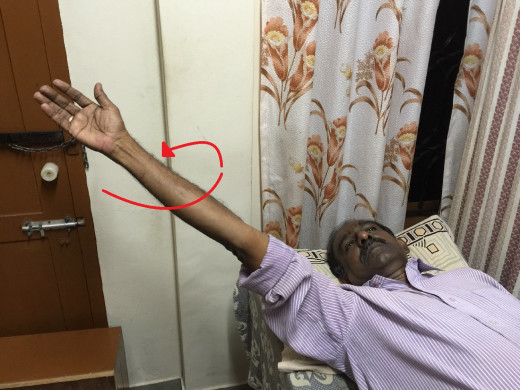
7. Starting Position – Same as above.
Actively rotate the right upper limb keeping the elbow straight in the clockwise direction and then in the anticlockwise direction in small amplitudes. Care should be taken that the rotation of the right upper limb does not cause much pain or discomfort to the patient. Repeat the exercise 5 times in the clockwise direction and then 5 times in the anticlockwise direction (may be progressed gradually to 10 times), twice a day.
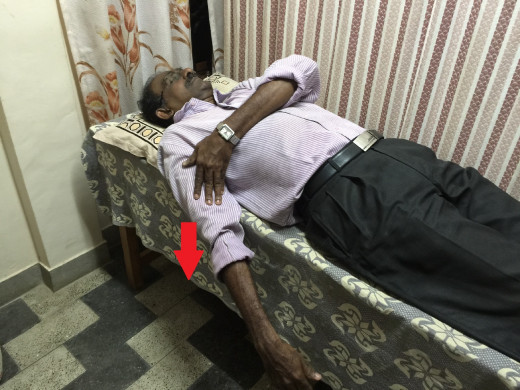
8. Starting Position – Same as above.
Move towards the right edge of the bed such that the right upper limb is outside the bed. Actively take the right upper limb downwards till a pain is felt on the shoulder joint. Bring the right upper limb downwards further till a stretch is felt and an end point is reached. Now hold the right upper limb at the middle of its upper arm with the left hand and a slow and gentle downward thrust or pressure of small amplitude is applied. This thrust or pressure is maintained for 3-5 seconds. Now slowly and gently bring back the right upper limb to the starting position. Care should be taken that it does not cause much pain or discomfort to the patient. Repeat the exercise 5 times (may be progressed gradually to 10 times), twice a day.
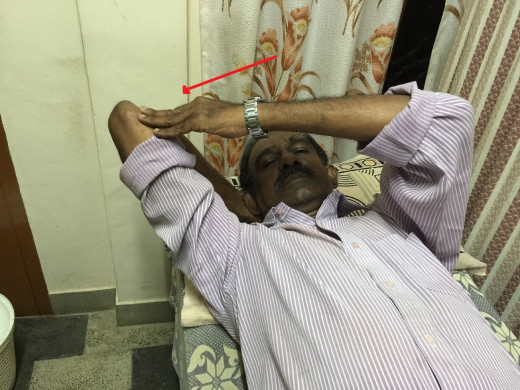
9. Starting Position – Same as above.
Actively keep the right hand under the head in such a way that the head rests on the palmar aspect of the right hand. Now, since the shoulder is frozen, the flexed elbow usually points outwards and upwards. Bring the flexed right elbow downwards and try to touch the bed with the right elbow. Do this movement till a pain is felt on the shoulder joint. Bring the right elbow downwards further till a stretch is felt and an end point is reached. Now hold the right upper limb with the left hand at the elbow and a slow and gentle downward thrust or pressure of small amplitude is applied. This thrust or pressure is maintained for 3-5 seconds. Now slowly and gently bring back the right upper limb to the starting position. Care should be taken that it does not cause much pain or discomfort to the patient. Repeat the exercise 5 times (may be progressed gradually to times), twice a day.
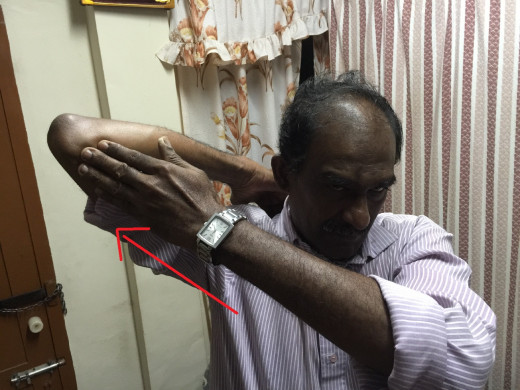
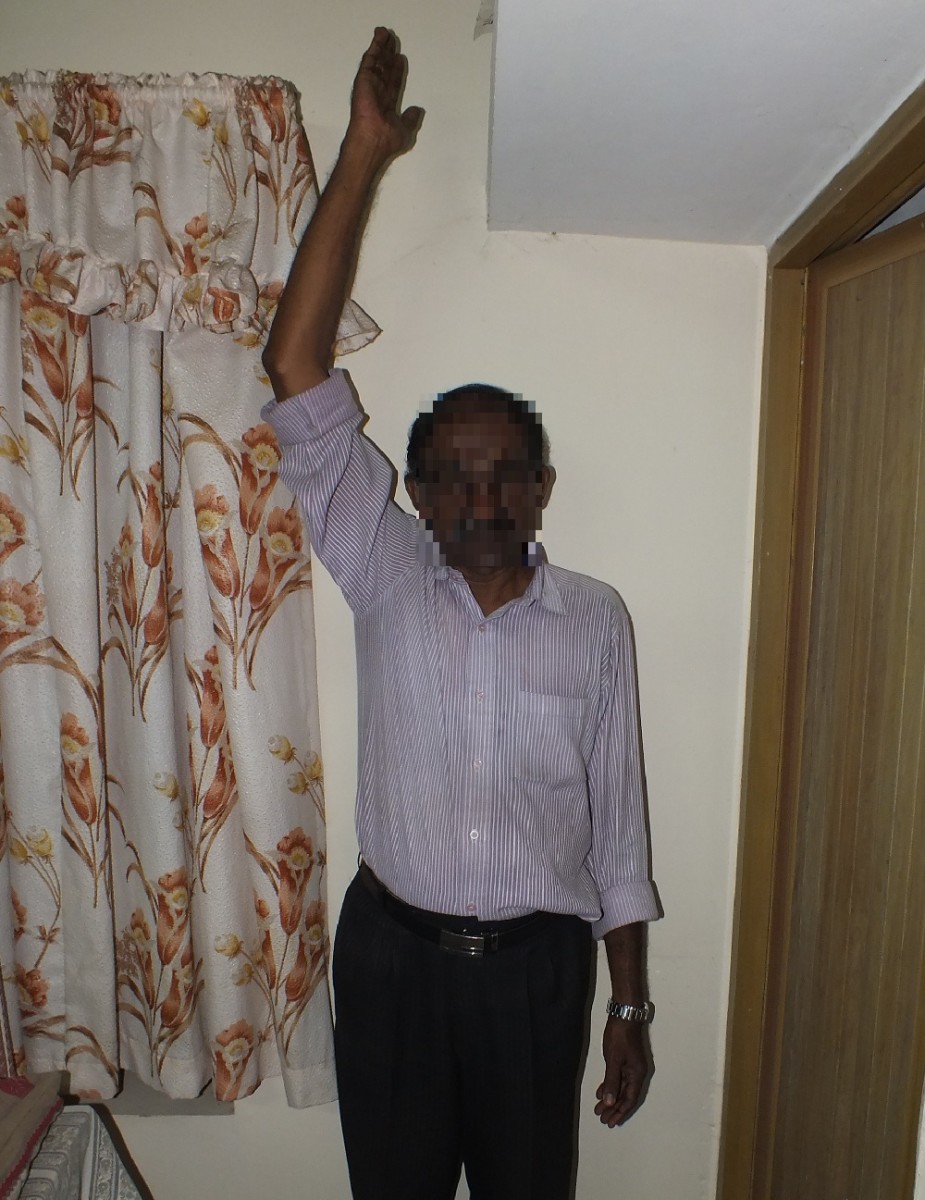
10. Starting Position – The patient stands with the upper limbs hanging down.
Actively lift the straight right upper limb upwards to the maximum, bend the elbow and try to touch the intra scapular area with the finger tips. Do this movement till a pain is felt on the shoulder joint. Continue this movement further till a stretch is felt and an end point is reached. Now hold the right upper limb at the elbow with the left hand and a slow and gentle thrust or pressure of small amplitude is applied in the direction of movement of the right upper limb. This thrust or pressure is maintained for 3-5 seconds. Now slowly and gently bring back the right upper limb to the starting position. Care should be taken that it does not cause much pain or discomfort to the patient. Repeat the exercise 5 times (may be progressed gradually to 10 times), twice a day.
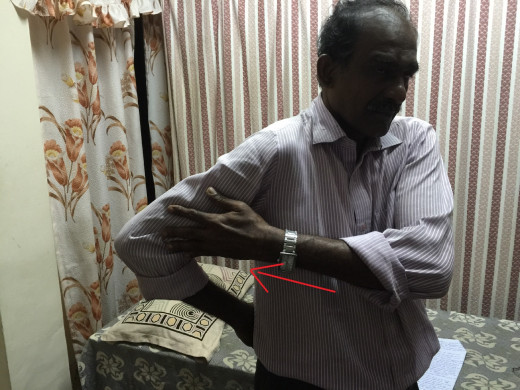
11. Starting Position – Same as above.
Actively bring the straight right upper limb backwards and sideways, bend the elbow and try to bring the hand to the back. Do this movement till a pain is felt on the shoulder joint. Continue this movement further till a stretch is felt and an end point is reached. Now hold the right upper limb at the middle of its upper arm with the left hand and a slow and gentle thrust or pressure of small amplitude is applied in the direction of movement of the right upper limb. This thrust or pressure is maintained for 3-5 seconds. Now slowly and gently bring back the right upper limb to the starting position. Care should be taken that it does not cause much pain or discomfort to the patient. Repeat the exercise 5 times (may be progressed gradually to 10 times), twice a day.
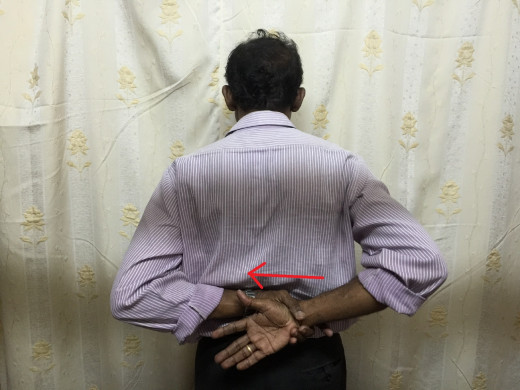
12. Starting Position – Same as above. Refer the Exercise No. 11.
Once the right upper limb has reached the back of the body, try to bring it towards the left side of the body. Do this movement till a pain is felt on the shoulder joint. Continue this movement further till a stretch is felt and an end point is reached. Now hold the right upper limb at the wrist with the left hand and a slow and gentle ‘pull’ of small amplitude towards the left side of the body is applied. This ‘pulled up’ position is maintained for 3-5 seconds. Now slowly and gently bring back the right upper limb to the starting position. Care should be taken that it does not cause much pain or discomfort to the patient. Repeat the exercise 5 times (may be progressed gradually to 10 times), twice a day.
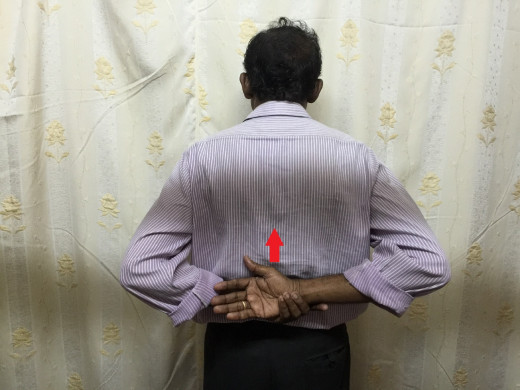
13. Starting Position – Same as above. Refer the Exercise No 11 and Exercise No. 12.
Once the right upper limb has reached the back of the body, try to bring it upwards. Do this movement till a pain is felt on the shoulder joint. Continue this movement till a stretch is felt and an end point is reached. Now hold the right upper limb at the middle of its forearm and a slow and gentle upward thrust or pressure of small amplitude is applied. This thrust or pressure is maintained for 3-5 seconds. Care should be taken that it does not cause much pain or discomfort to the patient. Now slowly and gently bring back the right upper limb to the starting position. Repeat the exercise 5 times (may be progressed gradually to 10 times), twice a day.
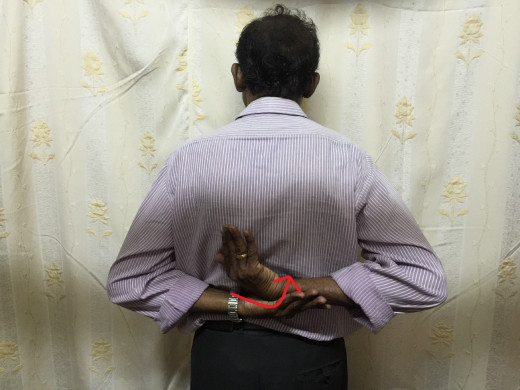
14. Starting Position – Same as above. Refer the Exercise No.11, Exercise No 12 and Exercise No.13.
Once the right upper arm has reached the back of the body, turn the forearm upwards and try to touch the back of the body with the fingers. Do this movement till a pain is felt. Continue this movement further till a stretch is felt and an end point is reached. Now hold the right upper limb at the middle of the forearm with the left hand and turn it upwards further by small and gentle rotatory movement of small amplitude. The newly attained position is maintained for 3-5 seconds. Care should be taken that it does not cause much pain or discomfort to the patient. Now slowly and gently bring back the right upper limb to the starting position. Repeat the exercise 5 times (may be progressed gradually to 10 times), twice a day.

