Thoracic Outlet Syndrome #5 - Physiotherapy Treatment 2 - Breathing Exercises

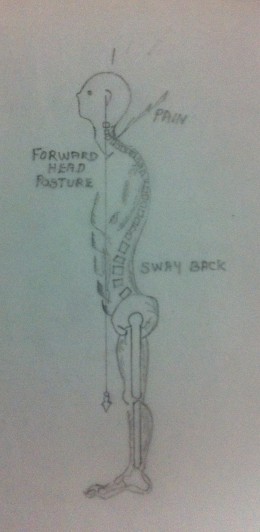
As we have already discussed, as a sequence to the ‘forward head posture’ there are certain bodily changes that adversely affect the patient anatomically and physiologically. The shoulders droop, the scapulae rotate forward and downward, the breasts sag and the mobility of the thoracic cavity is diminished. As a result there is decrease in vital capacity. Hence breathing exercises are very important in the case of Thoracic Outlet Syndrome. Breathing Exercises, especially the inspiratory exercises, can help to improve the mobility of the thoracic cage where it is limited by any underlying pathology. Here I would like to deal with three types of Breathing Exercises which are suitable to improve the mobility of the thoracic cage and hence to improve the vital capacity.
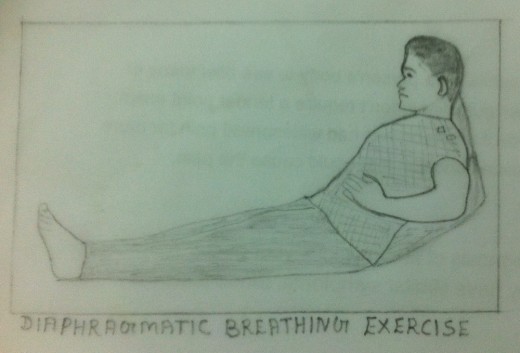
a. Diaphragmatic Breathing Exercise- Starting Position- Crook/Half Lying.
The patient keeps the palms of his hands on the anterior aspect of either side of the lower part of the chest cage in such a way that the thumbs and the index fingers of both the hands rest on the lower part of the chest cage while the other three fingers of both hands rest on the abdomen just below the chest cage. Now the patient can feel the inspiration as the abdomen goes up and the expiration as the abdomen comes down. The patient is instructed to relax and breathe out to feel the abdomen sinking down. This movement of the abdomen should not be forced. At the end of the expiration, the patient applies a firm pressure to the area. Now the patient is instructed to expand the abdomen against the force applied by the hands with the next inspiration. The pressure applied should not be excessive. If the pressure is excessive, it could restrict the movement of the abdomen. At full inspiration the pressure is released. Now the patient breathes out and the abdomen comes down. Again the pressure is applied as the patient begins to breathe in again. The exercise can be done 10 times, twice a day.
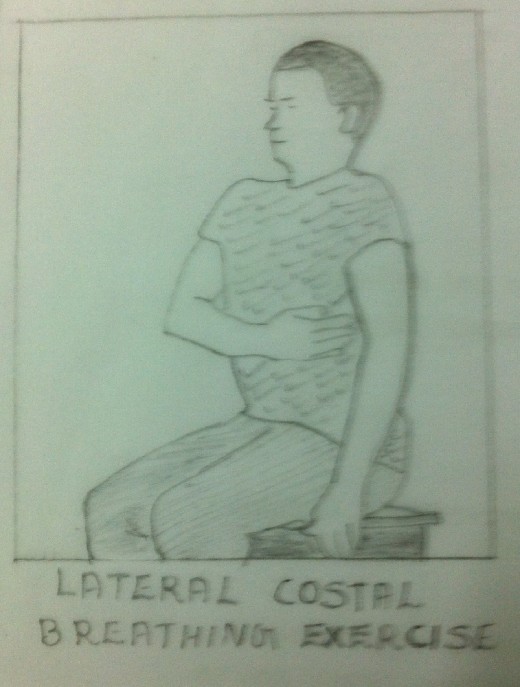
b. Lateral Coastal Breathing
Starting Position- Crook/Half Lying or Sitting The patient places the palm of his right hand well round the left chest in the mid axillary line over the 7th, 8th and 9th ribs. Now the patient can feel the inspiration as the chest goes out and the expiration as the chest comes in. Now the patient is instructed to relax and breathe out to feel the inward movement of the chest. The movement of the chest should not be forced. At the end of the expiration, the patient applies a firm pressure to the chest. Now the patient is instructed to expand the chest against the force applied by the hand with the next inspiration. The pressure applied should not be excessive. If the pressure is excessive, it could restrict the movement of the chest. At full inspiration, the pressure is released. Now the patient breathes out and the chest comes in. Again the pressure is applied as the patient begins to breathe in again. Now the exercise is given to the other side of the chest. As a progression the exercise is done simultaneously for both sides. The exercise can be done 10 times, twice a day.
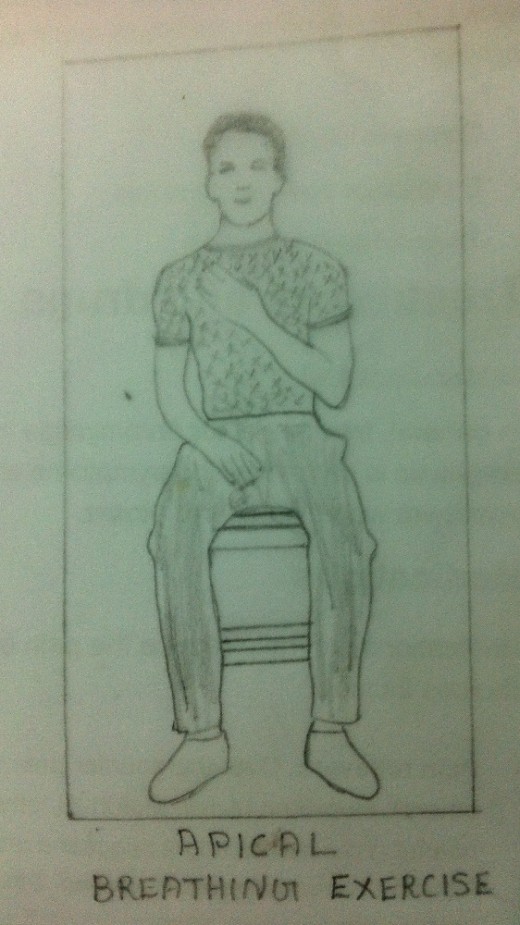
c. Apical Breathing Exercise- Starting Position - Crook/Half Lying or Sitting
The patient places the palm of his right hand on the left side of his chest in such a way that his fingers corresponds the area below the clavicle. Now the patient can feel the inspiration as the chest goes up and the expiration as the chest comes down. Now the patient is instructed to relax and to breathe out to feel the inward movement of the chest. The movement of the chest should not be forced. At the end of the expiration, the patient applies a firm pressure to the chest below the clavicle with the fingers. Now the patient is instructed to expand the chest against the force applied by the hand with the next inspiration. The pressure applied should not be excessive. If the pressure is excessive, it could restrict the movement of the chest. At full inspiration, the pressure is released. Now the patient breathes out and the chest comes down. Again the pressure is applied as the patient begins to breathe in again. Now the exercise is given to the other side of the chest. As a progression the exercise may be given simultaneously for both sides. The exercise can be done 10 times, twice a day.
Breathing Exercises can also be incorporated in the normal physiological exercises as well.
Breathing Exercises – Free Exercise
Breathing exercises can also be incorporated in ordinary free exercises. Here with I am dealing with a few such exercises.
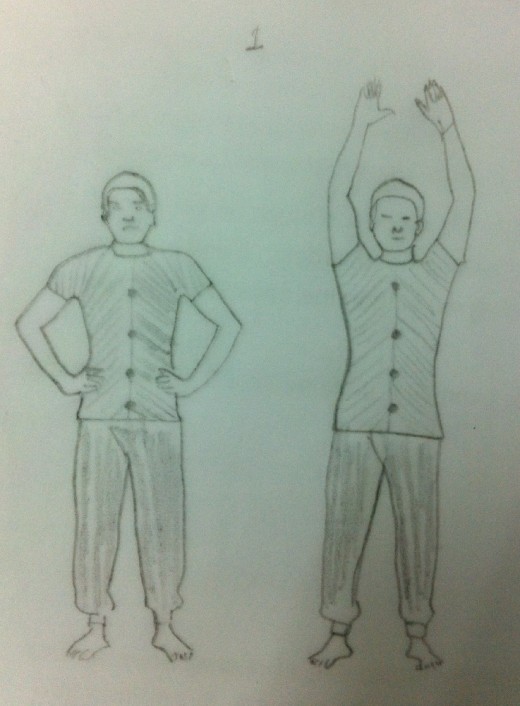
1. Starting Position – The patient stands relaxed with the feet together by the sides or a little apart with the upper limbs hanging down. He ‘breathes in’ and ‘breathes out’ as quietly as possible while relaxing the shoulders and the chest. Now he is instructed to have the feeling of breathing. Breathing through the nose is preferable as this warms, moistens and filters the air. But if breathing through the nose is difficult and if he becomes breathless it is often advisable to ‘breathe in’ and to ‘breathe out’ through the mouth.
The patient raises both the upper limbs forwards and upwards simultaneously until they reach the maximum. He ‘breathes in’ along with the movement of the upper limbs. He ‘breathes in’ in such a way that the inspiration stops as soon as the upper limbs reach the maximum. Hold the upper limbs in that position for 3 seconds. Hold the breath also for 3 seconds. Now bring back the upper limbs to the starting position. While he is bringing back the upper limbs to the starting position, he ‘breathes out’ along with the downward movement of the upper limbs. He ‘breathes out’ in such a way that the expiration stops as soon the upper limbs reach the starting position. Repeat the exercise 10 times, twice a day.
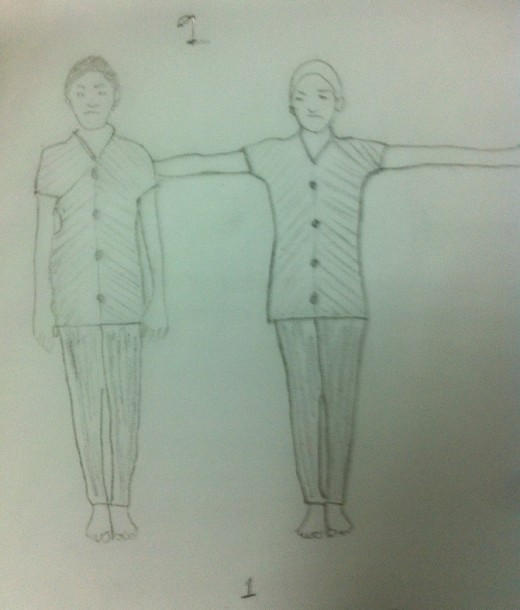
2. Starting Position – Same as above.
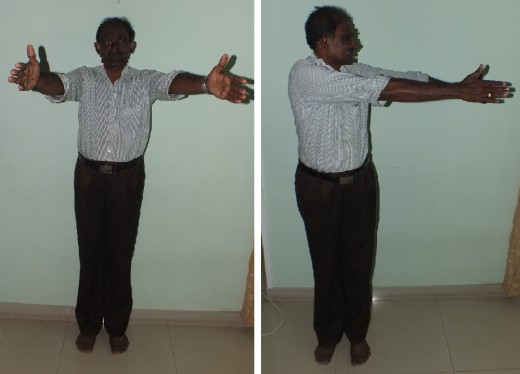
The patient raises both the upper limbs sideways and upwards simultaneously until they are in line with the shoulders. He ‘breathes in’ along with the movement of the upper limbs. He ‘breathes in’ in such a way that the inspiration stops as soon as the upper limbs reach the maximum required position I.e. in line with the shoulders. Hold the upper limbs in that position for 3 seconds. Hold the breath also for 3 seconds. Now bring back the upper limbs to the starting position. While he is bringing back the upper limbs to the starting position, he ‘breathes out’ along with the downward movement of the upper limbs. He ‘breathes out’ in such a way that the expiration stops as soon as the upper limbs reach the starting position. Repeat the exercise 10 times, twice a day.

3. Starting Position – The patient stands relaxed with the feet together by the sides or a little apart with the upper limbs hanging down. The patient raises both the upper limbs forwards and upwards simultaneously until they reach the level of the sternum and then keep both the hands together, facing each other.
Now stretch out the upper limbs sideways until they are in line with the shoulders with the palms of the hands facing forward. He ‘breathes in’ along with the sideways movement of the upper limbs. He ‘breathes in’ in such a way that the inspiration stops as soon as the upper limbs reach the maximum stretched position i.e. in line with the shoulders. Hold the upper limbs in that position for 3 seconds. Hold the breath also for 3 seconds. Now bring back the upper limbs to the starting position I. e. at the level of the sternum. While he is bringing back the upper limbs to the starting position, he ‘breathes out’ along with the forward movement of the upper limbs. He ‘breathes out’ in such a way that the expiration stops as soon as the upper limbs reach the starting position i.e. at the level of the sternum. Repeat the exercise 10 times, twice a day.
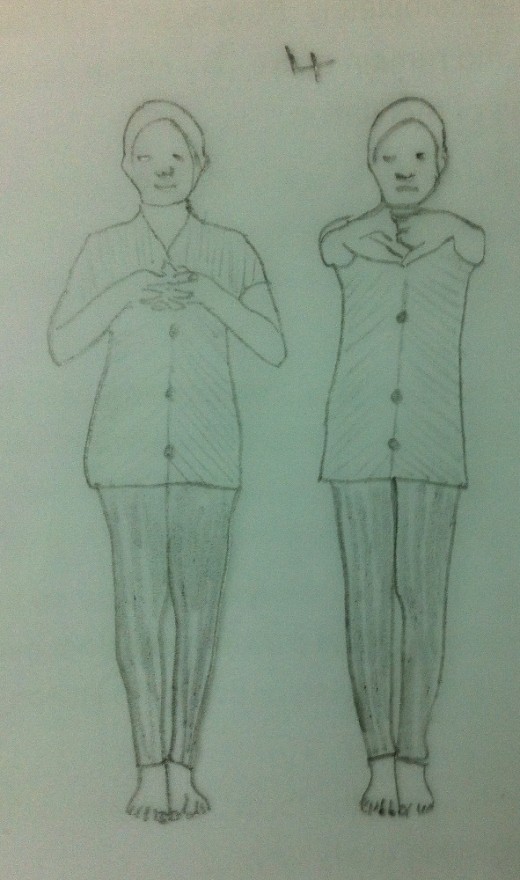
4. Starting position – The patient stands relaxed with the feet together by the sides or a little apart with the upper limbs hanging down. The patient bends both the elbows simultaneously and keep the hands close to the chest with the fingers interlocked and the palms of the hands facing the chest.
Stretch out the upper limbs forward simultaneously and keep them at the level of the shoulders with the fingers interlocked and the palms of the hands facing forward. He ‘breathes in’ along with the forward movement of the upper limbs. He ‘breathes in’ in such a way that the inspiration stops as soon as the upper limbs reach the maximum stretched position. Hold the upper limbs in that position for 3 seconds. Hold the breath also for 3 seconds. Now bring back the upper limbs to the starting position. While he is bringing back the upper limbs to the starting position, he ‘breathes out’ along with the movement of the upper limbs. He ‘breathes out’ in such a way that the expiration stops as soon as the upper limbs reach the starting position. Repeat the exercise 10 times, twice a day.

5. Starting Position –The patient stands relaxed with the feet together by the sides or a little apart with the upper limbs hanging down. The patient raises the upper limbs forwards and upwards simultaneously and keep them at the level of the shoulders with the fingers of both the hands interlocked and the palms of the hands facing forward.
Now raise both the upper limbs upwards simultaneously, with the fingers of both the hands interlocked till the upper limbs reach a level just above the head and the palms of the hands facing upwards. He ‘breathes in’ along with the upward movement of the upper limbs. He ‘breathes in’ in such a way that the inspiration stops as soon as the upper limbs reach the maximum stretched position. Hold the upper limbs in that position for 3 seconds. Hold the breath also for 3 seconds. Now bring back the upper limbs to the starting position. While he is bringing back the upper limbs to the starting position, he ‘breathes out’ along with the movement of the upper limbs. He ‘breathes out’ in such a way that the expiration stops as soon as the upper limbs reach the starting position. Repeat the exercise 10 times, twice a day.
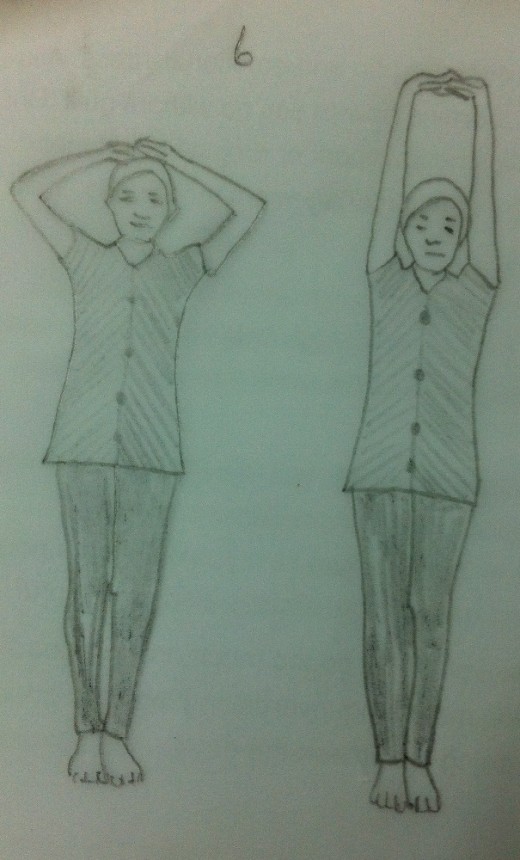
6. Starting Position- The patient stands relaxed with both feet together by the sides or a little apart with the upper limbs hanging down. The patient places both the hands on the head with the fingers interlocked and the palms facing upwards.
Stretch out both the upper limbs upwards with the fingers interlocked and the palms of the hands facing upwards. He ‘breathes in’ along with the upward movement of the upper limbs. He ‘breathes in’ in such a way that the inspiration stops as soon as the upper limbs reach the maximum stretched position. Hold the upper limbs in that position for 3 seconds. Hold the breath also for 3 seconds. Now bring back the upper limbs to the starting position. While he is bringing back the upper limbs to the starting position, he ‘breathes out’ along with the movement of the upper limbs. He ‘breathes out’ in such a way that the expiration stops as soon as the upper limbs reach the starting position. Repeat the exercise 10 times, twice a day.
7. Starting Position- The patient stands relaxed with both feet together by the sides or a little apart with the upper limbs hanging down. Now raise both the upper limbs forwards and upwards simultaneously until they reach the level of the sternum and hold them parallel to each other.
Now turn the upper body towards left with the upper limbs held in the starting position itself I. e. with the upper limbs held parallel to each other. Care should be taken that the lower body and the feet do not turn along the upper body. While the upper body is turned towards left, he ‘breathes in’ along with the movement of the body. He ‘breathes in’ in such a way that the inspiration stops as soon as the body is turned towards the left to the maximum. Hold the body in that position for 3 seconds. Hold the breath also for 3 seconds. Now bring back the body to the starting position with the upper limbs still held parallel to each other. While he is bringing back the body to the starting position, he ‘breathes out’ along with the movement of the body. He ‘breathes out’ in such a way that the expiration stops as soon as the body reaches the starting position. Do the exercise towards the right side also, alternately. Repeat the exercise 10 times, twice a day.
8. Starting Position-The patient stands relaxed with both feet together by the sides or a little apart with the upper limbs hanging down.
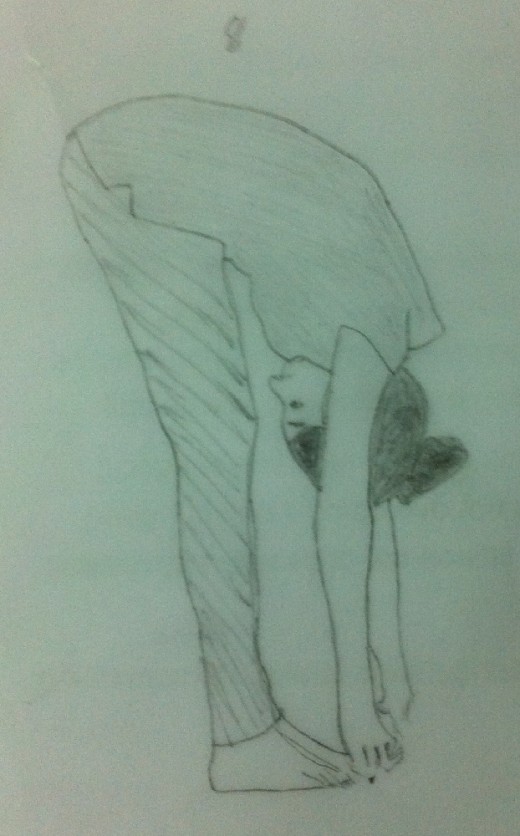
The patient raises both the upper limbs forwards and upwards simultaneously until they reach the level of the head. He ‘breathes in’ along with the upward movement of the upper limbs. He ‘breathes in’ in such a way that the inspiration stops as soon as the upper limbs reach the maximum stretched position. Hold the upper limbs in that position for 3 seconds. Hold the breath also for 3 seconds. Now, with the upper limbs in the stretched out position, bend the body and try to touch the ground without bending the knees. While bending down, he ‘breathes out’ along with the bending movement of the body. He ‘breathes out’ in such a way that the expiration stops as soon as the maximum bending movement of the body is achieved. Repeat the exercise 5 times, twice a day. Heart patients, B.P. patients and pregnant women to avoid this exercise.
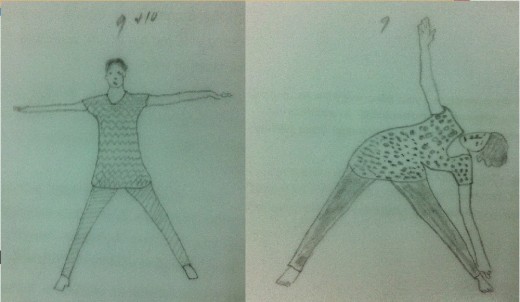
9. Starting Position-The patient stands relaxed with both feet by the sides about 3 feet apart with the upper limbs hanging down. Stretch out both the upper limbs sideways until they are in line with the shoulders.
Now bend the body towards left and try to touch the outer border of the left foot with the left hand. He ‘breathes in’ along with the leftward and bending movement of the body. He ‘breathes in’ in such a way that the inspiration stops as soon as the maximum bending movement is achieved. Hold the body in that position for 3 seconds. Hold the breath also for 3 seconds. Now bring back the body to the starting position with the upper limbs stretched out and in line with the shoulders. While bringing back the body to the starting position, he ‘breathes out’ along with the movement of the body. He ‘breathes out’ in such a way that the expiration stops as soon as the body comes back to the starting position. Do the exercise in the other direction also, alternately. Repeat the exercise 5 times, twice a day.
Heart patients, B.P. patients and pregnant women to avoid this exercise.
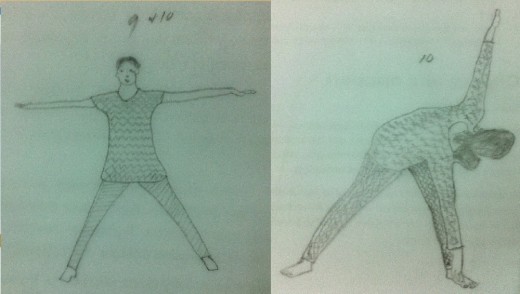
10. Starting Position- The patient stands relaxed with both feet by the sides about 3 feet apart and the upper limbs hanging down. Stretch out both the upper limbs sideways simultaneously until they are in line with the shoulders.
Now bend the body towards left and try to touch the inner border of the left foot with the right hand. He ‘breathes in’ along with the leftward and bending movement of the body. He ‘breathes in’ in such a way that inspiration stops as soon as the maximum bending movement is achieved. Hold the body in that maximum stretched position for 3 seconds. Hold the breath also for 3 seconds. Now bring back the body to the starting position with the upper limbs stretched out and in line with the shoulders. While bringing back the body to the starting position, he ‘breathes out’ along with the movement of the body. He ‘breathes out’ in such a way that the expiration stops as soon as the body come back to the starting position. Do the exercise in the other direction also, alternately. Repeat the exercise 5 times, twice a day.
Heart patients, B.P. patients and pregnant women to avoid this exercise.
More
Related
 - Upper limb")
Frenkel’s Exercises for Ataxic Conditions (Cervical Spondylotic Myelopathy) - Upper limb

Neck Pain #7 – Cervical Spondylosis – Treatment 3 - Mobilization Exercises
-
Frenkel’s Exercises for Ataxic Conditions (Cervical Spondylotic Myelopathy) - Lower limb

How to get Rid of Flabby Arms Fast – Steps to Lose Upper Arm Fat

Examples of Isokinetic Exercises


