Top 5 Yoga Breathing Exercises and Their Benefits

Breathing correctly, while essential to our health, also contributes towards our overall growth. As such, understanding the importance of breathing in yoga is imperative - our breath functions on two levels of the body: strengthening the physical body and charging our energy. This ensures that there is a perfect balance of physical as well as mental well-being. Many yoga schools in Rishikesh, the world capital of Yoga, include these breathing exercises in their 200 Hour Yoga Teacher Training in Rishikesh. Listed below are the top 5 yoga breathing exercises for beginners, step by step instructions on how to do them and their benefits -
1. Kapalabhati (Skull Cleanser):
An advanced yogic breathing technique, Kapalabhati is also known as ‘Skull-shining breath’. This exercise employs forced exhalation and cleanses, purifies and rejuvenates the body. It is also highly invigorating and stimulates the mind, boosting function and growth.
How to do:
- Sit on a hard surface with your spine erect to start with the process of Kapalbhati pranayama.
- You can either sit in a sukhasana (your legs crossed), Virasana (your legs bend and your shins tucked in under your thighs or on a chair while performing this pranayama.
- Place your hands on your knees with the palms facing up or you can place your hands one over the other in your lap for higher focus.
- Inhale air with both the nostrils.
- Exhale the air with forceful action and again breathe in.
- Continue this process for 20 minutes.
Benefits:
- Kapalbhati is one of the best pranayamas when it comes to balancing your chakras.
- It helps in improving your memory and concentration by energizing your brain cells with the consistent practice of pranayama.
- The regular practice of Kapalbhati can result in the burning of body fat, especially belly fat.
- It increases the blood supply to various parts of the body, resulting in effective blood circulation, improved metabolism and overall well-being.
- This pranayama is extremely helpful in improving the digestion process.
- It is an excellent practice to relax and de-stress your body on a daily basis.
2. Bhastrika (Breath of Fire ):
Bhastrika is a breathing exercise that gets its name from the bellows, a device that produces a strong air current and was used to fan fires. This is a very energetic practice where our lungs are moved in the same manner as a bellows. The yogis of old called this exercise the “Yoga breath of fire”.
How to do:
- Sit comfortably on the flat ground. People who can’t sit on the ground can sit on a chair and make sure that your spine is straight.
- Take a deep breath in through your nostrils and fill the lungs with air, then exhale with a hissing sound.
- Inhale deeply and exhale completely.
- Do 3 to 5 rounds.
Benefits:
- It is known to improve blood circulation and increase one’s appetite.
- It prevents heart-related diseases and keeps one’s lungs healthy.
- It calms the mind, improves one’s concentration power and relaxes the body.
- It also relieves stress, depression and hypertension.
- It cures arthritis, throat infection, asthma, obesity, headaches, migraine, gastric problems as well as neurological problems.

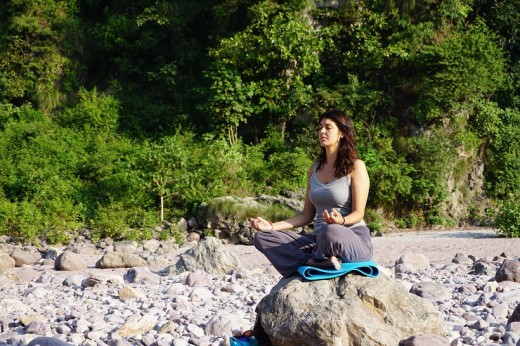
3. Sama Vritti Pranayama (Box breathing):
This is one of the most basic exercises of pranayama. Sama-vritti means equal ratio breathing and as such it focuses on the inhalation being the same length as the exhalation. This balance can be maintained by a mental count allowing you to do this exercise absolutely anywhere. It is known as a soothing, calming technique and can reduce anxiety and stress quickly.
How to do:
- Close your eyes. Breathe in through your nose, slowly while counting 1 to 4. Feel the air filling your lungs.
- Hold your breath inside and slowly count to 4 again. Do not to clamp your airways shut, simply avoid inhaling or exhaling for 4 counts.
- Slowly exhale to the count of 4.
- Hold the exhale for another 4 counts.
- Repeat these steps until you feel calm and centered.
Benefits:
- It relaxes one’s autonomic nervous system.
- It is also known to alleviate the stress levels in the body.
- It helps to focus your mind and remove distractions making it easier to focus and concentrate.
- It helps to center yourself and meditate.
4. Simha Pranayama (Lion’s breath):
Simhasana pranayama is a seated exercise in which the posture resembles that of a sitting lion. This exercise uses a strong breathing technique called lion’s breath. This technique is used to get rid of negativity and helps you tap into your inner strength and energy. It is a great way for seasoned and new yogis to access their inner power.
How to do:
- To practice this breath, come to kneel with your buttocks resting on your feet and your knees a little apart.
- Place your hands on the floor. Straighten your arms and extend your fingers.
- Inhale through your nose.
- Exhale strongly through the mouth, while making a "ha" sound. As you exhale, open your mouth wide and stick your tongue as far out as possible towards your chin.
- While exhaling, bring your drishti (internal focus) towards your third eye (center of your forehead) or the tip of your nose.
- Inhale, returning to a neutral face.
- Repeat 4-6 times.
Benefits:
- It boosts vitality and enhances circulation throughout the body.
- It fortifies your voice and promotes a healthy and open throat chakra (Visuddha).
- It tones the platysma muscle that controls the front of the throat.
- It relieves tension in the neck, jaw, chest and face.
- It provides headache relief and releases stress and fatigue.
- It enhances self-expression and increases confidence.
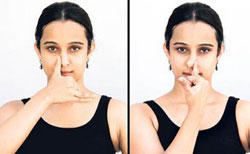
5. Nadi Shodhana (Alternate Nostril Breathing):
Nadi shodhana, also known as Anulom Vilom Pranayam is a simple technique that helps to clear the subtle energy channels (nadis) in the body. Also stylised as alternate nostril breathing, this technique employs the use of alternate nostrils to inhale and exhale and is a highly calming technique. This exercise perfectly showcases the importance of breathing in yoga as well.
How to do:
- Find a clean and calm place and sit on a mat in a comfortable posture.
- Keep your spinal cord straight, close your eyes and relax your body.
- Use only your right hand in Nadi Shodhana exercise. Only use the thumb, index and middle finger of the right hand. The last two fingers should be straight and connected to each other.
- Place your index finger and middle finger on your Agya Chakra (between the eyebrows).
- Now put your thumb upon your right nostril and inhale from the left nostril. After breathing completely in now exhale the from the same nostril.
- Similarly, using the last two fingers, close the left nostril and take a deep breath from the right nostril, and then release it from the right nostril.
- While doing this Kriya, focus on your breathing.
- During the practice, keep in mind that you have to switch the nostrils for every inhalation.
- After 4-5 minutes you can breathe out from the left nostril and finish the exercise.
Benefits:
- It supports clear and balanced respiratory channels and infuses the body with oxygen.
- It calms and rejuvenates the nervous system.
- It helps to cure respiratory allergies that cause hay fever, sneezing, or wheezing
- It clears and releases toxins and helps to balance hormones.
- It reduces stress and anxiety and fosters mental clarity and an alert mind.
- It enhances the ability to concentrate.
- It balances solar and lunar, masculine and feminine energies in the body.
Related

Understanding the Essential Role of Deep Breathing in Exercise

Yoga Breathing Routine by Baba Ramdev - Yoga Pranayama, Kapalbhati and Its Technics Explained

Yoga Posters

Top 5 Free Kindle Fire Exercise and Workout Apps: Top 5 Free Kindle Fire Health and Fitness Apps Reviewed

5-Minute Yoga for Every Body: Yoga for the Low Back


