Yoga for Relaxation | Three of the Best Restorative Yoga Poses

Though yoga serves many purposes, many beginning students want to use yoga for relaxation and relief from stress. Fortunately, some of the best restorative yoga poses can easily be practiced by beginners. Here are instructions for three easy yoga poses that use props to support the body, allowing one to relax, de-stress and receive the benefits of yoga asanas.

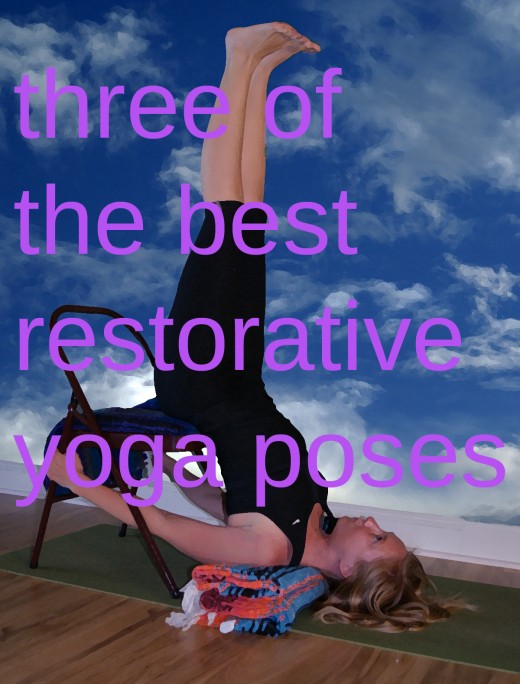
Sarvangasana - Shoulderstand with a Chair
Of the three poses shown, this one is the most adventurous for beginning yoga students. Chair shoulderstand may look challenging, but moving into the pose carefully is not difficult. Once you are there for a few minutes, it may become one of your favorite yoga asanas.
For this version of supported sarvangasana, you need a stable chair. A metal folding chair works best; many big box home good stores sell them for 10 - 15 dollars if you don’t already have one. Place a blanket on the chair seat for cushioning and two folded yoga blankets at the base of the front chair legs. (See photo.)

Step 1) Sit sideways in the chair; swing around to sit backwards with your legs hooked over the backrest on the chair.
Step 2) Begin to lean back, and walk your hands down the side chair supports. As you lean further back, lift your head slightly to tuck your chin toward your chest. Keep walking your hands lower on the sides of the chair. Your shoulders will reach the blankets, even if seems like they will never get there. Depending on how tall you are, you may need to partially unhook your legs so that your shoulders can descend all the way to the blankets.

Step 3) Once your shoulders are resting on the blankets, let your head rest on the floor, and, if possible, thread your arms between the chair legs. Straighten your legs toward the ceiling; the back of your waist will be resting on the edge of the chair seat.
When it’s time to come out of the pose, simply let yourself slide away from the chair; take the blankets out from under you, and let your lower legs rest on the chair seat with your back on the floor.
For many people, there is a fear factor associated with the upside down and backward positions required to get into this pose. Have a friend spot you or practice the pose with a yoga teacher that knows this setup. (It is common in Iyengar yoga classes.) Once you have done the pose a couple of times, getting into it will be much easier.
Chair shoulderstand allows you to stay in the pose much longer than with the unsupported version, making it an excellent restorative yoga pose. The effort required will be less, and you will still receive the calming effects of this yoga pose.
Setu Bandha - Bridge Pose with a Bolster
This is the easiest version of bridge pose. It allows you to stay there several minutes, opening the chest and quieting the mind. Setu bandha is an important pose in almost all restorative yoga sequences. For this version, you will need a bolster and a yoga block. If you don’t have a bolster, several yoga blankets will work.

Sit on the bolster and lean back, using your arms for support as needed, until your shoulders reach the floor. Your shoulders must be firmly resting on the floor - slide back on the bolster as needed until they get there - but as close to the end of the bolster as possible so that your chest is lifted and open.
Then, straighten your legs and rest your lower legs or feet on a block out beyond the other end of the bolster. If your lower back is noticeably uncomfortable in this pose, add height to your foot rest. Your arms can angle away from the bolster with your palms toward the ceiling, but relaxed.
To come out of supported bridge pose, bring your feet to the floor, and carefully roll off the bolster to your right side.

Viparita Karani - Legs Up The Wall Pose
Perhaps the best known restorative yoga pose (other than savasana), this is simple asana is a nice way to de-stress the mind and relax the body. Viparita karani (commonly called legs-up-the-wall pose) is accessible to almost everyone and does not require any special flexibility or prior yoga experience. It is a particularly good yoga pose to rest the legs and/or as yoga for mind/body restoration after a day on your feet.
Using a bolster or folded blankets for viparita karani will elevate the legs further and reduce any concerns about hamstring flexibility. Though not required, the use of these props should enhance the overall experience.
Legs-up-the-wall pose can be a little awkward to get into. Follow the instructions exactly and you will find your transition to tranquility is easy, graceful and elegant!
Step 1) Place a bolster or folded blankets parallel to the wall. If you use blankets, they should be firm. Your support can be from 4” - 6” high, 8” - 12” wide and a couple of feet long. Leave about 4” - 6” of space between your bolster/blankets and the wall. The more flexible you are, the smaller this space can be. If you place a yoga mat under the support there will be less slipping and sliding.
Step 2) Place your outer right hip on the top right side of your blankets or bolster. The best way is to pretend that you are “sitting” on the wall. This means your buttocks are on the wall, your right side hip is on the top of the blankets and your right side is on the floor, perpendicular to the wall. Resist the temptation to prop yourself up with your arms.

Step 3) Roll over onto your back. If you placed yourself correctly in Step 2, your hips will be centered on your bolster, your legs will be up the wall and your upper back and the back of your head will be resting on the floor. Angle your arms slightly out to either side, palms facing up and relaxed.
It is not necessary for your sit bones or buttocks to be touching the wall. A little space there is fine. the bolster/blanket support should be under the top of your sacrum and lower back, even as high as the kidneys or lowest ribs. The base of the buttocks can release into the gap between the support and the wall, as if the root of the thigh bones were to relax downward, allowing them to settle. The legs should be gently brought together, not spread apart.

When you are ready to come out of viparita karani, bend your knees in toward your chest and roll over to your right side. Rest there for several breaths and then slowly sit back up.
After you have practiced it a few times you may find that viparita karani has become your favorite yoga asana for rest, relaxation and restoration of the mind and body.
General Tips and Suggestions
Stay in each of these poses for at least three minutes, initially. As you become more accustomed to each of the asanas, increase the time you stay there. Five minutes is a good target, but you can certainly stay for seven to ten minutes.
In restorative poses it is easy for the mind to wander, jumping from thought to thought; practice detaching from that tendency. Allow the mind to become quiet. Gently bring your awareness to the breath. Do not try to change the breath; just observe it. You may find that it becomes relaxed and even. Allow the breath and your attention to gently spread throughout the inner body.
You can practice these poses on their own or as part of a longer restorative yoga sequence. Though doing restorative yoga poses with props is an important part of an overall practice, you should also practice more active yoga sequences that include unsupported standing poses, twists, backbends, inversions and seated poses. Let yoga for relaxation come at the end of an active sequence, as a reward for a week of working on more challenging poses or when you need to destress after a particularly difficult day.
All photos and illustrations are by the author and may not be reused without permission.

© 2014 chet thomas
Related

Vishnu Mudra Benefits Wellness: Busy People Manage Stress and Find Life Balance with Yoga, Meditation and Mindfulness

How to Perform the Yoga Chair Pose or Utkatasana

How to Perform the Locust Yoga Pose to Strengthen Buttock Muscles
")
Yoga Poses for Abs (With Pictures)

5-Minute Yoga For Every Body: Grounding and Calming Yoga


