How to Use a Blood Pressure Cuff

Choosing Your Stethoscope

Taking your blood pressure (BP) is an important measurement of the health of your heart and blood vessels. The high pressure exerted by the pumping and resting of the heart muscle and valves reveals the potential damage to cardiac structures that may occur overtime. If your physician has instructed you take your BP on a regular schedule, or before you take your medication, these instructions can help you achieve confidence in your skills with accurate results. Please read all of the instructions before attempting to take your blood pressure.
Selecting and Testing the Stethoscope
Inexpensive and lightweight stethoscopes are perfect for taking BP. The flat bell and diagram fit easily under the arm cuff and provide soft plastic ear pieces that fit well in the ears and block out other noises. Ensure the plastic tubing of the stethoscope is well connected to the arms and properly connected to the bell (the part that is placed over the heart to hear the heartbeat). Inspect under the bell to ensure the plastic diagram is properly inserted. Make sure the room is quiet and don the stethoscope to test that it's working properly. Place the diaphragm of the bell over your chest to make sure you can hear your heart beat.
Choosing Your BP Cuff

Choose a BP Cuff that Fits Well
The most accurate and basic of BP cuffs is the sphygmomanometer, or simply the arm BP cuff. The arm cuff wraps around the upper arm and is secured with Velcro. Ensure you use the right size BP cuff that fits your arm well. BP cuffs sizes are determined by the size of the arm: pediatric, small, medium, large and extra large.
Get the Right Size Arm Cuff for Accurate Readings
Make sure the arm cuff is the right size and wraps around the upper arm in a snug fashion. If the cuff is too tight, you will get a very high reading. If the cuff is too loose, you may get a very low reading. The best way to ensure a good fit is if you are able to barley get two fingers under the cuff at the bend of the arm.
Practice Using the BP Cuff
If you’ve never taken your BP before, it’s a good idea to practice using the bulb and valve with one hand before starting. The arm cuff has a bulb that is pumped to fill the BP cuff with air. The bulb includes a valve that opens and closes to let the air out or stop the air from escaping.
- Practice pumping the bulb in one hand and filling the BP cuff
- With the index finger and thumb on the same hand, open the valve and slowly release the air
Notice the needle on the gage moves and responds to the pressure of the air in the BP cuff, this is how the BP cuff measures blood pressure.
Take Your Blood Pressure
Some physicians prefer that you use your left arm for BP readings, because the heart is on the left side of the body. If you are taking your own, and are left-handed, you may not be able to take it on the left and that is fine. Be sure to inform your doctor that your readings are taken on the right arm.
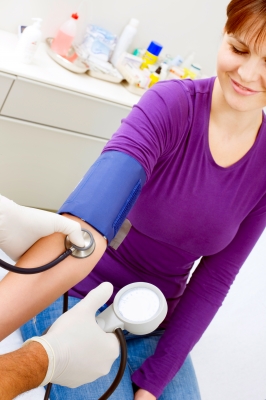
Apply the Arm Cuff on the Upper Arm
Make sure there is no air in the cuff and wrap it around the upper arm. Ensure that the bend of the arm is not covered by the cuff. Most BP cuffs mark the stethoscope placement with a white line. Be sure that line is placed over the inner part in the bend of the arm; the same area where blood is usually drawn by the nurse.
Position the Gauge of the BP Cuff
The gauge is sensitive to any movement and has to be free from interference. If the gauge is connected to the BP cuff, remove it and steady it on a solid surface or hang it from a place that is free of vibrations. Make sure you can see the needle and the numbers on the gauge clearly from where you are sitting.
Place the Stethoscope on the Bend of the Arm
Gently put the stethoscope into your ears and place the diaphragm on the bend of the arm. Ensure the head of the stethoscope is flush with the skin, but don’t push down too hard or you may not hear anything.
Pump the Bulb and Fill the BP Cuff with Air
As you fill the BP cuff with air, the needle on the gauge will rise. Pump enough air to reach about 30 points higher than your usual blood pressure. If you create more pressure than needed, you may constrict your circulation and get an inaccurate reading. If your BP is usually 140/90, pump up the gauge until the needle is on 160.
Look, Listen and Read the Gauge
“Crack” the valve and allow air to slowly escape. As the cuff deflates, watch the needle on the gauge and listen for the first sound of a “heart beat” or a thumping sound. The number the needle is at the moment the thumping sound occurred is your systolic BP, or the top number.
Now, Listen for the Bottom Number, or Diastolic BP
Next, listen and watch the needle for the bottom number to complete your BP reading. Watch the needle, and when the thumping sound disappears, this is your bottom number, or diastolic BP reading. If you miss the readings, it’s okay to pump back up and repeat the procedure. However, if you repeat the process more than 3 times, you may get a wrong reading. So, remove the cuff and wait a few minutes before trying again.
Alternatives to Basic Manual Cuffs
Less accurate but much more convenient electronic BP cuffs are available for taking BP in the arm and wrist. The same rule applies for the fitting of the arm cuff and the sizes run exactly the same. For people who cannot tolerate or are medically restricted by arm cuffs, the wrist BP cuff is an electronic device that can measure BP in a convenient manner. Ensure batteries are charged and always have extras on hand. The electronic BP machine also measures heart rate as well as BP.
Overview of Taking Your Own BP
Manual BP techniques can be tricky to learn but the accuracy is unbeatable. Using electronic devices to take BP are less accurate but much more convenient. For those who prefer the manual cuff and stethoscope, practice makes perfect. Always observe safety when performing medical techniques and never leave a BP cuff on so long that circulation is impaired or damage to the tissues ensues. It is important to be involved in your own healthcare plan. Always consult your physician before performing any medical or health-related procedures.