Easy Christmas Ornament

A Great Project for Young Children
At our church, we had a children's Christmas event that included story telling, games, crafts and more. It was loads of fun!
I had the pleasure of helping with the craft, and this is the project we did. It is easy enough for children as young as 4 or 5, the older children had fun with it as well, and it worked out just about perfect for the 20 minute time slot we had. It can also be easily modified for skill levels.
Aside from being a quick and easy craft, it's a great way to use objects to help children learn about the Christmas story.

Materials Used
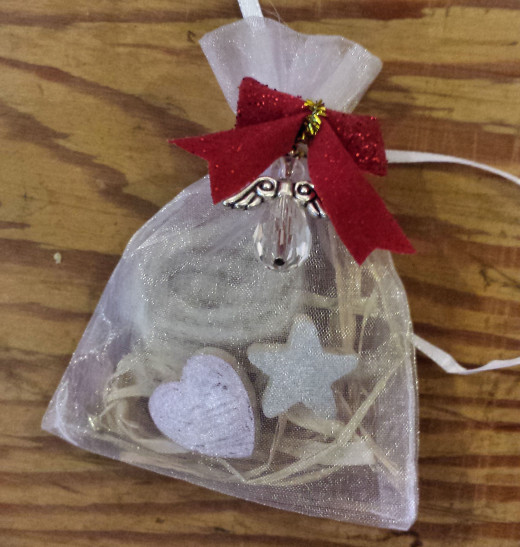
- Small, transparent drawstring bag. These can be found in the wedding section of craft stores in a number of colours. White allows for most visibility of the objects inside.
- Wool. If you can get a bit of raw, undyed wool, that would be great, but even a cotton ball or stuffing will work.
- Hay or straw. If you have access to the real thing, go for it! In our project, we used raffia as a substitute.
- Star. We used small wooden stars, which the children could then colour or decorate themselves. Star beads, miniature star decorations, foam, felt or "gem" stars could also be used.
- Heart. We used wooden hearts similar to the stars. Again, hearts of other materials can be used. Ideally, choose something that children can decorate themselves.
- An angel. In our project, our angels were bead sets of 10 to a string. These were separated and each angel, made up of a pear shaped bead for the body, tiny silver wings, a round bead for the head and a small, flat bead for the halo, were threaded onto 2 inch head pins first. The head of the pin acted as a stopper at the bottom, while the top was twisted to create a ring above the halo, then the excess was trimmed with wire cutters.
- Gold. Of course, the real thing is too expensive, so we used beads as substitutes. We found beads that resembled hammered gold.
- Frankencense and Myrrh. Real frakencense and myrrh both come from trees. Their oil is used for their fragrance, and the resin can be burned as incense. For our project, we used beads that resembled lumps of resin (amber glass for one, citrine for another). Small pieces of wood could also be used for one or both.
- Small decorative bow. In the sample made, a type of miniature bow with a metallic pipe cleaner tying the centre was used. The angel was threaded onto both ends of the pipe cleaner, before it was attached to the bag. The wire was rather short, so for the children, we used bows with a different type of wire and longer ends. After the bag is drawn closed, the wires of the bow can be wrapped around the bag under the drawstring, which will help stabalize it.
- Small wooden "boy" game piece. These are for the children to draw, colour and decorate to look like the baby Jesus.
- Optional: Markers, paints, glitter glue, stick-on gems, etc. If time is a concern, markers and stick on items are best for the children to use to decorate. If there is time to allow objects to dry, paints and glues can be used. For the sample bag (which did not have a baby Jesus in it, as there were not enough to go around), the heart and star were both painted with metallic paint markers on one side.
- Miniature bows, narrow ribbons, embroidery thread and needles, miniature decorations, etc. The outside of the bag can be decorated however the child wants; colourful bows can be added, colourful ribbons tied on, tiny decorations can be attached, or older children can stitch designs on the bag itself (before anything is put in it!). Whatever is used, try to make sure the objects inside the bag can still be seen.

Advance preparation
If these are for a group project, prepare ahead of time by putting one of everything needed for a decoration into a 3 oz drinking up for each child. We found the children loved that, and the younger ones enjoyed colouring their cups as much as the wooden pieces!

What it all means
We printed up cards for the children to take home with their decoration, that listed some of the items used, and why they were there. The children had had the Christmas story read to them earlier, so before we started on the craft, we took the time to talk to them about what they remembered from the story. This not only helped reinforce the story, but the tactile element of real objects they could hold and decorate made greater connections with the story.
The cards we made were printed on perforated business card paper, using MS Publisher. There are all sorts of free software programs that can be downloaded that allow you to create your own business cards and any one of them can be used. Publisher was chosen because of the clip art available.
When starting the craft, ask the children what they remember from the Christmas story, and find the objects that match.
- An angel: for those that announced the birth of our Saviour
- Wool: for the shepherds and their sheep who first heard the good news.
- A star: which lead the wise men to the newborn King.
- Hay: for the manger He lay in.
- Gold, Frankincense and Myrrh: precious gifts for a precious child.
- A heart: "For God so love the world, that he gave his only Son, that whoever believes in him should not perish but have eternal life: John 3:16
Going through the objects is a great time to talk to the children and give them a chance to ask questions.
A Special Reminder
Once the children have filled the drawstring bags and decorated to their hearts content, the draw strings can be used to hang the decoration on their tree, or anywhere they like. Every time they seem them, they will not only see a lovely decoration they made themselves, but they will see the objects inside, and remember that amazing event being celebrated: the birth of our Saviour.
Hand making decorations for your tree can become a wonderful family tradition. I hope this one will help make memories that will last for many years!
Do you and your family make your own Christmas decorations?
© 2014 AnnaMKB


