10 Great Valentine's Day Crafts for Kids

Valentine's Day should be a day about love and showing it to others. You could always go it a box of pre-made Valentine's from the store and write all of your children's classmate's names on them. But what fun is that, for you or your children? They could always sit quietly and make their own cards at the table too while you make dinner or do the dishes, and what about the cards they make at school?
The problem with all of these options though, is that each and every one of them is without the one person that they love the most... You! Kids love being able to create, whether that means draw, cut, paint, glue, color, or put together, and why not use this Valentine's Day as a great excuse for them to do so! And do it by their side. This is a great opportunity for you to also show your kids how much you care about them by spending some valuable quality time with them.
Not only will these projects spark their imaginations and let them express their creativity, but they will help to get everyone in the household in the right mood for a great day of love and joy. Take this time to talk to them about all of the people that they care about in their lives and what they can do to show them how much they care.
It could definitely be as simple as a card, but what if they were to create something even more special? Let's see how you and your kids can do some of these fun Valentine's Day crafts together.

Valentine's Heart Wreath
This is a great way to get your kids in the mood for Valentine's Day, have fun for a few hours, and have something to be proud of afterward. And what better way to show off their work than to hang it on the front door! Even my 4 year old son had a blast putting this together with me. It may take a few tries to get it just right, but who cares if it's perfect.
Materials:
- 2 paper towel rolls
- Scissors
- Red paint
- Paintbrushes
- Glue sticks
- Paperclips
- Long piece of ribbon
Instructions:
- The first thing you'll want to do is smash both of your paper towel rolls flat.
- An adult may need to help with this, but one folded side needs to be folded inward to create that heart shape desired. Then press down flat again.
- With scissors, the paper towel rolls should each be cut into 1/2 inch equal pieces all the way down.
- Next flatten out any pointed arches in your hearts to make them look more like hearts.
- This is the fun part! Now you get to color or paint each of your little hearts with your markers or paint and paint brushes.
- Make sure to allow all of your hearts to dry completely before continuing with the project.
- Lay your hearts out tip to top in two circles, going separate directions, one inside the other before securing them.
- Once you've achieved the look that you want, I suggest clipping them together with paperclips so that they stay together while you are gluing them.
- Finally, one at a time, unclip your hearts and either glue them together well with glue sticks, or dab them with hot glue, and then clip them back together again until the glue dries.
- Don't forget to glue both of your circles together.
- When your wreath is completely dry, remove all of the paperclips, wrap your piece of ribbon through the middle, and hang it on your door.

Birdseed Hearts
This is a craft that not only your kids will enjoy, but so will all of the birds in your backyard! We have done a number of these, in a few different ways, for each holiday to provide the birds in our neighborhood some food throughout the year. For bonus points: research the type of birds in your area and purchase birdseed specific to those types of birds.
Materials:
- 1 1/2 cups of birdseed
- 1 cup peanut butter
- Twine or string
- Scissors
- 6 heart-shaped cookie cutters
- Wax paper
Instructions:
- Start by pulling out a large mixing bowl and pouring your birdseed into it.
- Lay out one big piece of wax paper and lay your heart-shaped cookie cutters out on it.
- You may also want to go ahead and cut about four (4 inch) pieces of twine to be ready for your birdseed hearts.
- Pour your peanut butter into the mixing bowl.
- Feel free to mix your birdseed with a nice big spoon or even with your hands until everything is mixed.
- With a spoon, fill each of your cookie cutters half full, and then lay the ends of one folded piece of twine into each of your cookie cutters.
- Now finish filling each of your cookie cutters full of your birdseed mixture, smoothing over evenly across the top.
- Let them dry completely before hanging them outside for the birds.

Celery Paintings
This is one of my favorites! There's no reason to go buy expensive materials to make fun crafts around the house with your kids, especially when you have homemade paintbrushes around! And don't limit yourself to celery, tons of different fruits and vegetables, along with other household items, can be used as great paintbrushes.
Materials:
- 1-2 full heads of celery (depending on how many little hands you have)
- Red and green paint
- Paintbrushes
- Fun paper to paint on
Instructions:
- This will probably be the easiest project for your kids to do.
- Start by bundling your celery with rubber bands, tight enough so that when you cut them, they will stay together.
- Cut your heads of celery off about 4-5 inches from the bottom. This should give your children at least two great "paintbrushes" for the project.
- Prepare bowls of red paint for them to dip their celery in and let them go.
- If you want beautiful tulip pictures, like in the example, you will also want to prepare some green paint and paintbrushes for them.
- They can either paint the tulip stems before or after having fun with the red paint and celery.

Valentine's Party Shirts
This is a cute idea for any and every holiday. But how cute would this be for a classroom of students for a Valentine's Day party?! You could buy t-shirts in bulk, or ask all of the students to bring t-shirts to school for painting. This would make a great homeschool project, or something for a much larger group to do. Don't be afraid to get creative.
Materials:
- A t-shirt (preferably in red, pink or white)
- Freezer paper
- Scissors
- An Iron
- Fabric spray paint (in a color other than your t-shirt)
Instructions:
- First decide what kind of design you would like on your t-shirt. Do you want rectangles with hearts cut out, like in the example? Hearts? Heart shapes with hearts cut out?
- Whatever your decide, prepare your freezer paper likewise. I really liked the idea of the rectangles with hearts cut out.
- In that case, cut out small rectangles. Fold them in half, and cut a heart shape out of the middle.
- The reason freezer paper is necessary, is because it has a waxy side and a non-waxy side. Once the shape is cut out, you can simply iron your shape directly onto your t-shirt.
- If you would prefer to simply lay regular paper out on your t-shirt and spray paint it without ironing it down, that's okay too.
- Spray your t-shirt the way you would like, let it dry, and then remove your shapes. Voila!
Stained Glass Hearts
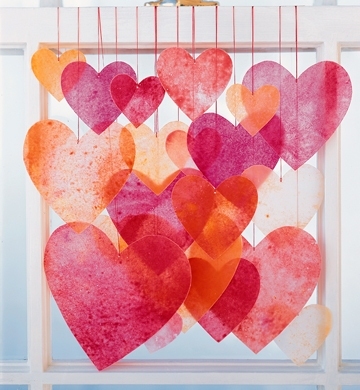
These are very beautiful to hang in the kitchen window and remember the real meaning of Valentine's Day! We like to tape them up in all of the windows of the house, and even use them as gifts for friends, family and neighbors to show them we care. My son loves all of the various materials that go into this craft, and of course, being able to use scissors!
Materials:
- Red, pink, and white tissue paper
- Clear contact paper
- Scissors
- Single hole punch
- String or thin ribbon
Instructions:
- This one is also a lot of fun!
- Start by unrolling your clear contact paper and cutting it off about the height of your tissue paper so that you can layer tissue paper across it.
- Pull the paper off of your contact paper to reveal the sticky side.
- One at a time, layer your tissue paper across so that the entire paper sticks to the contact paper.
- With your scissors, feel free to cut heart shapes out of your tissue paper/contact paper combo.
- Punch a small hole in the top of each heart and string your ribbon through.
- Hang each in a window as a collection of tissue paper "stained glass" hearts.
- Enjoy!

Valentine's Tic Tac Toe
Why do crafts just have to be limited to something you can hang on the wall? They don't! Not only is this going to be fun on Valentine's Day, but your kids can enjoy this game all year long. You might even want to box it up with your holiday decor and pull it out for more fun next Valentine's Day. Make it a tradition!
Materials:
- One piece of red poster board
- Black marker
- Red and pink felt (3 sheets of each color)
- Hot glue gun
- Bag of dried beans
Instructions:
- You will want to start by cutting a huge heart out of your red poster board, as large as you can get it.
- If you need to fold your poster board in half to do this, go for it!
- Next you'll want to draw out your TicTacToe board on the front of your poster board heart.
- To do this, you'll need to draw two horizontal and two vertical lines with your black marker. I suggest using a pencil first.
- Now let's get started on your bean bags.
- Fold each of your felt squares in half width wise.
- Because they are hard to fold again, I'm going to suggest that you cut your folded felt in half. You should be able to get four felt hearts out of every one felt square.
- This is where an adult should get involved. To make it easier, just hot glue every two hearts together around the edges, leaving a hole in one side.
- When your hearts have dried, have your kids fill each pocket with dried beans to make their bean bags.
- Now you can hot glue the last little bit on each heart bean bag together to seal them.
- Have fun!
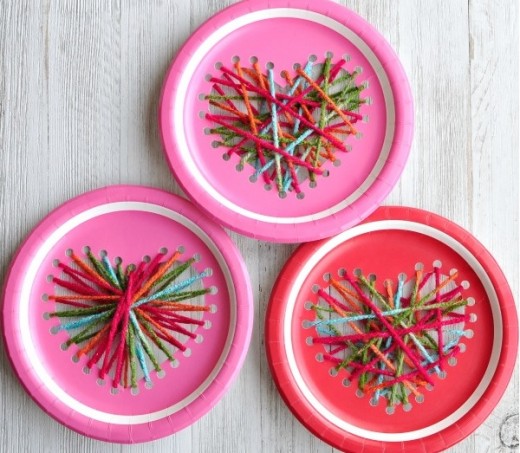
Paper Plate Yarn Hearts
This is a new skill for my son. Not only do you have to cut a heart shape out of the middle of your plate, and punch holes all around the heart, but them you have to weave the yarn onto your shape. This craft may be just a bit harder than some of your kid's abilities. If you don't have an older child to help, this one may need a lot of adult help.
Materials:
- Paper plates
- A pencil
- Scissors
- A hole punch
- Yarn
Instructions:
- If you are starting with a white plate, I suggest coloring or painting it first.
- Then turn it over on the back and draw a heart right in the middle of the plate.
- Using scissors, cut out the heart shape.
- Next, use your hole punch to punch separate holes all around your heart shaped hole in the plate.
- Finally, tie a piece of yarn into one hole and weave the yarn back and forth through all of the holes you made.
- To finish it off, tie the end of your yarn to the last remaining hole when you're finished weaving.

Valentine's Tie Dye Heart Banner
This one is fun. Both of my kids love markers and water. To find a craft that includes both is a real treat! This is a pretty messy one, so I highly recommend using washable markers, and protecting your kids clothing during the craft. But this will definitely be one they won't forget.
Materials:
- Cookie sheet
- Pieces of white paper
- Napkins
- Markers
- Water
- Scissors
- Hot glue
- Ribbon
Instructions:
- In your cookie sheet, to keep the mess to a minimum, lay a piece of white paper, then a napkin.
- Let your kids color the napkin with their markers. They can color anything they want, but the more color, the better the result will be.
- Now let them drizzle water over the napkin, making sure the whole thing is damp, not super wet.
- Lay another piece of white paper over the top and press down. When you peel the top paper up, it will be printed with tie dye colors, and so will the bottom piece of paper.
- You can do another press with the same napkin or start all over again.
- When the papers are dry, cut out your hearts. They can be strung into a banner, taped into the window, or anything else you choose.
- To make a banner, hot glue your hearts in regular intervals onto your ribbon.

Paper Plate Heart Suncatchers
For Valentine's Day, we find any excuse to do a fun craft together. Paper plates and watercolors seem to be the base of many of our fun crafts simply because they are so inexpensive to get ahold of. We like this particular craft because we can hang them from our ceiling fans or chandeliers and see the light shining through the beads all day long. They are really beautiful.
Materials:
- Paper Plates
- Watercolors
- Paintbrushes
- A pencil
- Clear contact paper
- Scissors
- Beads
Instructions:
- Start by painting your paper plates with watercolors and let them dry.
- On the back of your plates, draw a heart in the middle and cut it out.
- Now cut circle of contact paper just bigger than the heart on your plates.
- Peel the paper off the back and stick one circle to the back of each plate, over the heart shaped hole.
- On the front, sprinkle beads over the contact paper and press down.

Whatever crafts you decide to do with your kids for Valentine's Day, make sure they're memorable. Hang them on the wall, stick them on the refrigerator, display them on your dinner table, or even hang them on your front door.
Doing crafts together bring families together, gets everyone in the holiday mood, and gives you wonderful decorations to give your home a makeover for the holidays. You can bring these crafts out time and time again over the years to remember your times together and all of your past holidays.
On great tip is to find the best deals on craft supplies, like the beginning of the school year, but don't be afraid to peruse thrift stores or craft recycling stores for great deals. There's no reason you have to spend a great deal of money on craft supplies to do some of these fun crafts. And save all of your scraps. We always find fun ways to use them in our house.
For some more great ideas for Valentine's Day fun, check out my article on 17 Delicious Valentine’s Day Treats to Make With Your Kids. Have fun!
© 2014 Victoria Van Ness

