How To Make A 3D Pop-Up Tabletop Christmas Tree


Create a Cute 3D Pop-up Tabletop Christmas Tree
This is an easy and fun craft to make at Christmas time. You can make this project with your kids, just make sure to use the hot glue gun when it's needed. Or use a strong craft glue instead of the hot glue.
If you like to craft and decorate around Christmas, this tree is for you. I love this time of year, it's fun to decorate and entertain your family and friends. It's also fun to make your own decorations, like this tree. The Christmas tree is one of the most well known symbols of this time of year, so it's a fitting craft theme.
In this step by step tutorial, you will learn a quick and simple way to decorate your table top. Read through the entire page so you know what you will need, and what you will be doing. If you are going to create this tree with your kids, explain it to them.
I always loved to make crafts with my kids. We were making decorations and card, plus we were having lots of fun. We would talk endlessly while we completed our projects. We bonded over those sweet but simple projects.
Now let's get to crafting!
Read over the step by step directions to make a 3D Christmas tree so you know what materials you need and to make sure you understand what you need to do.

Here's What You Will Need To Make A 3D Christmas Tree
Here are the supplies you will need to make a 3D Christmas Tree:
- Unused Christmas Wrapping Paper
- A Piece Of Cardboard
- Yellow Construction Paper
- Scissors
- Hot Glue Gun And Glue Sticks

Step 1. Cut your cardboard into two equal sized pieces. Keep the other half for later.

Step 2. Fold one piece of cardboard in half. This is going to become the body of your Christmas tree.

Step 3. Cut your wrapping paper into rectangles. When you pick your wrapping paper make sure to have two or three different colors. Mix them up so your tree looks festive. Cut the rectangles in ascending sizes. You will need about 8 of them. Look at the pictures on this page to see what you are going to do. Then approximate the size of the rectangles you need. They should be proportioned to the size of the cardboard.

Step 4. Make small folds lengthwise in the rectangles. Look at the pictures and see what they should look like. (We used to do this with gum wrappers when I was younger!)

Step 5. Fold the zigzag folded paper strips in half making sure the ends meet. Make a fold in the middle by pressing when you are holding it with the ends meeting. Use your hot glue gun an put some glue the middle of your paper. This will seal the folded paper. It will look like a fan if you have done it correctly. These zigzags will become the layers of your Christmas tree.

Step 6. Start at the top and glue the smallest folded fan shaped paper to the middle part of the cardboard. Repeat this step with all your fan shaped wrapping paper until your page is full. Make sure to start at the to of the card with the smallest fan shape at the very top and continuing down the card with larger and larger fans. You can see how it should look in the picture.

Step 7. Now glue the other side of the fan shapes to the other side of the cardboard. Continue until all the layers are glued.

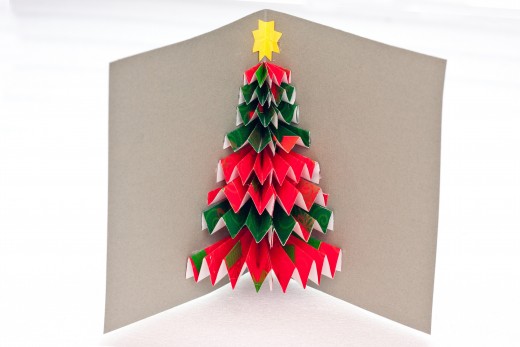
Step 8. Now take your yellow construction paper and cut a small star shape out. Glue the star at the very top of your Christmas card. Let the glue dry.

Step 9. Tada! (That's a quote from my granddaughter!) You are done. Display your 3D Christmas tree in your home where everyone can see how creative you are.
3D Christmas Tree Recap
Step 1. Cut the cardboard into two equal sized pieces. Take one to use now and keep the other half for later.
Step 2. Fold one piece of cardboard in half. This cardboard is going to become the body of your Christmas tree.
Step 3. Cut your wrapping paper into rectangles. When you pick your wrapping paper make sure to have two or three different colors. Mix them up so your tree looks festive. Cut the rectangles in ascending sizes. You will need about 8 of them. Look at the pictures on this page to see what you are going to do. Then approximate the size of the rectangles you need. They should be proportioned to the size of the cardboard.
Step 4. Make small folds lengthwise in all the rectangles. Check the photos to see what they should look like. We used to do this with gum wrappers when I was younger, we made long chains from them.
Step 5. Fold the fan shaped folded paper strips in half making sure the ends meet. Make a fold in the middle by pressing when you are holding it with the ends meeting. Use your hot glue gun an put some glue the middle of your paper. This will seal the folded paper. It will look like a fan if you have done it correctly. These fans will become the layers of your Christmas tree.
Step 6. Start at just about the top and glue the smallest folded fan shaped paper to the middle part of the cardboard. Repeat this step with all your fan shaped wrapping paper until your page is full. Make sure to start at the to of the card with the smallest fan shape at the very top and continuing down the card with larger and larger fans. You can see how it should look in the picture.
Step 8. Now take your yellow construction paper and cut a small star shape out. Glue the star at the very top of your Christmas card. Let the glue dry.
Step 9. Tada! (That's a quote from my granddaughter!) You are done. Display your 3D Christmas tree in your home where everyone can see how creative you are.
How to Make a 3D Paper Xmas Tree (DIY Tutorial)
3D Origami Christmas Tree Tutorial
Christmas Tree From Cardboard Rolls


