How to Make a Super Mario Nintendo Themed "1-Up Mushroom" Birthday Cake!
1-Up!
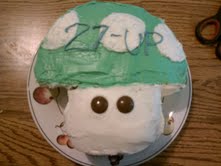
A Great Cake for Kids Young and Old
My kid sister's 27th birthday was last week. She's a professional counselor, but her heart is made out of a tiny 8-bit Nintendo implanted into the center her chest. Her ringtones are set to the sounds extra digital lives being obtained, and Yoshi swallowing things; her clothes usually feature giant animated amanitas with big, friendly eyes. So I set out on a journey through cyberspace to find a Mario-themed cake I could make for her birthday party, then I set out on a journey to my supermarket to figure out the easiest way possible to do this. Here's what I came up with:
Ingredients
- 1 box yellow cake mix, and ingredients listed on the box - usually eggs, oil, and water
- 2 32oz jars white (vanilla) frosting
- 1 bottle green food coloring
- 1 small bag dark colored round candy, like junior mints
- 1 small bag licorice strips, (for the text - optional. you could substitute dark-colored frosting)
- waxed paper
Instructions
- bake cake mix according to directions on box, dividing the mix to be baked into 2 8" shiny round metal cake pans
- let cakes completely cool on wire racks
- add 15-20 drops food coloring to 1 jar of frosting - you may add more or less to get the color you like
- transfer 1 round cake to serving plate rounded-side down. put 4 strips of waxed paper around the edge of serving plate to protect the plate from frosting. frost this cake with about 1/2 of the green frosting to within 1/4" of the edge.
- place 2nd cake on top of first, rounded-side up
- about 2/3 way towards the bottom of the cake, cut out two triangles from the bottom of the cake to form the shape of the mushroom. (to do this, cut in from the side of the cake about 1 1/2", then cut straight down. rounding the corners off creates a nice effect.)
- add a couple spoonfuls of green frosting to a sandwich bag and cut a small hole in the corner. use this to draw a straight green line about 2/3 way towards the bottom of the cake (where you made the cut for the triangles). frost entire cake above the line (sides included) with the remaining green frosting
- fill a sandwich bag about 1/2 full with white frosting and cut a small hole in the corner. use this to draw a white line right under the green line. frost the rest of the cake (sides included) below the line with white frosting
- smooth out frosting with a rubber spatula or the straight edge of a butter knife
- using the sandwich bag of white frosting, draw three big white circles evenly spaced across middle of green frosting (make partial circles where circles meet edge of the cake, as shown in the picture). fill in circles with icing from the bag, and smooth with knife
- using 2 pieces of dark round candies for eyes, place eyes about 1/4 way down the face
- add text with licorice strings or darkly colored frosting using the sandwich bag method above
- you may want to secure layers of cake together and licorice text with toothpicks so your masterpiece doesn't slide apart, especially if you're traveling with this cake

