How to Make Paper Snowflakes with Eight Points: Step By Step Instructions


Have you ever made paper snowflakes?
Everyone loves to make paper snowflakes
It rarely snowed where I grew up. We only saw the cold stuff once in my entire childhood. The only snowflakes I'm familiar with are the paper kind.
Do you remember making paper snowflakes in elementary school? I sure do! We made them throughout December. I think it was a way for the teachers to keep us occupied while we dreaming of Winter break.
Paper snowflakes are one of the easiest things you can make and still show a little creativity. I've seen various methods on the internet on how to make paper snowflakes. I'm going to walk you through the method I learned in school--and relearned from an an Army Veteran.
So, get out some colorful paper and a pair of scissors. We're going to make paper snowflakes!

Origami Paper Works the Best
The best paper for paper snowflakes is origami paper. Why? It's the right thickness and weight. It is thin enough for cutting, but it doesn't tear easily. Also, it doesn't leave marks from the folds.
You can also use color computer paper for larger snowflakes, but it will be difficult to use for smaller ones. The thicker the paper the more difficult it will be to cut through all the layers.
Do you have a bunch of wrapping paper scraps laying around? Most wrapping paper makes great paper snowflakes. Some wrapping paper is too thin and will tear. It also has a tendency to rub off at the folds. This will leave white wear marks on your snowflakes at the creases.
Tissue paper will not work. Although it is thin and easy to fold, you have to treat it gently. It will rip with very little effort.
Construction is a good option. However, it has the opposite problem of wrapping paper. It can be too thick. You'll notice that is it is harder to fold. When you try to cut your shapes, the scissors will have a hard time getting through the layers.
Test out different paper and see which works best. It's a great way to make decorations and get rid of some of the scraps that are too small to wrap presents with.
Let's Do It!
Step-By-Step Tutorial for Making Paper Snowflakes

Step 1: Start with a Square
For these snowflakes, start with a square. It doesn't have to be a perfect square. A little overhang won't hurt.
You can either use a template or fold your piece of paper to make a square and cut off the access. Either way works just fine.

Step 2: Fold into a large triangle
Now you're ready to make the first fold. Fold the square in half to make a large triangle. Don't worry if it isn't perfect, but try to get the edges close. If it's uneven, that's okay. The excess will be trimmed off later.

Step 3: Fold the triangle in half
Next, fold the triangle in half so that it is half the size that it was.
You now have a smaller triangle that has been folded from the larger one. If folded right, you'll have two open sides and one closed, folded over side.

Step 3: Fold the paper in half again
Fold the triangle in half one more time. This makes three triangle folds.

Step 5: Fold in half, small side towards big side
This fold confuses some. Take the short side of your triangle and fold over to meet the long side. You will have a small triangle leftover at the top of your paper.

Step 6: Cut off the top part
Your narrow triangle shape has an extra flap of paper at the top. Cut that piece off so the edge is even. Your triangle should look like the one in the example--a narrow, even triangle.

Step 7: Begin cutting the snowflake design
Now it's time to cut your snowflake! This is the fun part.
There is no correct way to cut a paper snowflake. There are two thing to keep in mind. One, don't cut completely across. Always leave an edge. Otherwise, you'll cut your snowflake right in half. Two, if you want a spiky snowflake, cut from the point on the "closed" side to the edge of the "open" fold side side. If you do it the other way (from the the open side to the closed side) you get what I call and opposite snowflake. You'll know it when you see it!
Be as creative as you like! Experiment with shapes, patterns, long cuts, and short cuts. Some people like to plan it out. I like to wing it and see what happens. I'm not all that great at figuring out what my cuts will look like when I open my paper snowflakes. It's kind of nice to be surprised.

Step 8: Cut some more
As you can see in the example, you can cut quite a bit off both sides of triangle. But, notice that I've always left just enough of an edge so that the snowflake stays together.
I've cut a spiky type of snowflake with a hole in the center. I wonder what this will look like in the end?

Step 9: Time to unfold it
If you've done you cuts right, your paper snowflake will hold together as you fold it. Be very careful if you are using thin paper like wrapping paper. It's easy to tear it when unfolding as some of the edges of the paper can be stuck together.
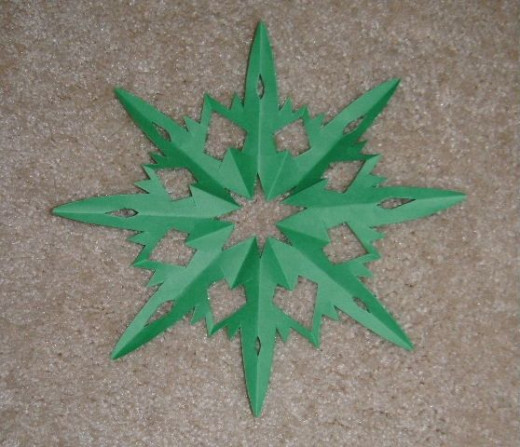
Now let's see the final product

Here's what my paper snowflake looks like. It's not as spiky as I wanted. Looks like I've got people holding hands around the outer edge. Most likely some strange pagan ritual :D Not exactly what I planned, but I like the final product. It kind of looks like a spider web.
Snowflake Creations
Paper snowflakes were big when I was a kid. We always made them in elementary school, then decorated the classroom with them during the winter months. Perhaps because it never snowed where I lived. This was the only way we'd see anything resembling the phenomena.
I've often wondered if this was something all school children did or if it was a California thing. How about you? Did you make paper snowflakes as a child?
Some of My Masterpieces: These are Some of My Snowflake Creations
Click thumbnail to view full-size


I Learned it from an Army Veteran
I remember making paper snowflakes in elementary school. By the time I started my first job when I was 17, I had forgotten all about them.
I had a co-worker who was in her late 50s. She was a no nonsense woman who had been in the army--and she acted like she still was! One day around the holidays, I found this very serious woman at her desk making paper snowflakes. It seemed so out of character!
I wanted to learn how to make them, but I was afraid to ask her. I was a bit intimidated by her. So, a few days later, I screwed up the courage to approach her. I was informed that there was only one proper way to make paper snowflakes and that she would show me.
I have been making paper snowflakes ever since. I've perfected my skills a bit and I've taught several others how to make them. My nieces and nephews all know how to fold paper the "proper" way--thanks to my elderly co-worker!
Get Inspired

To Pattern or Not to Pattern?
Do you cut yours from patterns or free form?
Patterns Can Give Predictable Results
You've seen them. Prefolded sheets that have the pattern drawn out so as to make a specific snowflake pattern. You know what you'll get when you unfold your paper and it is lovely. But, is it as much fun?
I've worked with patterns in the past. However, I prefer to create mine from my imagination. I like the idea of cutting away the little pieces and designing it as I go. Then, when I unfold it, I am surprised as everyone else.
I never know what my snowflakes will look like. For me, it's more interesting that way. However, it can be interesting to make a specific design especially if you are working on a project that uses multiple snowflakes. You can predict what it will look like in the end.
Patterns can be found on the internet. There are many pinned on Pinterest and websites for elementary school projects usually have pre-made sheets. Also, there are books that provide an array of origami designs you can work from.
Things to Do with Paper Snowflakes: What the Heck Do You Do with Them Once You've Made Them?
- Hang them on the wall.
- Tie yarn to them and hang them from the ceiling.
- String several on length of yarn and make paper chains.
- Use small snowflakes as gift tags.
- Make a gigantic snowflake and tack it to the door.
- Make small snowflakes and decorate the kitchen table.
- Staple several together in a circle and make a wreath.
- Attach them to strings, tie them to wire, and make a mobile.
I hope you enjoyed this page. After reading the instructions, did you make a paper snowflake?


