How to Make a Table of Contents in Microsoft Word

E-Books need a table of contents
If you read e-books, you know that a table of contents is a priceless tool. Whereas a physical book may not need a TOC for the reader, when you are in digital mode, the TOC is the only way to find the page you are looking for without having to constantly swipe through hundreds of pages.
Making a TOC in Microsoft Word is not difficult. Here are step by step instructions.
Create the table of contents
After you have finished your manuscript, insert a page break in between the dedication page and the beginning of the first chapter. Do not use manual returns, as these will not convert to e-book format. Instead, go to the top of your screen, click on Insert, and then Page Break.
Make a list of all your chapter headings. There is no need for page numbers as e-books don't convert the same across all different devices. On some readers, it may be 100 pages, on others, only 95. Therefore, do not even include page numbers on your document.
Once you have the TOC written up, left justify it and we are ready to begin.

Insert bookmarks
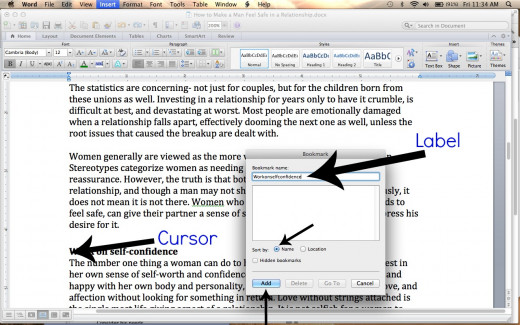
Now you want to insert a bookmark before the beginning of each chapter heading. Go to the first chapter and put your cursor right before the first letter of the header. Go up to Insert on the menu bar and choose Bookmark. A little box will pop up asking you to name the bookmark. I find that it is easiest to type in the heading (I make it one word with no spaces). Do not use characters or symbols as it will not accept them. Make sure the option Sort by Name is turned on. When you are finished, continue through all the headings until they have bookmarks.
*Note: You will not be able to see the bookmark, but it is there!
Creating the link in the table of contents
Once you have inserted all the appropriate bookmarks, it is time to create the links. First go back to the TOC page. Highlight the first chapter name, go to Insert, and choose Hyperlink. (The shortcut is control K).
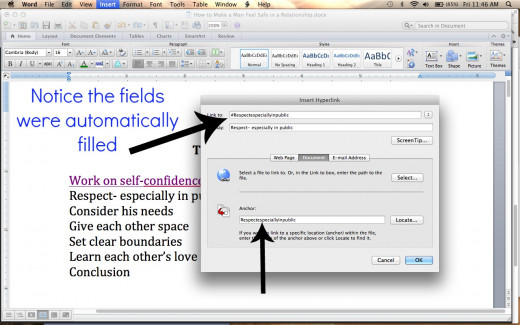
A box will pop up. First you want to locate where it says, Web Page, Document, or Email Address. Click on Document. When you click on it, you'll notice that the Locate button is now available. Click on it. Another box will pop up that says, Top of Document, Headings, and Bookmarks. Click on Bookmarks and it should give you a list of all the bookmarks you just made.
Find the bookmark that corresponds with the right heading and choose it. Click Okay. The smaller box will disappear and you will see the original pop up box with a bunch of fields entered in. Go ahead and click okay.
Your chapter heading in the TOC should now be underlined and blue. To test the link, simply click on it. If it takes you to the right chapter heading, then you have done it correctly!


Other options
Create a Beginning button at the end of the book
You can easily create a link at the end of your book that brings the reader back to the beginning of the book. Simply write the word Beginning, highlight it, and click Insert Hyperlink. Choose the Document option and when the bookmark box pops up, choose the option that says, At the Top of the Document.
Highlights and footnotes
If you have an especially long book, you may want to save some of your descriptions in an appendix. Any footnotes you have, list them at the end of the document. Then insert and label bookmarks in front of each description.
Go through your document and when a word appears in the paragraph that requires further explanation, simply highlight the word and insert the hyperlink. Follow the same steps as mentioned above.
Was this tutorial helpful?
Conclusion
This simple technique goes a long way in the reader's ability to navigate an e-book, which can be especially difficult if you are writing a handbook of sorts. You want them to be able to find the information they need quickly, and they will be more likely to buy your next book if you have taken the time to make these simple hyperlinks.

About the author
Julie DeNeen is a freelance writer, e-book author, and MS Word guru. She has taught many workshops on navigating the popular word program and hopes you can benefit from this tutorial.
Are you interested in Hubpages? Sign up and publish your first article today!
Related
")
How to Use Word Processing Software (NVQ Diploma in Business and Administration & IT)

The Devil’s Matrix: This World of Lies, Deceptions, Illusions & Distractions

How to Create Free Recipe Cards With a Template

How to Create Your Own Meme

IncludePicture: How To Mail Merge Graphics and Photos in Microsoft Word Step By Step


