4 Fabulous Flower Containers, For Inside Or Out

To build any these fabulous flower containers you will need the containers of your choice and some hanging baskets. I will take you through all the steps involved to create baskets and containers exactly the way you like. The container's and baskets were, assembled by me. It's easier than you think. Why pay someone money when you can do it yourself? I chose four different containers to make it easier to choose which one you want to make.
Here are some basic things to think about before we get started:
- Where are the flower Containers going to be placed?
- What are my favorite colors?
- What size and shape of containers do I want to use? Tall, medium, or small?
- Do I want a particular style, ex: Farmhouse, modern, antique or bright and sunny?
- How many plants do I need? The number of plants needed is determined, by the size of both the container and the size of the flowers.
- Do I need shade or sun loving plants? That is decided, according to what direction your sun comes from, will determine where the plants will go.
- Do I want to arrange a couple hanging baskets at the time?
- Do I want to bring them inside later?
- Am I going with all the same colors, ( monochromatic) or a variety?
- Do I want flowers that need more water or ones that like a dry climate? Some places have water restrictions, making plant's that need less water perfect.
All these questions are important, to make an interesting, and fabulous basket or container, for inside or outside your home. These can be placed in a greenhouse or garden shed. Whether it's on your deck or patio, you will be happy you saved the money and did it yourself.


Container #1, Similar But Different
These containers are similar but different. They flanked the driveway of our home. The steps and items you need to make these fabulous large containers are listed below. Let's get started with all the supplies you need and the process involved to make them. Add some interest by adding a pop of color to the front, Center.
Supplies List:
- Large or Xtra Large containers
- Small rock or pea gravel
- A couple of bags of container soil, the one with peat moss or vermiculite.
- 14 to 16 plants of your choice. I'll name the ones I used in these containers in the directions. Two of the plants should be tall, for the center part of the planter.
- Your choice of decor,( optional)
- Watering can
- Small gardening shovel and gloves
Directions for large- extra large planters:
Fill the containers with small rock or gravel. About 2 inches in the bottom for drainage. The rocks keep roots from rotting. Then add your container soil mix, about 3/4 of the container full. Pick about 14 plants for this planter. I used three petunias, four green vines of your choice. 1 Center spike or palm green. Three lobelias. Three geraniums. Depending on the size of your plants, you might need a few more. Start from the Center of your planter and work your way outwards. Use different types of plants and change to shorter plants as you reach the edge. Finish with the vines at outside edge. Make sure you consider the container as a circle that will be viewed, from all sides. Remember to loosen each pot and arrange them where you want them before planting them in. Make adjustments as needed. Now gently loosen the root bottoms and add more dirt, till container is almost full. Lightly press in around the roots and water in place. You can step back and enjoy your work. Think about all the money you saved doing it yourself. Place in the spot where you want them. If you like a bit of whimsy, add your choice of decor.
Types of Flowers And Greens Used
The two containers above have these flowers and greens in them:
- Palm leaf in the center.
- White and pink petunias around in a circle.
- A bright pink geranium. Placed in between the petunias.
- Blue lobelia near the outer edge
- White coepia at the edge
A Little Tip
When using a variety of flower plants,
Get ones that mature to different heights.
This will add interest and depth to your container.
Do You Garden?
Are You Making Fabulous Flower Containers?
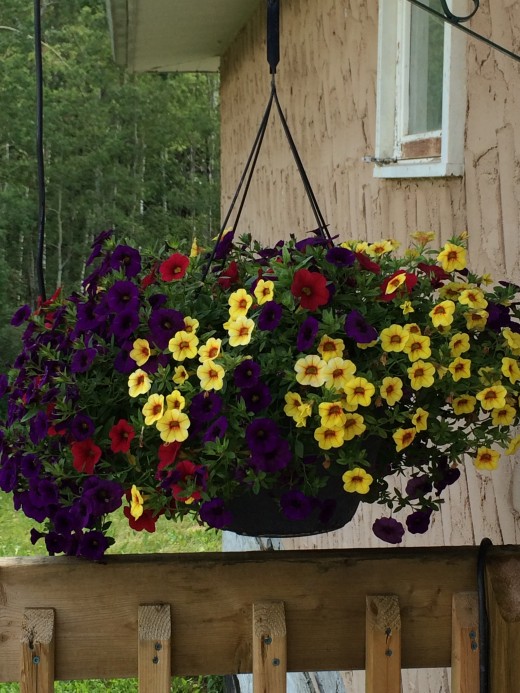
Colourful Million Bells
#2 Hanging Baskets & #3 Tea Cup Planter
Hanging baskets are quick and easy to build. They add color and interest to any space. They can be hung, on your patio or deck. Or from a railing or fence post. When I make hanging baskets, I like to make them in groups of two. I find they have the most impact when you use the same type of plant in a variety of different colors. For the best fullness, use four to five flower plants. The great thing about hanging baskets is you can also use them for some foods. Like strawberries and other vine plants.
The first photo is a flower called, million bells, in different colors. The hanging baskets can be, made for cheaper then you can buy them. The million bells basket only needs the container, small gravel in the bottom of the pot and add container soil about half way. Use four plants of the same type to make this basket. Gently press around the flower pot to loosen and lay in the basket. Do this until you have all four in place. Add more dirt till you fill the hanging basket and gently press around the base of each plant to secure the roots. Water each of the plants, and now you are done. Hang where you want them and let's move on to the table teacup container.
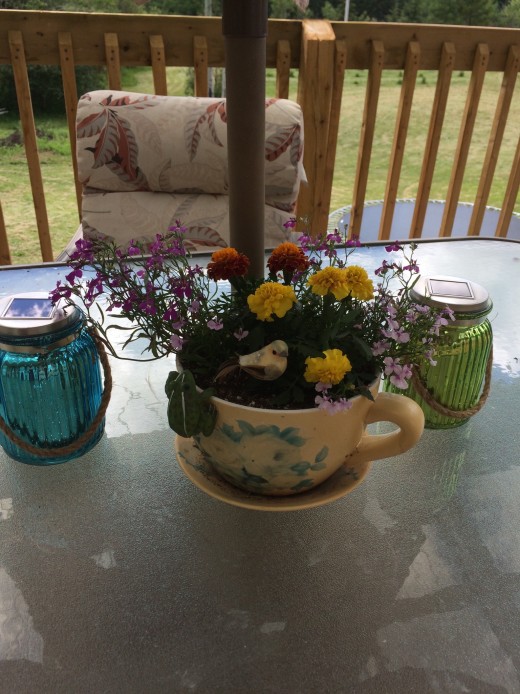
This teacup table container is fun to do. It's also a great way, to let children or grandchildren arrange a planter. My grandchildren helped me with this one. Let them pick out the flowers and have them follow along. I recommend you use a few plants that help keep the bugs away from your picnic table or patio. This teacup is also cute as a gift or in the greenhouse. Four plants, of your choice, work best here. It looks even better as it fills in. Don't forget to add a little piece of decor. Make it even better and use something you received as a gift. I used a bird that I bought at the dollar store. My grandson decided it needed the frog hanging off the edge. It doesn't have to be expensive to work. It can also be complete before your picnic or gathering.
Bright Pink Flower Arrangement
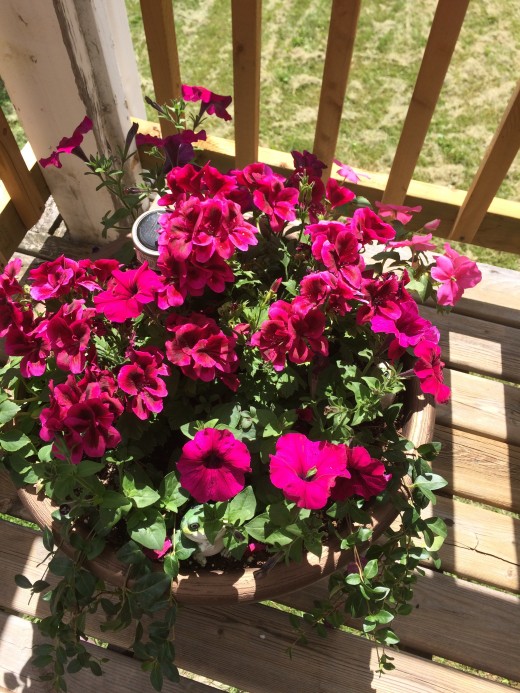
#4 Bright Monochromatic Color Container
Follow the basic container directions as above for this medium size planter. Only this time all the flowers will be the same color. The flowers used in this planter are, geraniums, petunias, and green vines. The color used here is called fuschia. You can use a goldfish plant or a lipstick plant. Another plant I like to use for trailers is ivy. I used one that grows best in my area. If you're not sure, then ask your local greenhouse or plant store. Most places are great at helping customers who aren't sure about what they are doing. The main difference is this time is your going to add a solar light to Center when you're done planting the container. Don't forget, to place the piece of decor that shows your personality. Go wild, making your deck or patio your own should be fun.
Monochromatic
It means the items used are all in the same color tone!
Here it's in reference to the flower container that is all the same color.
Other Flower Suggestions


More Flower Ideas For Containers
The last group of flowers was chosen to give you more choices of what plants and colors work well in containers. The first one is a dahlia; it would work in the monochromatic flower planter. This flower comes in a huge variety and size, check to see you're getting the one you want. There is information about each plant right on the container it comes in. Some have it on a stick in the dirt of the plant. The next photo is my petunias, growing wild. They are an annual plant, but they went to seed and now grow wild. My husband almost pulled them; he thought they were a weed. That's why I love flowers so much. Sometimes we get a surprise.They too have decided to grow wild. If you know about zones, you see it isn't supposed to happen here. We are only in zone 2-3. That's makes it hard to grow a lot of plants over the winter. My million bells are the same. This cute little flower looks great at the outer edge of the container, with vines coming out from underneath them.
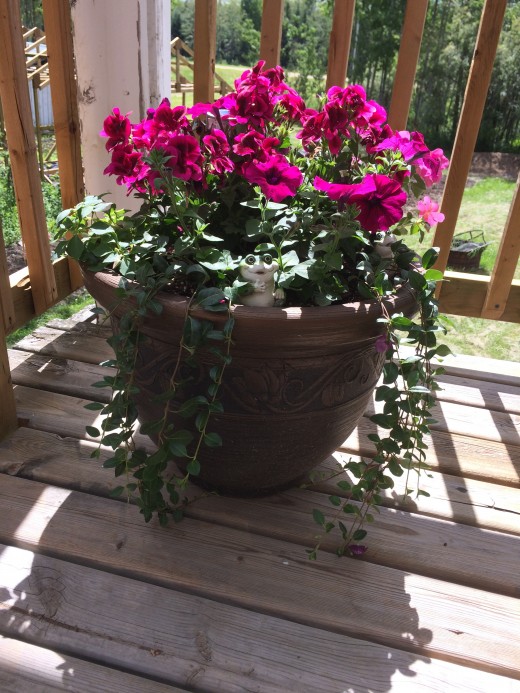
The four planters together are the group I have close to the house, next to the driveway. It also has an iron welcome sign and some fun decor I got as gifts from family. The parrot in the one container is a solar light. Items that look cute, and are useful are a bonus. I am excited to add the new addition of the cement frog this year. If you don't want to buy items for the containers and yard, use items you no longer have a use for in the house. It's become another way to recycle and reuse, along with adding a personal touch to the outside of your home. The last photo shows how placing more than one planter close together can give the impression of a large container. I put both planters on the stairs one is a step above the other.
As you can see my favorite colors are pinks, purple, white and yellows. You can pick and choose whatever ones you love. If you are putting together, more than two containers get them by the flat. Not only are they a better deal, but some places will also give you an added discount for buying more. There is a lot of information, out there now. The internet can even find your areas growing zone. My plants will be going in and out of the house until the end of May. I do this to make sure I don't lose them from a late frost. If you want more information or just want to leave a comment with what you are growing this year, please do so below.
© 2017 Terrie Lynn


