A Good Reason to Tint Your Windows - In Your Home

Window Tinting
If you have ever been in a car, or in traffic, you have most likely noticed that some cars have darker windows than others. Maybe the car you drive has dark windows. This is called window tint. On cars it is only legal to tint the windows in the back, not the front, but some people don't pay attention to that law. But that's off our topic; I'll save law breaking for another hub.
There are multiple benefits to tinting the windows in your car. Did you know that these same benefits can be gained at home by tinting the windows in your house? Some of the main benefits are:
- UV light filtering.
- Reduces carpet fading.
- Reduces hard glare.
- Helps keep your home cool.
- Reduces drying and cracking of wood furniture.
- Many plants thrive in the filtered sunlight!
These are all good reasons for tinting windows. The one that really caught my attention is Helps keep your home cool. I'm a cold weather person; I absolutely wither in hot weather, so anything that will help cool my house down is a huge bonus in my book! But just how much would it help by tinting the windows. I certainly didn't want to black them out!
I went to the local hardware giant and found all kinds of window tinting treatments. They have all kinds of designs, and tints, to choose from. The size of the roll of tint wasn't to my liking, so I decided to check out the local auto parts store. They only have tinting, they don't have all the other fancy designs offered by the hardware giants, but I only needed tinting. I chose a 35% tint and headed home with it.
Applying Tint
Applying window tint yourself is not an activity for people that have a short temper, or perfectionist tendencies. You need patients, and a lot of soapy water! I tend to lean towards the perfectionist side, but I was still able to complete the job....perfectly!
When I applied the tinting film, if I could, I just took the whole window out of the frame. It was a lot easier than trying to apply the tinting film with the window installed. Of course I couldn't remove both sides easily, but just removing the one made it half the work. Plus, by removing the sliding side of the window I could apply the tint whenever I wanted to. That reminds me...you may not want to apply the tinting film when the sun is shining through the window you are working on. Besides having the sun beating down on you and blinding you, the sun will keep drying your soapy water as your trying to slide your tint film into place, and oh the frustration! So, start your work at night after the sun has gone down, or when the sun is on the opposite side of the house.
There are instructions in the window tint film box that give you clear step-by-step directions how to apply their product. Most window tint is applied the same way:
- Tint is applied to the inside of the window.
- Measure the window.
- Cut your tint.
- Apply lotsa soapy water to the window (Have a spray bottle with more soapy water close at hand).
- Remove film from the adhesive backed tint.
- Apply adhesive side to window and slide it into place as needed (squirt with more soapy water).
- Use a soft scraper to remove bubbles (more soapy water squirts) (start from the middle and slide the soft scraper to the edge to remove bubbles).
- Use an exacto knife, or razor blade, to trim the edges.
Soapy water is your ticket to this job coming out nice. Don't be afraid to really spray it on! As soon as the soapy water starts to dry the adhesive starts to attach itself. So, as long as your moving that tinting film around on the window, you want soapy water under it to keep it sliding. Then when removing the bubbles, they slide out easily if you have enough soapy water you applied.
Finish Tinting
By the time I had finished the window, to my perfectionist liking, I was fit to be tied! I was very proud that nary a bubble was under that film tint, but it did take some time and patients! Oh, and I found out, if you cut to the end of the tinting film and have a little piece you missed with the razor....DO NOT RIP IT OFF! If you try to rip that itty-bitty piece off, it will tear all the way across and into the center of your film, or take a huge hunk off of the edge it was connected to! And window tint does not splice together very well at all, believe me, I know. So, if there's a little piece you missed with the razor, try again with the razor, or use scissors to snip it off.
After all my work I was curious just how effective this window tinting was actually going to be.
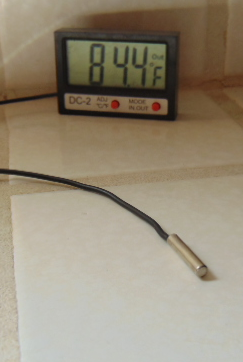
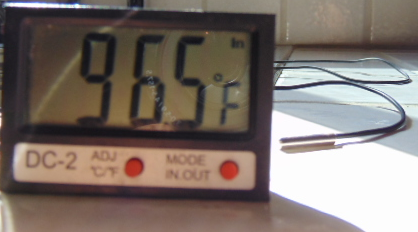
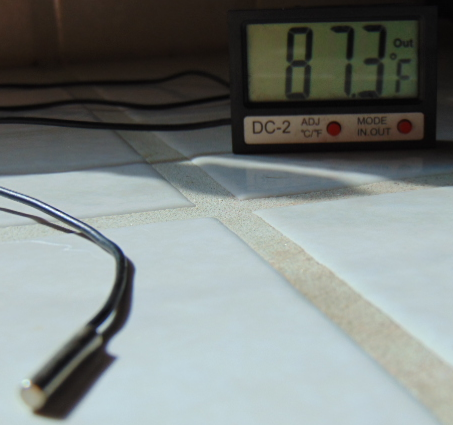
The next day, after the tint was dry, and the window was back in place, I waited until the sun was shining through that window and I took my digital thermometer and tested the area! I was pleasantly surprised to find a big difference in temperature where the window tint was compared to where it was not. Check out the accompanying photo's!
Fahrenheit Readings
Click thumbnail to view full-size


Results Of Tinting In Fahrenheit
Counter With No Sun
| Counter With Sun
| Counter With Tint
|
|---|---|---|
84.4F
| 96.5F
| 87.3F
|
Tinting Really Works!
Can you believe those readings? The counter was 12.1F lower in the shade compared to the sun exposed counter. That's to be expected, but the 9.2F, almost 10F degree difference between the sun exposed and the window tinted counter top was very impressive. I used the 35% tinting. At night I could still see outside easily. If that isn't impressive enough, then the cost of the window tint should be! I paid less than $20 for a box at the auto parts store for a sheet of tint measuring 24" x 6.5' . That's enough tint for a couple of windows!

