Chalkboard Paint Pots for Growing Veg from Seed

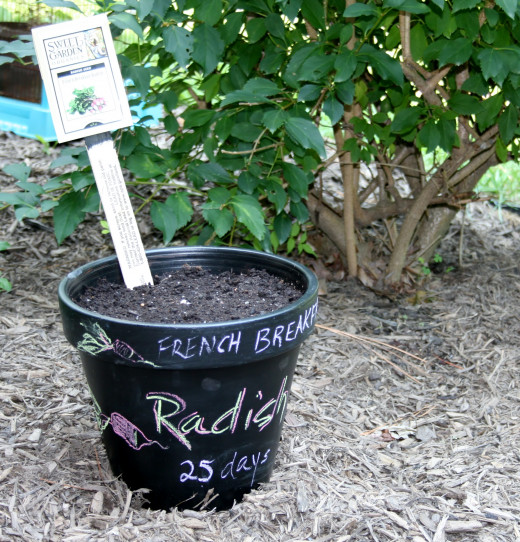


While preparing a display about fall vegetables for a nearby farmers' market, I planted radishes in an old clay pot painted with chalkboard paint.
I thought that using a chalkboard paint pot would make it easy to provide information about sowing, germination, fertilizing and harvesting radishes to passersby at a glance.
After the farmers' market display was taken down, I decided to use the pot to keep track of other handy information for myself, including
- name of vegetable
- planting date
- projected germination date
- dates for fertilization and
- projected harvest date.
I think using a chalkboard pot for vegetables is a really cool idea. And although I don't grow many vegetables in pots, I'll probably plant lettuce and Swiss chard in chalkboard containers also, just for the fun and easiness of it.
Make Your Own Chalkboard Pot
If you'd like to make your own chalkboard pot, you'll need
- new or used clay pots
- soapy water & a scrub brush (if you're using old pots)
- an inexpensive sponge brush
- chalkboard paint (not to be confused with chalk paint) and
- newspaper or drop cloths.
Fall Gardening
Do you grow fall vegetables?
And if you intend to use it for growing vegetables, herbs or other plants, you'll also need potting mix, seed, water and chalk.
I used an old clay pot that has a few chips in it, so the first thing I had to do was clean it to remove insect eggs, fungal spores, mold, etc.
Clay pots are best cleaned with warm soapy water (use a mild dish detergent) and a scrub brush.
Prep pots for planting & painting.


Paint the Pot
Once the pot was dry, I placed it on a plastic drop cloth outside in the shade and applied chalkboard paint that I had bought at Sherwin-Williams.
If I'd been applying the paint to glass or ceramic, I would have wiped it first with rubbing alcohol, but for clay pots, no additional prep work is needed. Just apply it with a brush. I used a cheap, disposable one.
The first coat dried in less than 15 minutes. It didn't look glossy enough to me, so I applied another. Then I left it alone for a few hours before filling the pot.
Apply chalkboard paint to clean, dry pots.


")

Plant Your Veg
I mixed up my own soil mix, moistened it and then filled the pot.
Next, following the directions of the packet of radish seed that I received free last year from Sweet Garden Organics Farm, I sowed them and watered them with seaweed fertilizer.

According to the package, the seed should have sprouted in 7-10 days, but it germinated in only two!
Fill the pot with soil, sow seed according to package directions & water well.


Track Your Plantings in Chalk
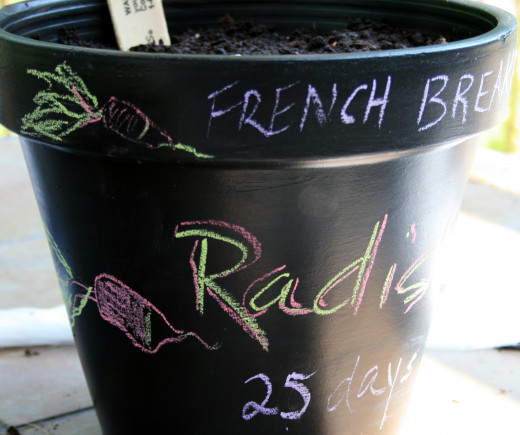
After sowing the seeds, I wrote all sorts of helpful information on the pot, including the number of days it would take for the radishes to mature, the date I'd planted them, etc. I also couldn't resist drawing a few radishes ! lol
Since I'm into re-purposing, I even used the stir stick, stapling the seed packet to it and sticking it into the pot as another visual reminder of what I'd planted.

I thought the chalk might smudge when I handled the pot, but I carted it to the farmers' market and back home again without no problem. I also moved it in the garden several times in order to keep it out of intense sun without disturbing the chalk.
It took a wet towel to remove the expected germination date after the seeds sprouted, so . . . the chalk really stays put.
I'm not sure how it would do in a rainstorm, but I don't intend to leave my radishes out it one anyway. (:
Other Practical Uses for Chalkboard Paint
About the Author
The Dirt Farmer has been an active gardener for over 30 years.
She first began gardening as a child alongside her grandfather on her parents' farm.
Today, The Dirt Farmer gardens at home, volunteers at community gardens and continues to learn about gardening through the MD Master Gardener program.
© 2014 Jill Spencer


