Chile pepper growing

Growing tips for Chile peppers
Here you'll find the basics of pepper gardening, most of which I learned as an "environmentally challenged" chile enthusiast. Some of it is from my own experience and some of the knowledge I got from other sources. If you have any comments, recipes and recommendations don't be shy.
Happy growing and eating.
Buy chile pepper seeds

Starting seeds indoors
When to begin: If you're a "cold-zone" gardener, resist the temptation to start seeds when the temperatures are still sub-zero, lest you end up with spindly, sun-starved plants. Don't wait until late spring, however, as your peppers won't reach their potential yield before the first killer frost. "Hot-zone" gardeners should start seeds early enough to beat the inevitable summer heat, which generally leads to blossom drop and little or no pod production. Wherever you live, I recommend starting seeds eight weeks before your target transplant date. This allows for up to six weeks of indoor growth and two or more weeks for the hardening-off process.
What you need: Seeds, soil, containers, water, heat and light.
Seeds
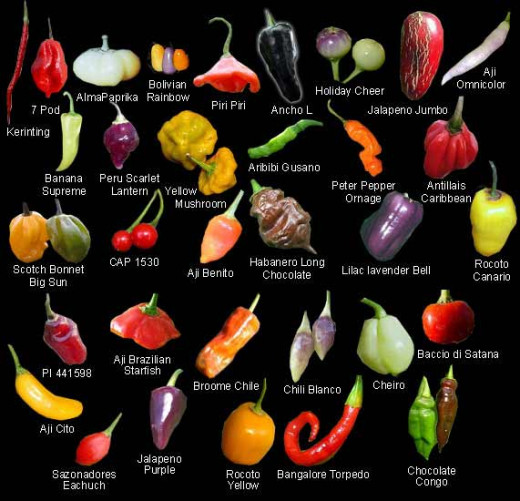
Pepper seeds are available at garden centers, department stores or from seed catalogs and germplasm banks, such as those maintained by the USDA. Mail-order is probably the best source for exotic varieties and new hybrids. If you're feeling thrifty or experimental, try planting seeds from pepper pods purchased at your local supermarket (see saving seeds).
Soil
Regular potting soil is too heavy for seed-starting, so use a lightweight potting mix with plenty of peat moss or comparable organic matter. This will provide better drainage and encourage root development. Keep in mind that you'll need to start fertilizing shortly after germination, as most seed-starting formulas don't contain the nutrients needed to support vigorous growth.
Containers
Plastic "six-pack" cells (readily available in multi-cell trays with clear-plastic "greenhouse" covers), small pots, empty milk cartons, single-serving yogurt containers, plastic foam cups with holes drilled in the bottom for drainage - all make excellent growing containers. And you'll need a waterproof tray to put them in.
Water
Before planting, fill a gallon jug with tap water and let it sit uncovered for a day. This will bring the water to room temperature and allow chlorine (if present) to evaporate. My tap water is high in alkali salts that could burn new roots, so I "treat" my seedlings to bottled spring water during the early stages of growth.
Heat
Peppers germinate best at temperatures between 70 and 80 degrees Fahrenheit.
Light
After the seedlings have surfaced, you'll need to move them to a sunny window or, better yet, place them under fluorescent light. A "shop light" fixture hung from the ceiling by two chains is ideal, as it can be adjusted up or down to keep the bulbs within an inch of the uppermost leaves. This is important, as the effectiveness of fluorescent rays on plant growth diminishes greatly with distance. NOTE: When I first began growing seedlings indoors, I used expensive, wide-spectrum bulbs. I've since learned that cheap, cool-white bulbs (a whopping $.99 each at Home Depot) produce the same results.
The procedure: Cover the work area with old newspapers; this will make cleaning up much easier. Partially fill a small bucket with potting mix. Add water and work the stuff with your hands until it sticks together. Fill each pot or cell almost to the top with the moistened potting mix.
Open the first seed packet and discard any broken or discolored seeds. Place three seeds in each container and cover with 1/4 inch potting mix. (When growing multiple varieties, be sure to label each container accordingly.) Water once more. When all seeds have been planted, drain off any excess water, cover the containers with a sheet of plastic wrap (or clear-plastic tray cover) and place them in a warm location, such as on top of the refrigerator. Don't worry about light at this stage.
The seedlings should begin to emerge in seven to 10 days, although stubborn germinators may take several weeks. Remove the plastic wrap after germination.
Once the seedlings are up ...
Move them into the light. I supply my seedlings with 16 hours of up-close fluorescent "sunshine" each day. An inexpensive timer ($4 at Wal-Mart) can be used to control on/off times.
Never let them dry out! Use a weak solution of balanced fertilizer (Schultz, Peters, Miracle-Gro, etc.) every time you water.
Put a fan in the growing room to increase air circulation and help toughen up leaves and stems.
When the seedlings have established their first set of true leaves, grab a scissors and snip off all but the most vigorous plant in each pot. Pause for a moment to think about the peppers they'll never grow up to be ... then get over it! You've done the right thing.
Hardening off
Seedlings grown indoors need time to adjust to an outdoor environment. Too much sun too soon will cause healthy-looking plants to wither and die, and a strong breeze may be enough to strip tender leaves from their stems. This is why "hardening off" - bringing seedlings outdoors for increasingly longer periods of time each day - is so important.
Begin by placing the plants in partial sun (no longer than an hour the first day), then gradually increase the duration of sun exposure over several days until they can safely make the transition to full sun. The plants also need to adapt to cooler night temperatures, so leave them out overnight when weather conditions are favorable. Remember to water thoroughly and frequently. Allow at least two weeks to complete the process.
Preparing the soil
Peppers require moderately fertile soil with a fair amount of organic matter and good drainage. That's it! Well, there's a little more to it than that, but since soil composition can vary dramatically from region to region, I suggest you consult your local extension service before applying costly soil amendments that may be unnecessary, even harmful. Of course, it doesn't hurt to ask other gardeners for advice. Just don't believe everything you hear. (We green-thumb types can be a lot like fisherman when we start jabberin'.)
Transplanting
If you start your seedlings in multi-cell trays, you'll probably need to move them into larger containers after a few weeks. But let's move on to the "big step" - transplanting outdoors.
Choose a garden location that will receive plenty of sun. Prepare the soil in advance.
Carefully remove the first plant from its pot. Gently loosen the root ball if the roots have become wrapped around the inside of the pot. Place the plant in a pre-dug hole, into which a handful of organic material has been added. Firmly pat down the soil around the transplant. Repeat the procedure, allowing 18 or more inches of space between plants. Water and fertilize immediately to ease transplant shock. It's also a good idea to add a layer of mulch around each plant to keep in moisture and deter weed growth.
Water and fertilize regularly the first month after transplanting. Initially, the majority of activity will occur below the soil surface, so don't be discouraged if your plants "just sit there." Sudden and rapid foliage growth will occur as soon as they develop a healthy root system.
Buy growing containers

Fertilizing
Peppers respond favorably to moderate fertilization, especially in the early growth stages (from seedling stage to a month or so after transplanting). However, applying too much fertilizer - particularly one containing a high percentage of nitrogen - can produce large, leafy plants with little or no pods.
In 1999, I kick-started my pepper crop with "organic" nitrogen in the form of fish emulsion. Other than smelling incredibly bad (although my dog was particularly fond of the odor), the stuff worked quite well, prompting a burst of new growth shortly after its application.
For my 2000 garden, I've been using "Arizona's Best" Tomato & Vegetable Food (8-10-3) from Western Organics. The packaging says it's been formulated specifically for Arizona soils. The initial results? Impressive.
Dealing with pests
Aphids love to suck the life out of peppers, especially young plants. But they do the most damage by spreading plant diseases. Aphids are "farmed" by ants for their honeydew secretions, so look for one insect where you find the other. Discourage aphids by spraying leaves and stems with a diluted solution of Ivory soap. You might have to repeat the process several times to control infestation, but it's a safe, inexpensive alternative to chemical pesticides. Also, if you buy your peppers from a greenhouse, be sure to check the undersides of the leaves for aphids before bringing them home.
Hornworms are monstrous caterpillars (the larvae of the sphinx moth) with an incredible appetite for pepper and tomato foliage. At 3 to 4 inches in length, they're easy to spot and best removed by hand. But wear gloves - they're disgusting!
Cats are notorious for eating pepper seedlings.
Dogs are notorious for chasing cats. Unfortunately, they also enjoy digging in the garden.
Birds eat peppers. Cats eat birds. It's a vicious circle.
Buy fertilizers

Harvesting
"When should I start picking pods?" It seems everyone wants to know. The answer depends on your motivation. For example, jalapeños, serranos and New Mexico chiles are often picked in their mature green stage for use in fresh salsas and cooked sauces. But they also can be allowed to ripen to red before picking, after which most varieties are dried for later use. In other words, "when to pick" is entirely up to you. The pods are edible at any stage.
Preserving
Drying peppers is easy to do using a home food dehydrator (available for about $50). To dry thick-walled pods such as jalapeños, slice them in half before dehydrating. Thin-skinned varieties may be dried whole. Store dried pods in air-tight containers. Use them whole in stir-fry dishes and pickling recipes, or crush and sprinkle them on pizza and spaghetti.
Freezing is the easiest way to preserve peppers. Simply wash and dry fresh-picked pods. Slice or chop, if desired. Place on a cookie sheet and freeze for 30 minutes. Transfer to Zip-loc freezer bags and return to cold storage. Use the frozen pods in place of fresh peppers in your favorite recipes.
Canning is time-consuming but well worth the effort. If you have an abundance of fresh tomatoes as well as peppers, and don't mind spending a day in the kitchen, try a recipe for canned salsa.
![Salsas and Moles: Fresh and Authentic Recipes for Pico de Gallo, Mole Poblano, Chimichurri, Guacamole, and More [A Cookbook]](https://m.media-amazon.com/images/I/51L3WyjotYL._SL160_.jpg)
Saving seeds
Saving seeds is a fun and economical way to plan future pepper patches. However, if you grow several varieties simultaneously in the same garden, you run the risk of cross-pollination - in other words, the seeds you save might yield unwanted hybrids. To prevent this from happening, plant only a single variety or isolate the plants from which you intend to save seeds.
The procedure: Use a sharp knife to remove the seeds from a fully ripened pod. Spread the seeds in a single layer on a paper plate and allow them to dry at room temperature for about two weeks. When the seeds are completely dry, put them into a 35mm film container or air-tight plastic bag. Store in a cool, dry place.
Jalapeño seeds I saved using the above method germinated at a rate of 97 percent the following year (29 out of 30 seeds were viable).


