- HubPages»
- Home and Garden»
- Home Decorating»
- Interior Design & Decor
How To Make a Fake Window Headboard for Your Bedroom


One of the most honest book sellers on Amazon!
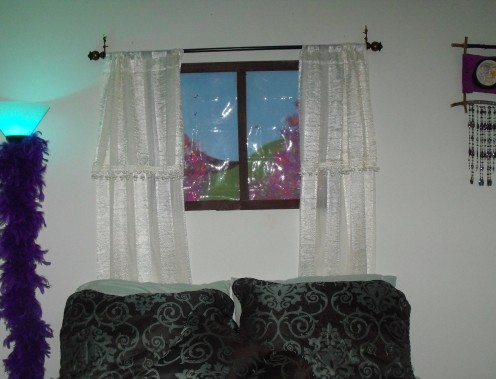
Create your own headboard in a few simple steps
You can make a headboard out of anything but I always wanted to make a window. There are a few things you will need before you begin. First of all you will need a window frame. These can be found online or in a home supply store but I really wanted to work for this one and make it out of something that had nothing to do with windows. I love recycling things and looking through my art supplies in an old storage closet, I found all the things I needed.
Below are the items you will need:
- Window frame or 4 pieces of wood to make a frame
- Paint (to color your frame, your choice)
- Canvas
- Paint brushes to paint your scene
- Staple gun
- Curtains or whatever décor you prefer for your window
- Plastic (find this in any fabric store. The thicker the better to resemble glass)
- Curtain rods
- Nails to hang your project on your wall
Below are the steps on how I got it all together.
1. The first step is to figure out where you want your window. Pick a wall, make sure you measure how big you want this window so you can pick out the frame accordingly. I love to recycle, so the thought of going to the store to buy a window frame seemed crazy to me when I have a storage closet full of art supplies. I didn't find any frames but I found 2 small canvas that were wrapped around wooden frames so I just took them both apart and made one large frame out of it. I didn't like the color, which was pale beige, so I painted it dark brown and let it air dry. I used acrylic, so it was dry within minutes.
2. Next thing is the canvas. Paint a scene on it that you like. It could be anything, using any colors of your choice. I chose a peaceful landscape to paint, using colors that enhanced my bedroom. If you don't like landscapes, here are some ideas; people, cars, buildings, animals or abstract. You also don't have to paint a day scene. You can easily paint a night scene with a moon and stars, maybe even using glow in the dark paint.
3. When the canvas dries, get the plastic and place it on top of the canvas and slowly cut along the edges, making sure the plastic is now the same size as the canvas.
4. Get the frame, which by now you should be dry and place it directly on top of the plastic. Make sure this is how you want it to look. This will be the last time you'll be able to really fix it. I suggest you look at it now because sometimes what you painted is covered up by the frame, you may want to paint something else on it or change the color. Now is the time to change it. If it's to your liking, simply flip everything upside down and staple the canvas and plastic to the back of the frame. I didn't use that many staples but I made sure it was secure and tight.
5. Your frame should be awesome right now! You can leave it this way and hang it as is or put some window decorations on it. I like curtains on mine so I found one panel in my things, cut it right down the center and made two smaller panels, which I placed on a rod and hung on the wall. Simple & done.
Since this project, I have put Christmas lights around the frame, which goes with my bedroom. I love lights and colors and a style all my own.
Personalize your window and make it your own. Maybe you can't paint? No problem! Just find a picture to frame instead. Maybe you have a personal picture you want to resize. That's an idea as well.
Whatever you decide, enjoy your new faux window. People will wonder if it's a real window. Mine doesn't really look real, at least I don't think so but most of my friends love touching it to make sure it's not, so I guess that means I did a pretty good job.
Do you have what it takes to be a writer? Join the HUB today and become a Hubber too. It's free and easy to join. Click below and start earning!
http://rosanamodugno.hubpages.com/_1j7va74oznq9e/


