DIY Calvin and Hobbes dresser for $85


Ever since I was little I have never been satisfied with the generic. Especially when it comes to bedrooms. Other than for convenience why join the army of people buying furniture from Target, Ashley’s or Bobs when you can easily make something that fits your style and personality in just one weekend and for half the price? Recently we painted my 17month old son’s room to be Calvin and Hobbes themed. We created one big mural that wraps around the entire room so he could be completely immersed in the funny thrills of my childhood. Like all kids though the amount of toys, books, and clothes continues to grow so it was time to add a little extra storage, but naturally we didn’t want just anything. After hours of searching online at all the usual, and some times unusual places, most of what I could find was just too much for our budget. Then I got the call…
At the moment I am very lucky to have a thrift store spy in my connections. My mother –in-law works at a used furniture store at her park and every so often she calls me, or sends me a text of things that come across her path. That morning it was an old out dated dresser that was going for $30 bucks! Score! I immediately texted her back and three days later it was sitting in my living room. My husband took one look at me and then one look at the dresser. Shortly followed by his usually mantra of “ I trust my wife, I trust my wife…” which fading into the distance as he walked away. REMEMBER, with the right vision everything has potential!
What you'll need
- Furniture of choice
- 1-2 Large bottles of Modpodge depending on project size. Found at Hobby Lobby, Michaels, Walmart, or any other craft store.
- 1 Packet of Foam Brushes (1.98 at walmart)
- Spray paint or 1 Quart of paint color of your choice
- Clear Coat for furniture. Lowes or Home depot
- Primer
- Roller/rolling pan or paint brush
- Any type of paper that you want to use. It can be craft paper, wrapping paper, or even just good old printing paper like I used.
Getting Started
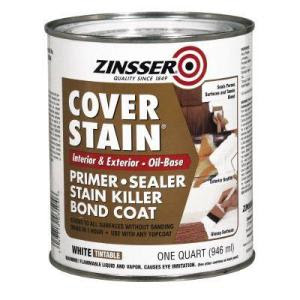
Like most furniture today this dresser was 99% particleboard. If you’ve never had the displeasure of trying to resurface particleboard I envy you. That is until now! After some cyber snooping I came across the best product that won’t even require sanding. Zinsser Cover Stain Primer and Sealer. It can be a bit messy but will bind to anything! This product is found at most home supply stores and is oil based so please, please, please use only in very well ventilated areas. Also, another word of caution, this product is liquidity so make sure to put down plenty of tarps to catch any run off. To give you a rough idea how much you’ll need; for my project I was able to give the entire dresser two coats and still had half a gallon left over.


Are you big into DIY projects?
Paint the accents
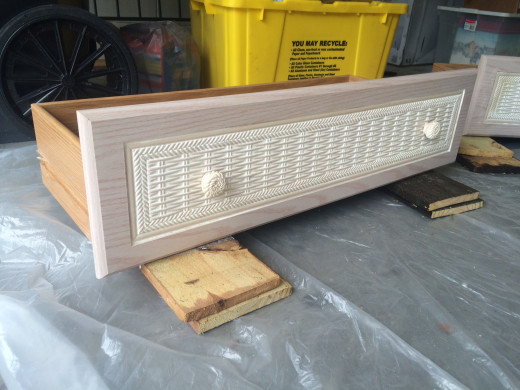
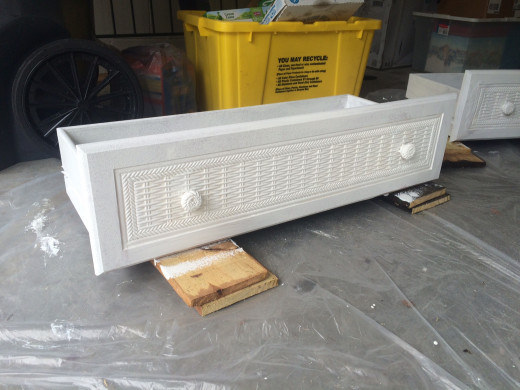
Now it's time to whip out the paint! The majority of this dresser is going to be covered in Calvin and Hobbes black and white comics so I went with black accents on the doors, drawers, top, knobs, and shelves. Hoping to emphasize the comic portion I decided on black paint. You can use spray paint, but for my project I purchased a quart of black wall paint in eggshell, and used a roller for the larger areas. The doors and drawers had that crazy weave textures so to reach into all the nooks and crannies I used a stiff bristle painting brush we already had stashed a the drawer. A synthetic brush will leave streaks everywhere as it pushes the paint around. Bristle brushes on the other hand, are made to hold onto the paint and will serve you better. Always remember to clean your brushes with mineral spirits or some other brand of brush cleaner. Otherwise when you come back to your project you will have a very hard paperweight for your desk.
Thoughts from me to you
Once everything was dry I gave all the painted areas a spray with furniture clear coat. It looks just like a regular paint spray can and can be found in the same isle. REMEMBER to shake the can for the whole 1 minute. I did for the first coat, but being a little skeptical I gave it a second coat…after 6 hours of papering and being tired I forgot to shake the can and came back the next day to find it covered in white dust that I then had to clean off with a towel.


Mod Podge
Between you and me a new love has entered my life and it’s name is Mod Podge! This glue like substance is fantastic! Not only does it work as glue but you can also use it as a sealer. When I first picked up the bottle my thoughts immediately went to,” There is no way this is going to cover very much.” Feeling a bit lazy and not wanting to make a second trip to Hobby Lobby I purchased two large bottles just in case, and my dear readers boy was I wrong. Not only did I get all my paper onto all of the areas I needed but I was also able to give everything 2-3 coats for extra protection using just one bottle. With the second I was able to give 3 additional coats making 5 total and still have a little extra. Now keep in mind for your own project that I did not paper the back (because no one would see it) and I didn’t do the middle of the drawers, doors or shelves. If your project is roughly the same size and you do everything I’d say you could easily paper everything and put on two coats with two bottles.
Applying Mod Podge Tutorial
Basic Mod Podge 101
Sadly, it wasn’t until I wrote this article that I realized just how diverse Mod Podge really is. So what is Mod Podge? In a nutshell, Mod Podge is a glue, sealer, and finish all wrapped up in one bottle. Great for any project whether out door, indoor, cloth, or furniture. Here’s a quick break down of all the different types for you.
Classic Mod Podge: Which is what I used not realizing they have one just for furniture projects! So far it’s working fine though. Comes in glossy or matte making it great for a large number of projects. It can be a little bit tacky so just give it a thin coat of clear acrylic if that bothers you. I bought a large bottle at Hobby Lobby for 7.99, but like any good thrift shopper I added a 40% coupon, and only paid 5.99 total. People have told me it’s even cheaper at Walmart but don’t hold me to it.
Satin Mod Podge: Gives your project a slightly frosted appearance and holds it’s own.
Hard Coated Mod Podge: Great for furniture this version has an extra durable finish built in. This version has a satin finish so it also hides the scratches better than other version.
Paper Mod Podge: For the scrapbooking enthusiast this version will supposedly stand the test of time helping your project become archival quality.
Fabric Mod Podge: Works on fabrics and adheres fabrics to other objects.
Outdoor Mod Podge: For pots or any other out door project.
Glitter Mod Podge: For those projects that need a little extra twinkle.
Glow in the Dark Mod Podge: Lets face it; everything is better when it glows in the dark. Will take multiple coats to give the best effect.
Brushstroke Mod Podge: For when you want extra texture.
Kids Mod Podge: Specially designed to be easily washable for kid use.
Antique Mod Podge: It seems over the years more and more people are enjoying the look of antiques and now you can too with this version. This version only comes in matte finish, and applies a slightly brownish hue to give an over all look of age.


Applying Paper Details
Now for the fun part! This will take several hours and I suggest a good pad under your knees for cushion. To save some money, I took the Calvin and Hobbes books my Grandmother had given me years ago and copied the pages using my printer. Over all it took roughly 80-90 pages. I suggest making 5-6 copies of the same page. No one will notice when they are all spliced together.
You’ll want a clean spot to apply the Mod Podge. You can either wipe down a section of your plastic, grab an old piece of cardboard, or what ever works best for you. Next, turn the cut section of paper over nice side facing down and spread a thin layer of Mod Podge over the back. Go all the way off the edge. You will have roughly 30 seconds to move the paper into the place you want. Smooth out with either your hand, a small piece of cardboard or a paper roller.
Nobody ever wants to hear this but I’m going to give you some strait up advice. Don’t fret about a small bubble here or there. You are wetting paper and it is going to happen. Just as the tides move in and out of the ocean so will there be a bump or two in your paper. Some will even disappear after the glue dries. Trying to smooth out every single imperfection is going to drive you to the mad house, and trust me when I say no one is going to notice once the whole thing is finished. Unless you point it out to them.That being said, continue this process of cutting, glue, pasting, straightening, and smoothing until the whole area is covered. It will go faster the more practice you get.
In hopes that you will learn from my mistakes here is another small piece of advice. Decide how you want to paper your corners before adding the glue. When I was working on the doors it never even accord to me to pay attention to which way I was folding the paper over the edge. In fact I folded it over the top edge, and as a result, after all the work was done including sealing, I came to find that the paper “bump” on top of the door was just tall enough to make the door stick when shutting or opening. Keep that in mind when working on your personal project.
So far we’ve coated, painted, papered, and now it’s time for sealing! Mod Podge takes about 20-30 minutes to dry. Luckily that is approximately the same amount of time it should take to coat the whole dresser so by the time you finish the last drawer you’ll be able to start on the door you began with. The bottle recommends 5 coats for good measure and with a little one I was not about to doubt those numbers. So far the dresser has held up well to all his banging and slamming. Let the final product dry for at least an hour. After that the only thing left to do is to reassemble, and lounge in a comfy chair while drinking a yummy well-deserved drink to celebrate your DYI success!


Overall Cost Wrap Up
Dresser - $30
Paint - $12
Clear Sealant - $3.50
Foam Brushes - $1.98
Comic Strips - Free!
Mod Podge (2 large bottles) $13.98
Primer - $20
Grand Total of $81.46


