DIY Home Improvements: How to Replace a Light Switch

Disclaimer: I am not a licensed electrician. I don't even play one on TV. If you have any uncertainties about your own ability to tackle this home improvement project, you should always consult a professional before you start. Safety is ALWAYS the priority.
In Your Face but Overlooked
Before we bought our first home in January 2014, my wife and I spent the previous 12-24 months going to Open House events and getting acquainted with the local real estate market. Within our budget range, we were targeting homes in well established neighborhoods close to the city. Because we desired to be close to the city, to stay within budget we had to limit ourselves to homes that were typically 50+ years old or more. In that time we probably toured close to 100 homes for sale, during which I quickly developed a serious pet peeve: light switches, electrical outlets, and plates.

Mid-Century...Modern?
Older homes are not without their charms, and if they’ve been well maintained and kept up, it’s hard to discern their actual age. This makes them very desirable for first time buyers. However, something that will immediately betray the age of an older home is the color and condition of the electrical components. In majority of the homes we toured, it was very apparent that sellers would make an effort to re-paint a room to freshen up the look to entice potential buyers, but would completely ignore the dated electrical switches and outlets.
Cost Ineffective
Rollers, brushes, and a gallon of paint can cost more than $50, but a new light switch and plate cover is less than $3. And while a new coat of paint MAY help sell the house, chances are the new owners will want to put their own mark on the house and will re-paint the room again. So let’s recap for a second…not only is painting a more expensive and time consuming affair, it’s likely to be a wasted effort when the new owner re-paints to their taste…how’s that for irony?
In some of our Open House tours we did see that some sellers made attempts to update more than just the paint, but it was always something like this...

While this constant lack of attention to detail bugged me to no end during our search for a home, the reality of our local real estate market was simply that demand outpaced supply and sellers didn’t have to go to great lengths to elicit multiple offers. This is an unfortunate scenarios for buyers, who will have to bear the burden of this simple update. But it can also be a two-way street. What about sellers that find themselves faced with the opposite problem? What if supply is outpacing demand and you have to do more to get your house to sell?


You Have The Tools
The GOOD news is this…whether you are a Buyer or a Seller, changing out a light switch is really, really easy. All it requires is a little common sense and four tools, three of which you probably already own.
- Flat Head Screwdriver – Remove/Install switch plate
- Phillips Head Screwdriver – Loosen switch from box and to disconnect wiring
- Pliers – Bend wire around switch terminals, twist wires together as needed
- Voltage Detector – I saved the most important tool for last, as this one will keep you safe, which is the number one priority of any project around the house. It, of course, detects voltage (duh) to ensure that the proper circuit was shutoff in the main breaker panel. Every homeowner will at some point find themselves needing to shut off power somewhere in their home and this tool will ensure that it was done properly before proceeding with whatever work needs to be done. A well-designed voltage detector will both visibly and audibly indicate the presence of electricity through a series of beeps and flashing lights, and some have a built in LED light for working in the dark. I have used the one seen in these photos all over my house for the past year and a half and it has served me very well.

Breaking the (Color) Code
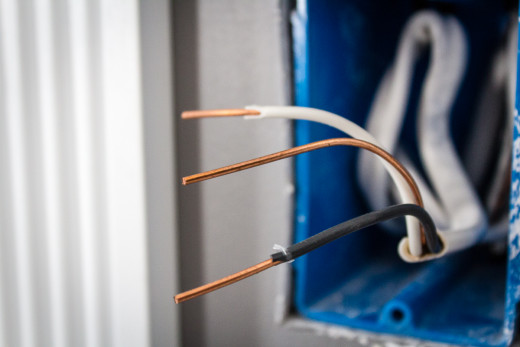
Electrical codes vary country-to-country, and even by state in the US. But one practice that is standard anywhere in the world is the mandating of wire color coding to easily and safely indicate a wire’s purpose in the circuit. I am writing from the perspective of someone from North America, where in general, one can reliably expect the following practices when dealing with electrical wiring:
- White – This is the neutral wire. Sometimes this may be gray.
- Black – The “hot” wire, this feeds current to the switch or outlet.
- Green / Bare – This is the grounding wire.
That said, be aware that all electrical wires regardless of their function or color coding, can carry an electrical current. It is good practice to treat all wires with equal caution. It’s not uncommon in older homes, built prior to the 1940s, to find different color coding if the wiring has never been upgraded. This alone should underscore the use of a reliable voltage detector anytime you’re working with electricity!


Out with the Old, In with the New
Use the following steps to safely and effectively replace a light switch:
- Shutoff the power to the switch at the main circuit breaker or fuse panel;
- Unscrew the switch plate and set it aside, use a voltage detector to verify the circuit is dead by checking each wire individually;
- Unscrew the switch from the box and remove it with the wires still attached;
- To avoid confusion, unscrew and disconnect all wires hooked up to the old switch one at a time and reconnect them one at a time to the new switch in the same positions;
- The hot wires are connected to the switch terminals on the right side, with the incoming source wire on the bottom and the outgoing fixture wire on the top post
- The neutral wires are connected together with a wire nut and are not actually connected to the switch hardware
- The ground wires connect to the green terminal post on the left side of the switch
- Gently push the re-wired switch into the box and screw it back into place;
- Replace the switch plate cover and turn power back on to test that everything is in working order.
So Fresh and So Clean
Changing out an old, beat up light switch is an easy and cost effective way to refresh the look and appeal of any home. Even for a beginner, it will take less than 15 minutes per switch, and can be done with tools many people already own. The most important thing is to take the proper safety precautions by ensuring the power is off before you touch any wires, and before you know it you’ll have your home looking brand new!

Related

The Top 10 Most Common Issues Home Owners Call Electricians About — Plus Quick Tips For Solving Them
")
Coleman Furnace Troubleshooting (With Photos)

How To Create Beautiful, Realistic Face Shading using Digital Art Programs

Electrical Wire Colors: What Do They Mean?

Remodeling? Follow This Electrical Checklist to Get the Most out of Your New Space
 Keep Tripping the Breakers?")

