Diy Kitchen Conversions / Measurements Wall Signs

Want to Make Your Own Kitchen Conversions Wall Decor?
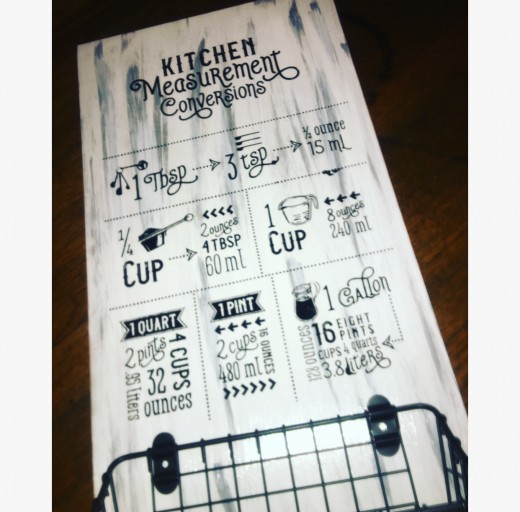
Learn how to build this really simple Kitchen Measurements Sign for your country home.
It is easily made using a plywood sheet, some paint and mod podge, a vinyl stencil (called a transfer), and some chalk paste. This little project took no more than an hour from start to finish. The longest portion of this process is waiting for the paint to dry.
Find the steps and materials needed below.
Sign Materials Needed
- Below is a quick rundown of what you will need to build this Kitchen Conversions Wall Sign
- 1ft. x 2ft. - plywood sheet, 1/4 in. plywood, from the Hardware Store
- 3 ounces - black chalk paste
- Size C Kitchen Conversions Transfer
- 1 ounce - white acrylic paint, from the Craft Store
- 1 ounce - grey acrylic paint, from the Craft Store
- 1 ounce - Mod Podge, from the Craft Store
- 10 inches wide Wire Basket, See below for example
Get Your Plywood Sheets Cut at Home Depot
It's really easy to ask an employee at Home Depot to cut your wood for you. If you give him your dimensions he will do all the work!
I generally have them cut 2 - 5 boards each trip. This gives me some extra surfaces to work with should I decide to make more signs or things!
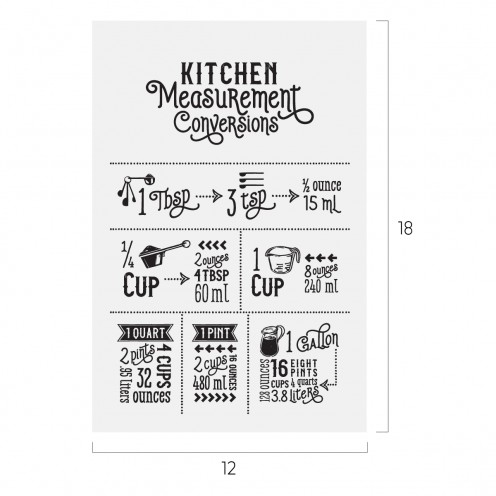
More Info On The Dimensions For Your Sign
- Plywood Sheets are 2 ft. x 4 ft.
- Cut Sign Dimensions: 12" x 24" (1 ft. x 2 ft.)
- Price Range: $5 - $15 for a 2ft. x 4ft. piece of Plywood
The Wire Basket To Attach To Your Sign

Don't Be Afraid To Get Creative!
You don't have to add a wire basket to your project. You can add anything you want, or nothing at all! Feel free to change up the design as your see fit! Adding a touch of personalization always makes DIY Projects feel so special!
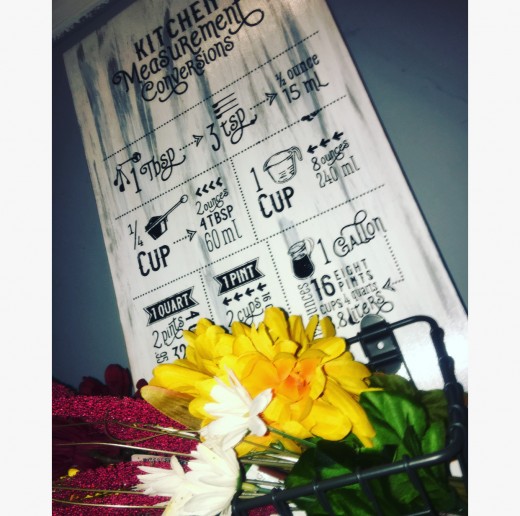
Other DIY Design Ideas to Consider for Your Sign
You have so many options for designs, if you are thinking about changing up this design, here are some ideas that may help!
- Flowers - you can add flowers to the board to give it a really soft feel to the board.
- Colors - use different colors. Go with a black paint with white lettering, or try a bright white with teal lettering! The sky is the limit!
- Shelving instead of a basket. Put a small shelf to hold keys or other small nicknacks for your kitchen.
- Framing - Frame your sign in an intricate design to really make it stand out!
Always feel free to add a touch of yourself and some embellishments that remind you of home.
Lettering the Sign
The main part of this design is the lettering for the 'Kitchen Conversions' part of the sign. This is done simply by using a product from a company named Chalk Couture. Learn more about it below.
The Kitchen Conversions Transfer
These transfers are easy to use and are reusable. They come in all types of designs and themes. The are made of vinyl with a silkscreen over it. The silkscreen lets the chalk paste go through the design and adhere to any types of surfaces.
Kitchen Conversions Transfer
Using A Cricut Machine For Your Design
Some crafters will want to create their own stencils. Those who have a Cricut machine can easily do this using their Design Space Software that came with your Cricut.
Places like Creative Market will have tons of pre-made designs that you can choose from and upload into Design Space to cut out your stencil.
Cricut's and Silhouettes are a great option if you want to make a ton of different things and craft a lot. Otherwise, it might be best and most cost effective to go with the Chalk Couture Reusable Transfers we talked about above.
Instructions for Making Your Kitchen Conversions Sign
- Paint Your Boards. In my example I used white acrylic paint and then rubbed on some grey lightly throughout the entire board and let dry.
- Sand your board until it's pretty smooth. I use an electric sander with 60 grit sand paper.
- Apply 1 thick coat of mod podge to your entire board and let dry thoroughly.
- Apply your stencils or transfer to place the lettering onto the sign. See above to help you decide which method you should use.
- Attach your wire basket and any sign embellishments or frames you want to complete your sign.
- Seal your design with any clear spray sealer, like Krylon.
Kitchen Conversion Video Demo
Want to see a video of this sign being made? Check out the Hippy Gypsy Mom's Blog for the original video!
Don't Forget to Have Fun Crafting
Crafting shouldn't be hard. It is a stress reliever for me. This project is easy and should take you no longer than an hours worth of work. The most time consuming part of this project is waiting for the paint and mod podge to dry.
Tutorial Provided By

Find More Crafts From The Hippy Gypsy Mom!
Find more tutorials and fun crafting projects here on hubpages!
I hope to start adding more projects here too, so check back here often!
Thanks for reading! Happy Crafting!
Related

Give Your Walls an Instant Makeover With These No/Low Cost Design Ideas

Dalek Stools - The Perfect Kitchen Solution for Small People

Painting a Wall Mural Made Easy - Inspiraton, Tips and Tricks Plus How to Instruction for One Colour Paint

Design Disasters: What's Wrong With My Room?

Unique Wall Clocks - What's On Your Wall