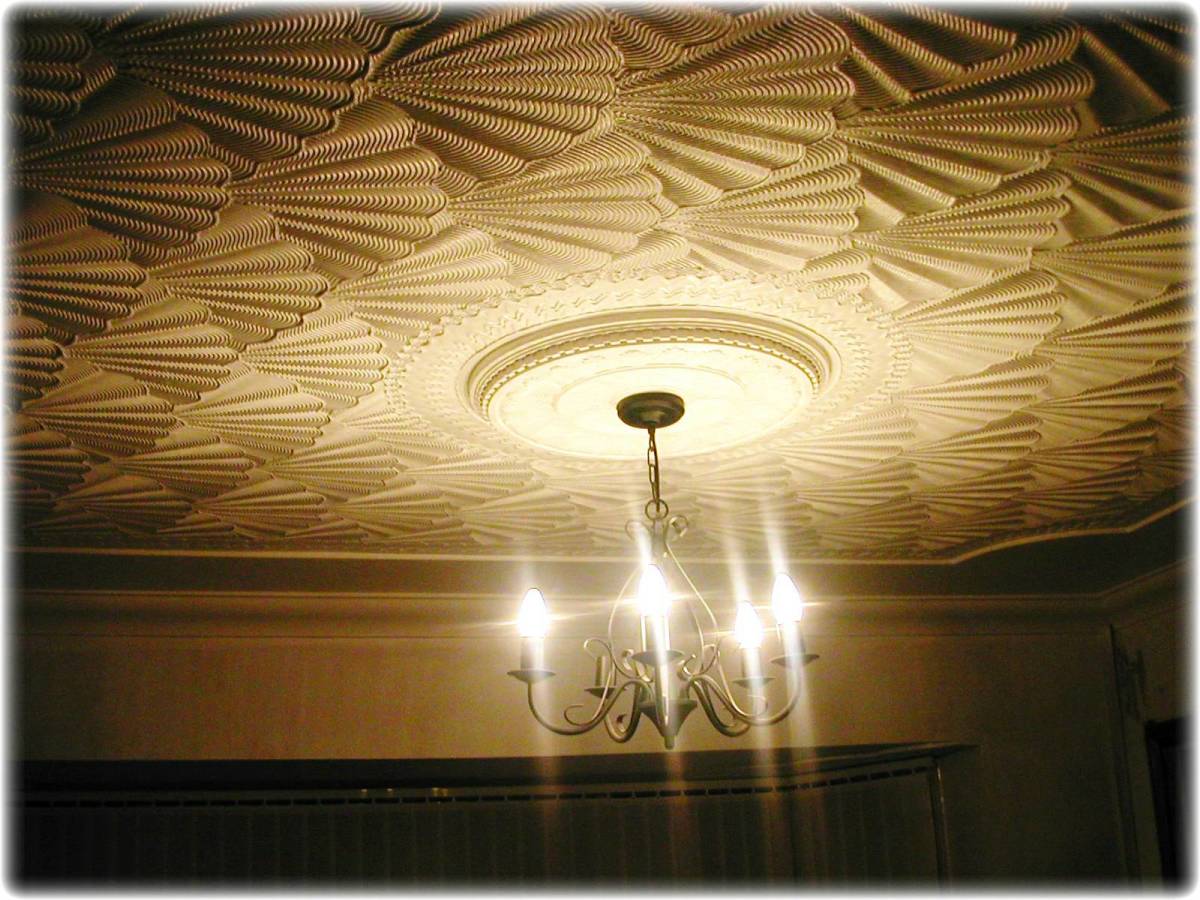
Creative Wall Textures - Fan-Shell Artex Pattern
Drywall Texture Comb Tools to Create Fan and Shell Patterns
A newbies guide to crafting creative ceiling / wall textures using a set of texturing comb tools
Some questions answered: (if I have missed anything out drop me a comment)
1: Where exactly on my wall should I begin my first fan or shell design so the pattern runs in the direction I want it to?
These questions plus the complete how to will be revealed here. Also, I have included a demonstration video where I am carrying out the fan / shell combination pattern on a wall, which adds visual cues and also describes further the process whereas my words may not.
Artexing - Texture Compound - Mudding - The Ins and Outs
Drywall texture compound can be sought ready mixed, or in powder form and once mixed with water for usage, is a cream coloured coating for ceilings and walls and is flexible for making patterns using various tools.
Texture compound is not paint. As paint solution has not the final viscosity of mixed texture and paint solution is required for adding a colour to your finished work, after the job of texturing or plastering is done. One would paint on the material using a brush, roller, sponge or spray, and in thin layers, to act as a coverage. Also, many paints protect the plaster/texture work beneath it.
There are specific texture compounds available in the States and Canada utilized for the purpose of adding bold textures; adding creative textured finishes onto ceilings and walls and is often known as mud, to professional and DIY users.
Compounds available in the UK are called Artex, another is Wondertex, and are ideal for creating textures.
Please make sure availability of the compound before attempting these textured patterns.
TOP TIP:
Plaster material / compound cannot be used as a substitute for making comb patterns or effects, as plaster has entirely specific benefits for a smooth, flat finish, and a comb tool is not to be drawn into or swept through it.
Steps for Combing Walls
For new users it is always a great idea to practice using comb tools and texture material on a prepared wall, first. This process is for practical purposes and to to familiarize yourself with creative texturing;
The porosity of the surface and the time allowance available for making patterns.
The process of laying compound on the correct depth to take combs running through it.
The usage of how to hold comb tools to draw through the texture compound.
Generally playing with your comb tools to create various swoops and patterns.
My advice to new users is take the time to set up a practice wall / area, and play with your new venture until you are competent with all the issues / benefits listed above.
There are many creative and free how to videos available on the internet to view whilst you are practicing comb textures and effects.
Once you have gathered up the compound and the tools to make the fan and shell wall texture comb pattern, and your wall is a prepared fully, and you are competent in the entire process also, and you have prepared a solid foundation which has been primed, or sealed, and left to dry completely. You may commence with the steps involved.
You will want the final comb pattern to run in the direction envisaged.
Mix up enough texture to complete the entire wall, and to the correct consistency.
The correct set up of your very first two rows of fans / shells pattern is paramount for most comb textures, and thus creates an essential uniformed finish to the textured wall, both diagonal and every other direction, to the eye of the viewer.
Many comb patterns to create professionally, takes repetition and dedicated practice. The other benefit of setting up the first 2 rows of comb pattern correctly is, you will be following the first 2 rows as a guide, replicating the same pattern down the entire length of the wall, row by row.
Now for the focal point of the room, and your wall feature.
1: Stand at the door entrance to the room you intend to endow your desired comb pattern and decide visually which way you want to run the textured comb pattern.
The door entrance will always be the focal point. No matter if you are texturing a ceiling or a wall.
There are various versions of fan and shell comb texture. Rows of fans and rows of shells can be in straight lines going from the top to the bottom of the wall.
There are also opportunities where you can run the fans and the shells so they end up in diagonal rows going from the top of the wall to the bottom.
The focal point is where a person enters a room and the wall is the feature in front of him or her, and folk instantly notice the bold design or pattern you have created.
Important note, if you are texturing for a customer do make sure they agree the direction of the pattern before you begin texturing to avoid costly time consuming mistakes later on.
Now you have the means to reach the top of the wall comfortably (a set of steps or a hop-up) and the chosen tools at hand, lay on a band of texture, around half inch thick, across the entire width of the wall. The band of texture laid on should be around two foot wide.
2: Once you have decided the direction the pattern is to run, go into the room to be textured and continue to the very corner of the room where you intend to begin.
Look directly at the wall and stand where you are going to begin.
For instance, if you are using your left hand for combing, slide right over towards the right corner side of the wall where your right shoulder practically touches the wall next to it. And vice-versa for right handed users, slide over to the other corner. This is where you will normally begin your first comb swoop which is drawn through the texture to create the desired fan or the shell pattern.
3: Hold the texturing comb tool and offer it to the corner of the wall. Place the serrated plastic edge onto the applied texture, tilt the comb slightly then begin swooping a full row of fans, overlapping each fan slightly, and working across the entire width of the wall from right to left.
When you start your very first fan your comb tool should touch or rest against the side wall. Your comb tool should also be an inch away from the top of the wall.
So in effect you are working from the right, towards the left side, across the width of the wall.
Completing the Second Row of Pattern
Now, you should step away from your wall and look at what you have done already.
There should be a neat row of fan patterns (swoops) across the entire width near the top of the wall, and still some band of non-textured material present.
For the second row of pattern, you may commence with a row of shells.
In effect, you alternate a row of fans, then a row of shells, which eventually creates the initial pattern where as the fans run down the wall in neat rows, and the shells run down the wall in neat rows.
One row of fan and then the next row of shell then the next row of fan then the next row of shell creates the fan shell combination you are seeking to achieve.
Laying on a band of around 2 feet wide texture until patterned, as you texture repetitively.
In the included video I am creating the diagonal fans shell comb wall texture.
To create a shell pattern, not a fan, sometimes known as an oystershell comb texture, is not so much as you swooping the comb through the texture like you would whist creating a fan, rather, you create a slight, soft swoop first where you intend the shell to be, and which acts as a kind of template, then you commence with the shell design on top of that.
Now complete the second row of shells across the entire width of the wall.
Now, the Meat of the Pattern Combination
Once you have combed the second row of mud, step away and take a look at your wall pattern and make sure you are happy with the direction it is going to run.
So far you have made a neat row of fans, then the next row is shells. Well done, you are on the right track to completing a combination fan shell comb Artex pattern.
Before you commence further, it would be a good idea to take a one inch size soft paintbrush, slightly wet, and run it along the outer perimeter of the ceiling/wall edge you have already textured, to clean any mess from the wall area and for a neater finish.
4: Now lay on another band of texture, around 2 foot wide and about half inch thick and with comb in hand, commence the full row of fan pattern across the width of the wall.
So far, one row of fan and one row of shell, and now one row of fan.
Can you now see the process building up and the desired pattern coming into fruition?
Take note to this next step as this is an important aspect of getting your entire pattern neat and uniformed and is essential for a professional finish.
To complete the 3rd row of fan pattern, you must replicate exactly the very first row you have already completed.
In effect, you are following the first fan pattern when making the third pattern, as following this method will ensure your pattern looks uniform.
You are copying exactly and the same dimension of the first fan pattern, and you will notice the fan swoop will sit directly underneath the first fan swoop.
And so it goes for creating the forth row of shell pattern, you are replicating the second row of shell you already completed so that each shell sits directly in line and underneath the second row of shell you created.
Remember, replication is the key when combining comb patterns.
5: Now complete the forth row of shell pattern across the entire width of the wall by following the second row of existing shells already present.
Repetition, repetition, repetition, for complete success with this comb texture
But Wait - What About Those Pesky Obstacles
Pesky obstacles, that is what you may perceive of light switch fittings getting in your way. Do not despair as you can use these fittings to add extra dimensions and 3D effects by adding a smaller comb effect around the obstacle, or by just running your one inch size paintbrush to tidy up the edges.
What you do is, and so that your pattern remains uniform whilst you texture down the wall, is imagine the fitting does not exist. In other words, keep your patterns uniform by following the process as already explained, and treat the light fitting as a feature you can enhance once you have textured past this point.
Maybe once you reach the area you may not be able to complete a full fan or a shell, and do not try to force it so either.
This is why it is a good idea to have an array of various comb sizes to hand, so you may step down to the smaller comb so that the smaller swoop or shell is easier to make.
Complete your entire patterning row by row, repetitive and throughout the entire wall, till completion, not forgetting to finish those perimeter edges, top, bottom and sides, using a soft, small and wet paintbrush.
I hope this helps in your quest to creating the fan and shell Artex wall comb texture and if you have any questions please let me know. I would love your input and experiences and will reply to your comment in the box supplied
Happy texturing for 2017 and beyond
Go on, Create a Craze!

