Gardening Basics How To's & Tips

You can't get any fresher!

Why garden when I can just go to the store?
Growing your own fruits and vegetables is one of the most rewarding tasks ever accomplished (at least in my opinion). Being able to go out to the garden and pick fresh lettuce, onions, radishes and cucumbers for a salad is much better than getting in a vehicle and going to the store. Plus, with growing your own you are guaranteed freshness.
There are a few basics that are needed in order to garden, but once you have those you are well on your way.
Tools of the trade
Gardening is not nearly as complicated as many people make it out to be. It does take a little practice and sometimes trial and error, but it is well worth the effort. For those who are just starting out, there are a few basic tools and tips you should be aware of. For the sake of simplicity all tools and tips will be for container gardening, but may easily be adapted for larger scale gardening.
- Containers - these may be anything from a simple plastic bucket to a fancier, self watering pot
- Soil - depending on your location, potting soil may be your best option. This is easier for those who live in apartments and do not have ready access to a good old fashioned compost pile
- Seeds - this is where the fun begins; start with your favorites and expand to new varieties later
- Bedding plants - plants may be purchased from a greenhouse or nursery to give you a jump on the growing season (and impatience of a new gardener)
- Hand-held garden tools - a must for container gardening. You will not get a regular size garden fork or spade into a patio container without doing some major damage, so buy the appropriate size tools
- Drainage medium - small rocks, glass beads or broken terra cotta pots all work well
- Sunny spot - most vegetables need at least six hours of direct sunlight a day in order to grow properly. A South facing window or balcony is best, but East and West may also suffice depending on the size of the overhang. For those with a yard, find your sunniest spot.
- Watering can - this isn't a necessity but it does make watering simpler.
- Rain barrel - using rain water is healthier for your plants than tap water. If you do not have sufficient room for a big barrel, collecting it in a five gallon bucket will do as well. If you are forced to use tap water for your plants, fill a bucket and let it sit for several hours in order for the chlorine to dissipate and the temperature to warm up.
With the above basics, you should be ready to start your garden.
Preparing your containers
Some initial planning and preparation is required in order to have success in container gardening. Don't worry - it will not require a lot of time or expense.
- Wash all containers with warm soapy water with a capful of bleach (vinegar will also work). This applies whether they are new from the store or from a yard sale you recently visited.
- Place at least two inches of drainage medium in the bottom of your pot. This will allow for air circulation and eliminate the pooling of water around your plant's root system.
- Add soil to the container, filling it about halfway for the time being. This will get your containers ready for either the bedding plants or seeds, whichever you choose.
Container Plants

Garden Poll
Which do you prefer?
Bedding plants, direct seeding or both?
Now that the soil is in the containers, it is time to decide which will be planted with bedding plants and which will be planted with seeds. The procedure for both is basically the same, although the soil will be added a little differently.
Bedding plants - depending on your choice of vegetables and container size, you will be able to plant several in one container. For the beginner, I recommend tomato and pepper plants as they are easy to transplant and easy to grow. I personally have planted tomatoes in 12 inch pots and have had wonderful success. For the sake of ease in directions, we'll go through the steps of planting a tomato plant in a container.
- Water the bedding plants in the nursery packs well; this will help prevent transplant shock, as the roots will be kept moist.
- If using 12 inch pots, plant one tomato plant in each. Make an indentation in the soil that you have already placed in your containers. Remove the plant from the pack (only remove the one you are planting to prevent the others from drying out) and loosen the root ball with your fingers or a fork. This will help the roots spread out once placed in the container as opposed to being root bound.
- Remove two or three leaves from the stem, starting at the bottom of the stem. Place the plant in the well you made in the soil and stand it up as straight as possible and spreading the roots out. Add more soil around the stem, gently firming it down as you go along. Continue adding and firming until you have covered at least six inches of the stem (provided you had that much to work with - some bedding plants are shorter).
- The idea behind planting the tomatoes deeper than they were in the plant pack is to encourage them to root more; the more roots the more nutrients they draw in from the soil. That in turn leads to larger, healthier fruit and plants.
- When the plants are secure in their new pot, water thoroughly. This will give them the boost they need to grow well. Be sure to keep the soil in the container moist, but not saturated.
Direct Seeding - this method takes longer to produce results, but is essential for those types of vegetables that do not transplant well (such as peas). I have grown radishes, carrots, peas, potatoes, lettuce, beans and even sunflowers in containers with success. The trick is to follow the planting recommendations on the seed package.
- In the case of direct seeding, you should fill the rest of your containers with soil. Basing your choice of seeds on your likes, plant them in the soil according to the seed package directions. Note that in a container you will be planting a little closer than in a traditional row garden. You will have better control over weeds and fertilizing, so planting closer is better.
- When your container is filled with soil, plant your seeds. In the case of radishes and carrots, they may both be planted in the same container. The radishes will mature much quicker so will be harvested before the carrots are ready. This utilizes the space by doing companion planting and you will have fresh vegetables.
- After planting the seeds, thoroughly water the container. This is best done with a rosette style end on your watering can, which will prevent the seeds from getting washed about with a heavy stream of water.
When planting is complete, place the containers in full sun. Do not allow them to dry out completely. Depending on the vegetables you planted, you should see growth emerging within a few days. Keep in mind vegetables germinate at different rates, so planting quicker germinating with slower germinating will make the most of your space.
Gardening Tips
No matter how big or small your garden is, keep the following in mind:
- keep your garden moist but not saturated; most crops do not like their roots to be constantly submerged in water
- keep the soil aerated; this is done by adding compost, sand and not over-watering
- keep weeds to a minimum - your fruits and vegetables should not have to compete with weeds for water and nutrients
- if you must walk in your garden, do it as little as possible. Compacting the soil makes it harder for water to reach the roots and for the earthworms to do their job of aerating the soil.
- add plenty of organic matter to your garden; a healthy garden deters pests and diseases
What about a bigger garden? I want more than containers.
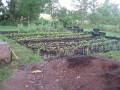
For those who are braver and want to garden on a bigger scale, I would like to stress the use of garden beds. I gardened using traditional rows before and used to swear that was the only way to do it. As I've become older and wiser (probably more older than anything), I have learned using raised beds is the way to go. Not only are they easier to manage, a lot more can be grown in a smaller space by utilizing companion and succession planting (also known as intensive gardening).
Traditional row gardens take up a lot more space and there is a lot more opportunity for weeds to take hold. Weeds like light, and with row gardening there is ample light available. There are big spaces between rows which absorb water which could be much better directed at the growing plants. Plus the soil is compacted from being walked; this compaction leads to less air space for the roots to spread out in search of nutrients. A looser soil encourages root growth which in turn leads to healthier plants.
Related

Organic Gardening Tips | How to Grow Vegetables at Home

50 Recycled Container Gardening Ideas

PRESIDENTIAL GARDENING Historical victory we can all enjoy

How To Grow Cherry Tomatoes In Desert Climates

How to Grow and Reproduce Strawberry plants in Containers by Runner Propagation - A quick gardening guide