Raised Beds: Time Saving Way To Garden

© by Jennifer McLeod writing as jenjen0703, all rights reserved.

Building the Raised Beds
Raised garden beds are sweeping through neighborhoods like wildfire. When I am driving, I take time to look at people's yards to see what type of landscaping they have around their houses.
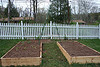
For basic raised beds, you will need the following items: long screws, a drill, a saw, 2 x 6 boards, a tape measure, safety goggles (for sawing), and 2 x 2 strips of wood to anchor the corners of the beds. The picture shown is an example of a kit you can buy at a hardware store; however this method is more expensive and only necessary for homeowners who want their landscaping to look the best. I bought my wood from Habitat for Humanity, and the wood costed me $13.00 for my raised beds.
Now, I am no construction wizard, but I drew a map to decide how I wanted my garden arranged and the placement of the beds. I estimated the size of yard space I would be using for the garden, decided what size I wanted my beds to be. I measured the 2 x 6 boards appropriately and and screwed them together at the corners. I also cut the 2 x 2 pieces of wood into small pieces and screwed then into the corners of my beds to create more stability in the bed frames. Once you are finished measuring and building your beds, position them in your yard according to your map, or until you are happy with their placements.
Filling the Beds with Soil
Moving On...
The next step is to find soil to fill the raised beds with. Most landscaping companies sell soil, mulch, and compost by the yard. Purchasing these items is expensive, and I was fortunate when I grew my first garden with raised beds. There was a location in my city that had a hug mound of rich, black soil and mulch. This was the drop site where the city dropped off fallen trees and chipped them into mulch. Soil that was dug up from city projects was dropped off at this sight. Needless to say, we were able to receive our soil and mulch for free. As for compost, visit a cow farm with your truck. Many farmers are willing to let you fill your truck bed with manure for little or no cost.
Most people have adequate ground to plant a garden. If you are one of these people, you will only need to fill the beds with soil. I would mix in some compost, just to get the soil fertilized before I start planting. If you have a yard like I did, you might have to do some digging before you fill your beds. My yard was all sand where I planted my garden, but it was the only place in my yard that received the most sunlight. I dug down one foot into the ground below the raised beds before I filled the hole and the bed with soil. This created an extra 12 inches of space for my root systems. Most traditional, row gardens have a depth of about 4 inches for their root systems to grow. Raised garden beds give you more space, especially if you dig into the ground. My garden beds had a total of 18 inches into the ground for my roots to bury themselves. This might have been extreme, but because I was growing in sand, I wanted to be sure I was covered. Take the time to test your soil with a pH tester. If pH levels are off, it can make your gardening experience less than it should be.
Also, I mulched the aisles between the raised garden beds. This made a huge difference in the outcome of my garden. Mulch has several advantages: it helps the garden retain water and heat, minimizes the amount of time spent weeding, and creates a more beautiful appearance for your garden.
Vegetable Beds

Planting Time
Some seeds need to be started indoors, prior to the last frost. Some seeds can be planted directly into the dirt. It is up to you to decide how you want to start your plants and when you want to plant your seedlings. Personally, I would not plant anything for one week after filling the beds with soil mixed with compost. You can turn the soil a few times throughout the week and give the sun a chance to warm the soil up first. Also, keep in mind that the directions on the back of the seed packs are directions for a traditional, row garden. Because raised garden beds have more space for the root systems than a row garden does, the plants can be placed closer together and compacted close to each other.
It is also a good idea to investigate your plants. Certain vegetables should not be grown near other vegetables because they do not interact well with each other. Also, check out a list of Natural Bug Repellents to learn more about plants that help deter bugs and act as a bug repellent. Marigolds and nasturtiums are used to keep several bugs away from your vegetables. I would not suggest using mint, unless you are growing it outside and a short distance away from the raised beds, as mint spreads like wildfire. Be sure to stick small markers into the dirt so you know which plants are which. This is also an excellent time to build trellises for the raised garden beds. I used scrap wood and twine and built trellises in various spots. These trellises were for the vegetables that have runners and climb, such as cucumbers and squash. Trellises save a large amount of room in your garden. They help to keep the vegetable off the ground after it is produced, and they help prevent your plants from growing everywhere, causing the runners to hook onto and choke out other vegetable plants.
At this point, you will need to maintain your garden for the summer as you normally would, being sure to water and feed your plants. You will discover that there is less weeding to be done in raised garden beds. If you mulched the aisles between the beds, you will not have to water your garden all the time, but only as needed.
Extras for Your Garden
The Pea 'Shiraz' was by Thompson and Morgan and was nominated as the 2012 Vegetable of the Year is a beautiful and healthy addition to your garden. The deep, purple color provides anthocyanin, a natural anti-oxidant.