How-to Lay a Concrete Paver Stone Walkway on a Budget

What you will need:
At least 1 paver stone mold of your choice. Pictures at the end of the article will show you some examples readily avaible on Amazon and at your local hardware store.
Enough 60lbs/80lbs bags of concrete mix to complete your project. Note: It takes 1 and 1/2 60lbs bags to fill one mold or one 80lbs bag.
Four 2x2x10 wood pieces
A shovel
A wheel barrel or bucket for mixing cement
1 finishing trowel
From the drain to the walkway
Heavy rain in late winter of 2018 made it clear that water abatement was now a new and significant part of my homeowning life. It all began with water etching its way across the middle of my garage. In my article "How-To Install a Channel Drain on a Budget," I outline my method to remedy water streaming through my garage. The new drain provides a route away from the garage towards the cement stairs south of the house. Great. Except my landscaping woes did not end with the channel drain, there was still more to address. With the drain permanently installed, I needed a transition and a walkway from the garage and driveway to the north side of the house.
The original walkway was as inadequate as it was unattractive, so it did not bother me to focus on improving the area. After many youtube videos on possible approaches, I settled on faux paver stones and concrete. I went to my local hardware store and found a paver stone mold that suited my fancy and bought ten bags of Quikrete at 60 pounds each.

First things first
First, I dug out the dirt for the transition area between the garage drain and the first stretch of the new walkway. Then I measured the with of my mold and built a form with 2x2x10 wood pieces from the hardware store. I cut an additional piece of 2x2 (the same width as the paver mold) to use as an adjustable base as I moved down the length of the walkway. I supported the form with concrete cinder blocks leftover from previous projects.

Once I'd cleared enough dirt, I put the form in place and made final adjustments by adding and removing soil from appropriate areas. The inner dimension of your form must comply with the final dimensions of your project area. Once you've placed your form in the desired location, you will need to find a way to secure it. Most videos will show wooden stakes temporarily driven into the ground to which the form is then nailed or screwed. I have rocky soil, so this option didn't work for me, luckily for this area, the cinder blocks worked like a charm.
How to Screed Concrete
Build a screed
A screed is used to level your wet cement to the desired height. I use two pieces of scrapped 2x4 or 2x2. For this project, I used two pieces of 2x2. I cut the first piece to the length of the inner width of my form; I cut the other four inches longer. I attached the shorter piece to the long piece with screws and left two inches of space on both sides of the longer piece. To screed my slabs, I filled the form with cement then placed my DIY screed tool on one end of the slab and worked my way across, creating a smooth level slab of concrete. The slabs do not need to be smooth and pretty for this project as the paver molds will cover up any inconsistencies.

Mixing and Pouring Cement
Using the spare piece of 2x2 I mentioned as an adjustable base earlier in the article, I measured the length of two forms. This method made each concrete slab about two feet by four feet. With the form in place and secured, I began to mix my bags of cement. Mix and pour until your form is filled. Note: be sure to pack your concrete into the form with your hands as you go, making sure all spaces are completely filled and pat it like a pet to remove bubbles.
How to mix concrete by hand
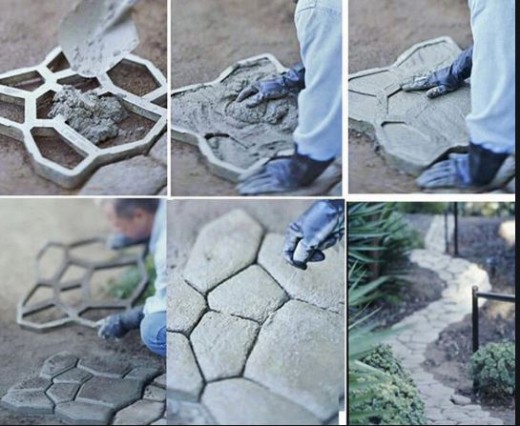
Using the forms
With one slab poured, I placed the paver mold on top of the wet slab starting at the far left. Fill each space in the mold to the very top then use your finishing trowel to level and brush off excess cement. Slap each section of cement to fill all the corners and remove air pockets. Finally, use your finishing trowel to smooth each section before removing the form. If you mixed your cement properly, you will be able to remove the form immediately and move on to the next section. Continue to fill 2 x 6 slabs and three pavers at a time until you have reached your final destination. Remember that rocky soil I mentioned earlier? Well, those rocks are handy when using an A-symmetrical form. I used the rocks I dug up from previous projects to fill in gaps and create a transition between the garage drain and the new walkway. I used excess cement to secure stones in the gaps; there is also a transition area filled with rocks where the walkway makes its turn towards the side of the house.

Rewards
This walkway project was very rewarding for me. This area went from a landscaping disaster to an area with purpose and greater curb appeal. I did this project 100% by myself, and it was moderate labor. Sixty pounds of dead weight is heavy for me, but in the end, I was stronger, more confident in myself, and proud of my accomplishment. I hope you all have the same experience taking on challenges around your homes, and please share with me your successes and lessons learned. Thanks for reading.


This content is accurate and true to the best of the author’s knowledge and is not meant to substitute for formal and individualized advice from a qualified professional.
© 2019 Lani Morris
")


