Canning Made Easy, How to Can Home Grown Vegetables

Preserving fruits and vegetables from the garden and farmer's market is a good thing
If you are like me, and I dare say you are, you simply want to have the very best foods available for your family. For us, this means getting the very best and nutritious organically grown fruits and vegetables available to us, for our family is our highest priority. So much so, we take the time and make the extra effort to grow our own fruits and veggies.
Because we understand and believe preserving fruits and vegetables from the garden and farmer's market is a really good thing.
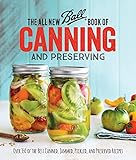
The canning Bible
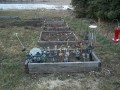
Preserving fruits and veggies grown in container gardens stock pantry and save money
Our backyard vegetable gardens, and container gardens for rare thinking people like us, just make sense. For those of us that share our passion, but do not have the time and space or expertise to grow our own, there is the local farmer’s markets where, when we ask the right questions, we can pick up locally grown fruits and vegetables. We can use them to supplement our harvest, or simply rely on the farmers to do all the planting, weeding, growing and harvesting for us allowing us to discover how to can homegrown vegetables, and simply enjoy all the seasonal farm fresh goodness any time of the year. Then we can be secure in the knowledge that we know exactly what our family is putting into their bodies.
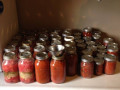
Canning homegrown fruits and vegetables as soups, sauces, and preserves
Canning fruits and vegetables really is easy, and as an added bonus, preserving your own homegrown vegetables will require you to purchase a few new necessary kitchen gadgets. Before you get too excited about the cost, let me share a little secret with you, the kitchen gadgets you will want to buy do not cost an outrageous amount of money.
Even better news, they are unbelievably easy to use, and cleaning is as easy as knowing how to use your dishwasher. OK, for those of us that do not have the option of using a dishwasher, a good bottlebrush, hot soapy water and a little hard work will work just fine.
Canning fresh produce, salsa and chili is easy
Canning is a safe and easy method for preserving foods. The canning process involves placing foods packed into specialty canning jars and heating them with boiling hot water, using a water bath canner, or a pressure canner, which destroys the microorganisms that cause food to spoil.
During this process, the boiling hot water heats the food inside the jar. This in turn, heats the small amount of air trapped inside the jar. As the air heats up, it expands and has nowhere to go other than to escape through the lid on the jar.
As the jar and the food inside it cools, a vacuum seals the jar and the lid. This vacuum seal prevents air from getting back into the jars and contaminating the food inside them, bringing with it contaminating microorganisms.
Which canner is best, water bath or pressure cooker style canner?
Water Bath Canners, boiling water bath canning is the quickest and easiest method for processing high acidic foods. High acidic foods have a pH of 4.6 or less and contain enough acid to keep the Clostridium botulinum spores from growing and producing their deadly toxin.
The boiling water bath method is safe for tomatoes, fruits, jams, jellies, pickles and other preserves. Then there are certain foods, such as tomatoes and figs, which have a pH value close to 4.6 that need to have acid added to them in order to use the water bath method. You can simply add lemon juice or citric acid, depending on your taste. I prefer the lemon juice personally, but they both work equally well.
In this method, pre-sterilized jars are filled with the desired food, then the jars are heated completely covered with boiling water 212°F at sea level, and cooked for a specific amount of time depending on the food. Which brings us to one of the must have resources, a complete set of step by step instructions and recipes for canning and preserving your soon to be family favorites. Pick-up your own copy of the Complete Guide to Home Canning and Preserving and you will have the most current and safest canning and preserving instructions available.
Everything you need to can using a hot water bath canner

Pressure canners
Pressure canners, Pressure canning is the only safe method of preserving vegetables, meats, poultry and seafood. Specialty canning jars filled with your desired food placed inside a special pressure cooker designed for canning. When heated to a temperature of at least 240° F, a temperature that can only be reached using the pressure cooker / canner method.
The main reason why pressure processing is necessary, a microorganism called Clostridium botulinum. Though the bacterial cells cannot survive at water boiling temperatures, they can form spores that can withstand these temperatures. The spores grow well in low acid foods, and a vacuum, when canning low acidic foods such as, meats, soups and sauces that contain meat or vegetables like green beans. When the spores begin to grow, they produce the deadly botulinum toxins (the stuff that will make you sick).
The only way to destroy these spores is by using the pressure-cooking / canning method processed at a minimum temperature of at least 240°F, for a specific amount of time, depending on the food and the altitude of the area you are canning. Foods that are low acid have a pH of more than 4.6 and because of the danger of botulism, they must be prepared in a pressure canner. Low acidic foods include meats, seafood, poultry, dairy products, and vegetables like green beans, peas, and carrots.
When comparing water bath canners to pressure canners for the sake of making a buying decision, consider this, a pressure canner can do both canning methods, where the boiling water bath canners cannot.
Pressure cooker canner, should be used to can low acid foods, tomato sauce, and soups that contain meat

Canning Jars
Canning jars, specially made to hold up to the heat required for canning food safely are reusable unless the rim of the jar is chipped or broken, and will last for many years. Jars are available in several popular sizes. Pint and quart size jars are used to can fruit, applesauce, tomatoes, pickles, and the like. Half pint jars hold 8 oz. and are the perfect size for jams, jellies and pickle relishes. You can get pint and quart jars in either, regular or wide mouth styles. Wide mouth jars work great for pickle spears and larger pieces of fruit like peach or pear halves. Canning jars sold in boxes of 12, come complete with a two-piece lid. The lid is comprised of the reusable outer ring, which during the canning process, holds the lid in place until the vacuum creates the airtight seal. The lid portion that creates the airtight seal has a one-time use only sealing capability, used for one vacuum sealing process. After the seal has been broken, it will not reseal for another canning
Do not use just any jars. Ball replacement canning lids may thread on to a miracle whip jar, some commercial pasta sauce jar, or another similar jar, but the glass is not as strong or tempered as it is in Ball, Kerr, or Mason canning jars. The surface of the non-canning jar has a rim that is much too narrow to allow a good airtight vacuum seal to form. These jars are easier to crack in the canning process and the lids are less likely to seal properly. Look at it this way, you can go to Rural King or Target and by a dozen new canning jars for less than $10, is it really worth the risk to save $10?
Canning Jars Use Two-piece lids
The most popular canning jar lids consist of the lid that seals to the jar rim and a ring that holds the lid in place. Amazon.com, or stores like Target or Rural King, and other department or hardware stores, kitchen shops sell replacement lids. Purchase your lids in packages that include both rings and lids together, or buy boxes of just lids. Sealing lids should never be re-used. Make sure you always use a new lid every time you can a new batch of your favorite food. Get the right size replacement lids for the canning jars you plan to use , regular or wide-mouth lids are different, however the lids that fit a regular mouth pint jar are the same lid that you will use on a regular mouth quart jar, and the same is true for the wide mouth jars.
Must have canning items
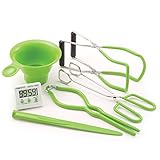
Basic Canning Gadgets you will need
● Magnetic lid lifter, to remove the lid from the pan of hot water used to soften the seal and sterilize the lid.
● Jar lifter, used to remove the jars from the canner full of boiling hot water after the canning process is finished.
● Wide mouth funnel makes it easier to fill regular mouth canning jars with soups, sauces, jellies, salsas and vegetables.
● Wooden or plastic spatula, used to help fill the jars and to remove any air bubbles trapped in the food before canning.
● Clean kitchen towel, to wipe off the rim of the canning jars before putting the lids and rings on to ensure a good seal during the canning process.
● Heavy dishtowel or absorbent mat, used to set the hot canning jars on after the canning process, allowing the jars of food to cool, and the vacuum to form sealing the lids.
Canning and preserving your own foods is sure to get your creative juices flowing.
Canning your own fresh garden vegetables or those bought at a farmers market can burn fat and calories taking the pounds off now!
Best wishes. Mike
The author of this publication, Mike Teddleton owns the copyright to. Canning Made Easy, How to Can Home Grown Vegetables. The rights to publish this article in print or online can only be granted by contacting me the author in writing. You may use the intro and link back to the article directing the reader back to my post here at HubPages where they may find the story in its entirety