How to Create Your Own Walk-in Closet
What to Do in a Big Bedroom With a Small Closet
About a year ago, my husband and I moved into a lovely Cape Cod style home. With two full bathrooms, a spacious kitchen that offers plenty of cabinetry, a large open living room, and four bedrooms (technically any room with a closet is a bedroom) it was perfect – well almost perfect anyway.
Unfortunately, whoever built the house (back in the 60s) must have assumed that the people who would be living there hated jackets, clothes, shoes, and just about anything else you could store in a closet. Why else would a roughly 289 square foot master bedroom have a closet that’s about 1/25th the size of it?
Initially we left our clothes and shoes in the smaller downstairs bedroom, which ironically has a closet that’s probably triple the size of the one in the master bedroom (which still isn’t saying much considering it’s only about 12 square feet). While this proved to be good exercise, it got pretty annoying going up and down the stairs just to get dressed. We contemplated getting bigger dressers, but no matter how neatly I fold clothes I always feel like I have to re-iron them every time I take them out of the drawer. So… what to do about a large bedroom with a small closet?
What I really needed was a big walk-in closet, so I decided to just create my own. It was my very first home improvement project and I completed it for less than $400 with only a few simple tools and materials. Here’s how you can create your own walk-in closet.
Materials You'll Need
Extra long curtain rod (I used one that extended more than 130 inches, but the length depends of course on how big your room is – it does not need to extend the entire length of the wall)
Brackets and mounting hardware (this is usually included with the curtain rod itself)
Curtains (I used six 44in x 84in panels, but again, height and width will depend on how “tall” and “wide” your room is)
Sturdy clothing racks (I used four) – you can find these at Amazon
Power drill
Ladder

Building Your Walk-in Closet
- Measure a distance about three and a half feet from the wall opposite your bed (you can really choose any wall as long as it’s blank – i.e. it doesn’t have windows).
- Make one mark on the ceiling about a foot from the wall adjacent to the one you just measured away from (i.e. the wall from step one). This is where the first curtain rod bracket will go.If you make it any closer to the adjacent wall, you’ll have trouble inserting the curtain rod and attaching the finial to the end of it.
- Make a second mark on the ceiling about three to four feet from the first mark, a third mark about three to four feet from the second mark, and a fourth mark about three to four feet from the third.The number of marks and the distances in between will vary depending on how long your curtain rod is so please just use this as a basic guide.
- Use your power drill to mount the brackets (they usually come with instructions on which size drill bit to use).
- Insert the curtain rod through the brackets, adding the curtains as you go (I had two panels hanging between each bracket).
- Assemble your clothing racks (the ones I used took about five minutes to put together).
- Place your racks behind the curtains and add your clothes.
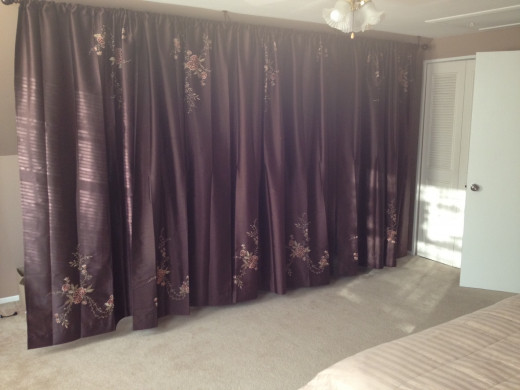
That’s it! You now have your very own closet! You can even throw, and I do mean throw, your shoes behind there. In fact, you can throw just about anything you want back there. It doesn’t matter how messy it gets because the disarray is totally hidden by the curtains.

