- HubPages»
- Home and Garden»
- Gardening»
- Fertilizers & Compost
How to Make Compost Out of Your own Kitchen Garbage.

")
Why do we need to make compost from our household .
This hub describes how to make compost from organic wastes you produce in your kitchen. There are some benefits of making compost, especially when the materials (the wastes) come from your own kitchen :
1. You know your garbage best, so you have the least drawback normally caused by the feeling of disgust when you treat it in compost making.
2. You dump less garbage so it helps you decrease the frequency of emptying the garbage can/bin.
3. You can supply your own need of compost for gardens, potted flowers and plants, lawns, yard grass, etc.
4. You can make some income from selling compost in case your compost production exceeds your need.
5. Your efforts in compost makings show your concern in environment protection since the compost you use will substitute for the need in chemical fertilizers.
Compost is absolutely good for soil structure which is needed for long term cultivation besides slimming your budget for fertilizer expense.
6.Compost will make your plants grow abundantly and lushly, bloom and propagate prolifically.
7. With compost you also start and create your own organic farming, a wise step for more healthful consumption in your life.
Fashionable and Effective Composters


Tools and Materials.
Tools :
1. A drum with lid.
2. A small-medium size scoop
3. Alcohol thermometer if any .
4. A knife
5. A sieve
6. Rubber gloves.
7. Mask.
Materials :
1. Organic wastes (pay attention to the conditions of acceptable or unacceptable organic wastes given in this hub).
2. Starter, you can use goat manure or if you can't stand dealing with manure you can use ready-for-use starter called EM 4 as a starter. EM 4 (EM stand for Effective Microorganism) is liquid contains cultures of microorganisms: Rhodopseudomonas spp, Lactobacillus spp, Saccharomyces spp, Actinomycetes, Aspergillus and Penicillium which have some positive functions to the soil like improving biological, physical and chemical characteristics of soil, enhance decomposition of organic materials, and enriches beneficial microorganism in soil. You can buy EM 4 at farm stores.
3. Water.
4. Soil.


Four Main Things to Do.
There are four main things to do in this activity :
1. Prepare the composter
2. Prepare the compost media
3. Load compost media into the composter.
4. Harvest the compost.

1. Prepare the Composter.
In this compost making we apply aerobic technique which needs the presence of oxygen for decomposing microorganisms to work.
The composter consists of two parts :
- The composting Barrel
- The aeration pipe made of PVC.
Composting Barrel :
You can use a large used bucket, plastic barrel, or a drum as a the composter. Clean the inside and outside parts of the bucket/barrel/drum you're going to use as composter, specially if it's an ex container of grease, oil, or other dangerous chemicals which the rest may poison the compost.
Make some holes on the barrel's wall, cover the holes with chicken wire fence from inside of the barrel. Tie the chicken wire fence with some wire so that it stays at its place when you fill the barrel with compost media.
Make a hole at the center of the barrel lid. The size of the hole should fits the size/diameter of the aeration pipe.

Aeration Pipe:
Aeration pipe is needed and used as a channel for letting oxygen to get inside the compost.
The aeration pipe is made of PVC pipe which the length depends on how deep your composting barrel is. Chose the 3/4 inch pipe, cut it with a saw at the length with excess tip around 20 cm longer or above your composter barrel. So, the total composter length should be :
The composter depth + 20 cm long tip.

2. Prepare The Compost Media.
1. Waste selections :
Organic wastes which will be used in compost making must be selected and free from :
- Bones,trunks, paper, plastics, rubber, glass, metal, paper clips, staples, and rocks. They are difficult or even impossible to be decomposed by composting microorganism and may hurt when you use it as compost.
- Meat, fat, carcass, blood, and oily waste. Their presence in decomposition will make bad smell due to production of hydrogen sulfide gas.
- Battery, broken thermometer, etc. They may pollute compost with dangerous chemicals like Cd and Pb.
2. Cut the organic garbage you have sorted into smaller pieces of around 1 up to 2 cm long. The smaller the size, the better for faster decomposition process.
Using Pots as The Composter.


3. The Media Loading.
1, After selection and cutting procedures, now the organic waste is ready for loading.
Put some waste into composter up to around 5 cm height, then add topsoil on top of it. Continue loading some more organic garbage onto the top soil into the composter and after reaching 5 cm height, add top soil again on top of it. Do it all the way to the surface so that you make layers consisting organic waste and top soil in the composter.
While you load the compost media, make sure that the aeration pipe is positioned in the middle of composter. The piling up media inside the composter will hold aeration pipe to stand up there.
At this stage, you can also use goat manure instead of top soil, or combination of both.
2.
Moisten the content in the composter with EM 4 solution. To make EM 4
solution you can dilute 200 cc (around 2 full-EM 4 bottle cap) of EM 4
liquid with 2 liters of water and stir it.
Pour the solution slowly to make the media inside the composter damp.
You can give more EM 4 solution to the media until it reaches sufficient dampness.
3. After you feel that the media is damp enough (the media feels wet but the water in it should not be excessive-a simple tip to check this condition: if you squeeze some of it in your hand, no water will drip from it) put the lid of the composter on.
4. It will take around 2 weeks until 1 month for the media to be decomposed to become compost. Due to the decomposition process, the temperature inside the composter will increase up to around 40-50 degree celsius. This temperature increase shows that your project runs as expected.
5. Check your work regularly to make sure that the media is still in desired moisture. Remixing the content may also be necessary if you find that the result of decomposition is not evenly dispersed.
6. The compost is done if the media has turned into dark brown or black soil and it ready for use in your plantation.
Thanks
to the decomposition process that makes organic wastes in the kitchen
become something very useful and also kills unwanted microorganisms in
the soil.
")
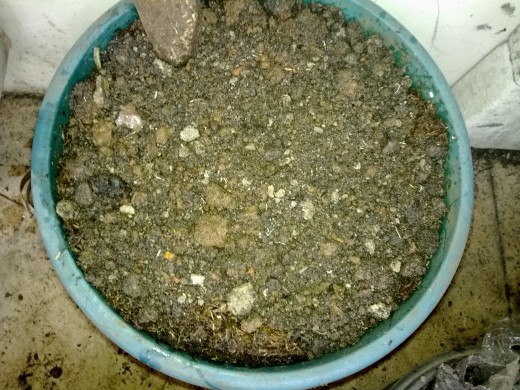
4. Harvest the Compost
The compost is done if the media has turned into dark brown or black soil with crumbly texture and it is ready for planting use. I also find some earth worms in my compost yield and I take it as another sign of good quality compost.
Thanks to the decomposition process that makes organic wastes in the kitchen become something very useful and also kills unwanted microorganisms in the soil.
In good compost no remains of seemingly organic waste seen. The complete decomposition process has made everything look uniform as compost.


