How to Paint Your Kitchen or Bath Countertops

Update your countertops with Paint.

Do you hate your old ugly kitchen or bath countertops?
Do you hate your old ugly kitchen or bath countertops? So you want to update your kitchen without spending a ton of money, but you want something durable? I'm going to show you how to do this. It's relatively easy. You'll need a few supplies, but the final outcome is worth the time and effort.
This is an easy project for a novice and the best part is, if you screw up, just repaint it.
Companies make and sell countertop makeover kits for hundreds of dollars, you can do this with better results without their kits, customized, and for a lot less money. For $100 or less and you can make those old nasty countertops come back to life!
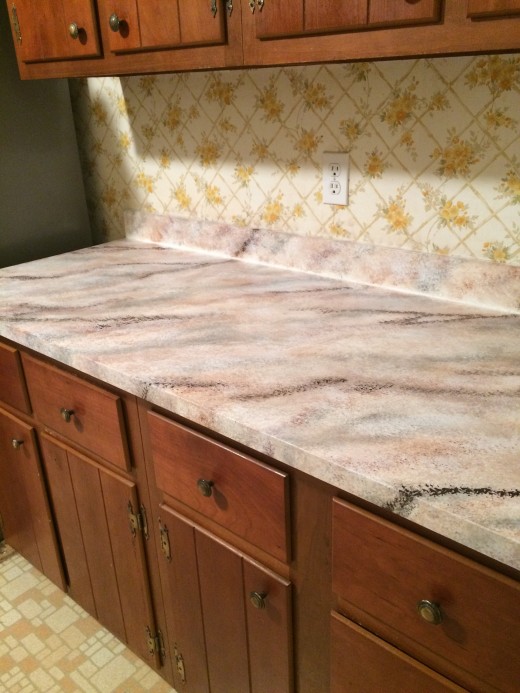
Before restoring countertops


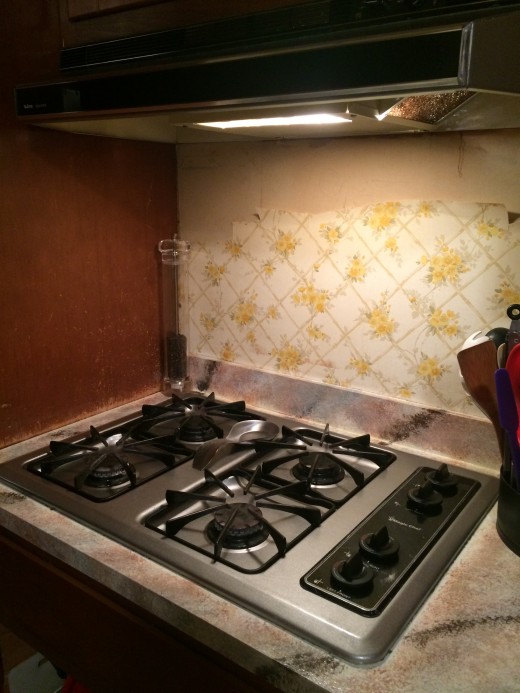
Decided to repaint the cooktop too!

Why use Polyurethane over Epoxy?
I've done the research for you. Using Polyurethane over Epoxy is a smarter choice. For a home DIY'er it's easier to apply. It's not as messy. Water-based polyurethane will also not yellow or discolour over time. It's 3:1 more durable. It's a lot less expensive, will run you about $15 for 150aq ft. of coverage.
Homeguide.com states-Polyurethane varnish is one of the best finishes for a countertop -- it's durable and, when applied properly, can be just as subtle as lacquer. Best of all, applying polyurethane doesn't require spray equipment and is a job you can easily do yourself.
According to FDA regulations, the typical clear wood finishes that dry to a hard film, including polyurethane, are considered food safe. Wait to use the surface until the finish is completely dried, and clean it before allowing food contact. Just don't use knives on the finished countertop. Always use a cutting board to protect them as long as possible.
POLYURETHANE FLOOR COATING BENEFITS. Like epoxy, polyurethane is a thermosetting polymer as well and is considered a high-performance coating. ... Aliphatic polyurethane has more flexibility than epoxy and it is this flexibility that aids in absorbing impacts better. It is also much more abrasion resistant.
Polyurethane varnish is highly durable. Oil-based polyurethane is a highly durable finish, but it is also easy to apply. It is resistant to heat, chemicals, and wear and tear such as scratches. ... Water-based polyurethane will not penetrate the wood as deeply, and also does not add color to the wood.
Supplies you will need
- Natural sponge, paint roller (mini size), paint brushes (various sizes), a wash rag, plastic bag, feather, tissue paper (optional for creating faux finishes).
- 150 grit sandpaper.
- Painters tape.
- Foam roller and brushes (for polyurethane)
- TSP or good cleaner/degreaser
- Wood filler or other supplies to repair damage or cracks if needed.
- Acrylic primer-be sure to get a brand intended for high gloss surfaces such as Bullseye 1-2-3, or similar brand.
- Acrylic paint-larger quantity for the base color, then smaller amounts for the colors you will use to create depth and texture. A good rule is use 4 colors.
- Gloss or satin water-based polyurethane (enough for at least 4 coats). We chose
Rust-Oleum 200041H Water-Based Polyurethane, 1-Quart, Gloss Finish - Any paint additives you want. Glitter, mica, flecks. (optional).
Instructions
- Clean the surface. Use TSP or other degreasers to clean your countertops really well. You want to remove any gunk, dirt, grime, and grease as best you can. So don't do a crappy job.
- If there is any damage to the surface, repair it now. You may need to fill holes or use wood filler, or glue for any parts that are damaged.
- Once the surface is clean and repaired, sand it with the 150 grit sandpaper. You want to rough up the surface enough to help the paint adhere.
- Now clean the surface to remove the sanding dust. You can do this with a wet rag or cloth, but be sure to get rid of the dust.
- Tape off anything you do not want to get paint on.
- Now prime the surfaces with the primer paint. Once this is dry according to instructions you can paint the base color on. We did two coats of primer, but you don't have to.
- When the base color is dry you can begin your faux finishing effect. This will vary by your preference, but it's typically layering paint and creating veins to mimic stone or another natural surface. See info attached in this article for ideas and suggestions. It can help to practice the look you want on scrap paper before applying.
- When everything is dry, apply your polyurethane (sand very lightly between coats) to protect and seal the surface! And that's it! New countertops! We did 4 coats of polyurethane, it's a bit time consuming but I wanted to seal the surface really well.
- Follow all alotted dry times for the paint before applying more coats. Your counters can be used lightly the next day, but allow at least 1 week for full cure time.
Care and Maintenance of your new countertops
Remember when you clean the surface of a polyurethane counter that you are cleaning the finish, not the actual material the countertop is made of.
There are a few ways to clean and maintain your finished countertops.
1. Use a damp rag with mild dish soap. You do not need to saturate the surface with water. Saturating the surface and not wiping it up is polyurethane's enemy, so make sure you clean up spills the moment they happen.
2. Use a diluted solution of water and vinegar, or water and bleach.
3. Do NOT use anything abrasive such as scouring pads, or heavy grit cleaners like Comet or Soft Scrub. Although the finish is strong to resist scratches you don't want to dull or damage it when you can avoid doing so.
4. You can use, window cleaner, mineral spirits, oil-based cleaners are not recommended.
Cheap remodels
We have a lot of work to do in our kitchen. The countertops are just the start. We will also be removing wallpaper and repainting cupboards. We'll also update the hardware on the cabinets. Doing all of this and replacing the flooring will be well under $1000. It's not that hard to do a cheap brilliant update, you just need a few bucks and some elbow grease. Do it properly to extend the wear of the painted update!
Practice and Supplies


Other things to paint!
- How to paint old tile and grout with Epoxy paint!
Give old tile and grout new life with Epoxy paint, skip the tear out! This is an easy DIY project that can rejuvenate yucky tile and an outdated space in no time flat! - Update Old Ugly Appliances With Paint!
Appliance paint can transform old ugly appliances in a weekend DIY project! - How to Paint a Concrete Basement Floor With Epoxy Pa...
An easy weekend DIY project. Paint your concrete basement floor and expand your living area! Add extra space or even another family room.
This content is accurate and true to the best of the author’s knowledge and is not meant to substitute for formal and individualized advice from a qualified professional.
© 2019 Rebecca


