Leaf Mulching from Start to Finish


Repurposing your fall leaves for mulch is an eco-friendly way to enrich your lawn and flower beds. When the leaves are in full fall, the approach to the task may seem overwhelming. My first year using leaf mulch, I repeated some steps and came up with a system to prevent rework and optimize the process. Nothing will stop your leaves from coming down, but by following this process, your leaf mulching will be as smooth as it is good for your garden.
Do I have to shred the leaves?
Not always. If you have an area where you aren’t concerned about plant growth, but want mulch, whole leaves are fine. They will eventually break down and enrich the soil. In fact, if you have a meadow or other natural area, whole leaves are good for insects, birds and other wildlife. A little benign neglect is just fine for those areas.
On your lawn and in your flower and vegetable beds, whole leaves will do damage. They will smother any existing vegetation and will break down too slowly for clean replanting the next spring. For these applications, shredding the leaves is required!
Before You Start - Equipment, Safety and Storage Considerations
Equipment
You will need one of the following: 1) A mower with a mulching attachment; 2) a leaf shredder; or 3) a leaf blower with a reversible setting to shred the leaves. I use an electric leaf shredder that I bought for under $70. It’s already paid for itself in what I would have otherwise spent in mulch. A leaf blower is helpful, but not necessarily required. I prefer electric corded varieties. I don’t like working with gasoline and gas blowers tend to be louder and heavier than their electric counterparts. Although I’ve tried the reverse setting on a few different leaf blowers, I’ve never found one that produced an end product of the size I get from the leaf shredder, so I personally haven’t had success with that method.
A rake is also a necessary tool. If you have them, a leaf rake as well as a metal garden rake would be ideal. At a minimum, you’ll need a garden rake for spreading your leaf mulch around. Safety equipment should include heavy gloves, eye protection, a dust mask and earplugs.
Safety Practices
If you are using a leaf shredder, make sure you always unplug the equipment before you put anything inside of the mulching attachment – especially any hands or other body parts! Turning it off is not sufficient as injuries may occur. Ensure the leaf shredder is always on level ground so that there is no risk of it tipping over while shredding. Drink plenty of water. Even when temperatures aren’t high, dehydration is still a risk.
Storage
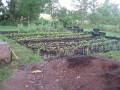
This process won’t be complete in just one session and you’ll likely want to save some mulch for refreshing in the spring. Come up with a plan for where you’ll store the mulch while the clean-up is on-going and where you’ll store your spring materials over winter. This may or may not be in the same place, depending on your space. For example, in my yard, I use a thick blanket of leaf mulch over winter in my flower beds. I can’t put the mulch down immediately because leaves will continue falling on top of it and I don’t want to rework all of this material multiple times. I have one vegetable bed that I clean out and use as in-season shredded leaf storage until the clean up is nearly over. Then I start applying the materials to the remaining flower beds after each clean up. Sure, entire leaves are still mixed in a little, but not enough to smother anything, so that’s ok. The material in the vegetable bed from earlier in the season becomes my spring mulch supply and the nutrients leaching out of the leaves soak into the vegetable bed soil to enrich next spring’s crop.
Figure out your plan in advance to minimize movement and frustration. The leaf pile will decrease considerably in size from the fall until spring, so while you may start with a heaping pile, by spring you wish you had more leaf mulch to spread around!
Early Fall - Light Leaf Drop
Starting in mid-September, your trees may start light shedding. This light leaf drop poses no real risk to smothering your plants or grass, so for this stage of the process, I recommend blowing the leaves out of your flower beds and just mowing over them with your lawn mower. Don’t bag up the debris, just let it decay in place. It will feed your lawn much-needed carbon, in addition to the nitrogen from the in-place grass clippings. The added advantage is it will shade out a lot of weeds. Since we stopped bagging our grass, our weed population has virtually disappeared. I won’t go back. I look forward to seeing how much greener the lawn is next year with this early leaf compost for added nutrition.
Heavy Leaf Drop Process
There comes a time, in zone 8A it’s around mid-October, when the leaf fall starts to get heavier. The leaves can’t simply be mown over and left to feed the lawn – there are simply too many of them. Leaves left in place will form a thick mat that will suffocate anything growing underneath, so it is important not to get too far behind in your leaf clean up. I recommend doing this process a little at a time, but no less often than every 2 weeks to keep your plants alive under the leaf fall.
Another consideration is rainfall. Wet leaves don’t chop up well and become difficult to move due to weight and matting. The more you stay on top of leaf clean up, the less of a risk wet leaves becomes. After a rain, a thin layer of leaves will dry more quickly than a thick layer and will be easier to work with generally.
First, use a leaf blower – preferably electric, but whatever you have – to blow the leaves out of your flower beds and onto areas of grass or open areas where smothering is less of a risk, like a driveway. Rakes in your flower beds may unintentionally pull up your plants and should be avoided.
Second, if your area contains a curb or any other type of crevice, is to rake or blow the leaves out of the crevice of the curb. This is important due to the difficulty of working with wet leaves. Even after a day or two, worms will be attracted to the crevices as the moisture, so be prepared to see them as you’re working with the material. I like to transport this material directly to the storage bed without shredding so that I can protect the worms and get the decomposition process started. It provides a nice foundation for the rest of the shredded leaf pile.
Third, take the open grassy areas, which may contain leaves from the steps above, and either drive your mulching lawn mover over the leaves with a bagging attachment or blow/rake them into several larger piles. If you’re using a leaf shredder, shred the leaves into a bag. Empty the bag pursuant to your storage plan and reuse it. In two years, I’ve only used one extra large trash bag for all of my leaf shredding!
In the spring, remember to pull back the mulch to allow the ground to warm before planting seeds or seedlings. I generally find that the leaf mulch has broken down enough around established plants that I don’t need to do anything to the mulch or plants. Leaf mulch makes for easy-care gardening until it’s time to shred those leaves again!