Planning and Maintaining a Shrubbery


The shrubs may be planned together to form a shrubbery or mixed with trees, climbers, herbaceous perennials or annuals. Whether they are mixed with other plants and a total garden planning is required or they are mixed among themselves in a shrubbery, certain general principles of planning apply. We shall discuss them in relation to shrubbery here.
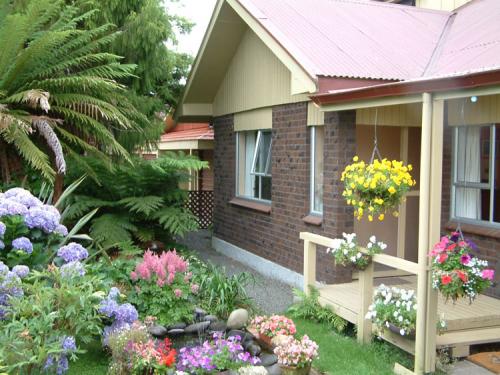
The shrubbery should have color balance and harmony. There are six main colors in the color wheel arranged in the order of the rainbow colors VIBGYOR minus I for indigo. Yellow, orange and red, the bottom three colors are warm and the violet, blue and green are cool colors. The subsidiary colors like blue, green or orange-red fall in between the two main colors. Beautiful color schemes matching or contrasting can be created by using the opposite main or subsidiary color or neighboring colors. Some interesting combination arise as of the bright yellow “weeping” Jasminum primulinum with the violet of erect and bushy Franciscea latifolia. Here not only the colors are contrasting but also the shapes. An example of contrast, using neighboring colors, is red tubular dainty looking flowers of Jatropha panduraefolia with round orange fruits of Citrus japonica. A lovely combination is of violet-purple of Petrea volubilis with magenta-red of Bougainvillea – a rich and glorious sight.
The shrubbery should have color all the year round. It could be provided by flowers, leaves, and berries in separate plants or combined in a shrub like viburnums with white or pink flowers, autumn coloring of foliage and berries in colors of black, red, plum purple or yellow or in Murraya exotica with its rich, glossy, evergreen foliage; waxy, white fragrant flowers and rust-red berries.
The balance is provided by the lines and shapes merging or contrasting in a pleasing manner. A formal Thuja besides the informal carpet of Coleus or a group of camellias providing a backdrop to the riot of color of azaleas. One beautiful combination is of Nandina domestica with its feathery foliage at the back of lush magenta of bushy azaleas. A graceful curve here, a screen of shrubs there, a specimen plant as a focus and a mass of sprawling shrubs beside, all heighten the balance.
Harmony is must. It is the ultimate effect of all, the color, the shape, the curves, the lines, the balance and the fragrance. An important point for harmony is that the personality of each plant must get expressed in the best way, which implies no overcrowding, no smothering.
It is to be noted that, all that is mentioned here sounds pretty theoretical when you start as a beginner. Let it not discourage or dishearten you. If an evergreen shrub has been wrongly placed it can be lifted and given a new site during the rains and the deciduous one during the winter. So make no plan, if you find it confusing and go ahead. Even if the lines fail to balance or the colors clash, if the effect is harmonious, well let it be so. The rhythm of the plant world will bring the harmony to you naturally.
Garden Operations
The garden operations include the following:
- Procurement of plant material
- Preparation of the site
- Planting and labeling
- Propagation
- Pruning
- After-care
Procurement of plant material
The plant material may be in the form of seeds or plants and the source of supply must be very reliable. It is heart rendering to get an indifferent bloom after tending and caring for the plant and anxiously waiting for it for months or even a year or two. It is helpful to consult the experienced friends while making a selection. One of the convenient ways is to visit the flower shows, meet the exhibitors, discuss with them and the organizers and make the selection. With experience one may start referring to horticulture societies etc.
Preparation of Site
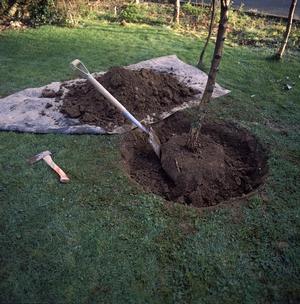
A rough and ready suggestion is to make a circular pit of 45 cm dia for a small, 60 cm for a medium and 90 cm dia for a tall shrub with the depth in case equal to the diameter.
To make a circular pit, the operations are as follows:
- Select the site and insert a small twig 15 to 20 cm at its center.
- Take a piece of twine and tie its one end to the twig at the center.
- Measure the length of the twine from the center equal to the radius desired.
- Rotate the twine around the center and mark the circular outline with a hoe as the thread rotates.
- Dig one spit about 25-25 cm, the length of a spade blade, and keep the soil on one side. This is the topsoil and must be saved for the topmost layer when the pit is refilled.
- Keep soil of each spit separately and on refilling it should go in its original order.
- The number of spits to be dug and removal of soil will be two times for a 45 cm pit, three times for a 60 cm pit and four times for a 90 cm pit. (Remember that it is difficult to remove soil after 2 or 3 spits by one person and an additional person is required. Sometimes together they use a shovel with a rope string and remove the soil with a swing, one holding the handle and the other string on the opposite side)
- After removal of soil, the soil in pit should be loosened by a spit and not removed.
- Get a layer of crocks, small stones and gravel at the base and cover it up with dry leaves, hay etc. with total depth of about 8-10 cm.
- For a 45 cm pit, take a basketful (15 kg) of each organic manure and leaf mould. Add couple of handfuls of bonemeal and mix them. Divide the mixture in three parts.
- Put one part of the mixture at the base on top of the dry leaves etc.
- Remove all big stones bigger than 3 cm dia from the soil. In the top layer soil, remove some of the smaller stones also which are too close to the roots and may obstruct or smother the roots.
- Put the soil of the second layer over it. As there is some addition in the ground of leaves and manure, the level will rise if the soil is put back. Therefore, keeping 2 baskets of soil in this layer is suggested. (The dry leaves etc will perish and get mixed in the soil.)
- Compress the soil and put the second part of the manure-leaf-mould mixture. Do not disturb the layers.
- In the soil of the first layer outside, mix the remaining mixture and put in on the top.
- For a bigger than 45 cm pit, the same process is to be repeated with the addition of one or two layers increasing the compost mixture to a total of 40-60 kg and dividing it in 4 to 5 equal parts respectively.
The pit is now ready to receive a plant.
The same basic principles will apply if a bed is made for shrubs. This process gives a robust, healthy plant and saves the annoyance of pests, diseases and stunted growths later.

Planting Shrubs
If the essentials of planting and understood, the chances of survival become very high. An analysis of failure has made the reasons clear. The essentials are:
- Transpiration loss should be minimum. This requires planting in the afternoon when it has become cool; provision of shade to more delicate plants from direct sunlight, watering immediately after planting and thereafter once or twice a day, depending on the weather, till established; to keep them with their original earth ball as much as possible; to cut out excess foliage below the growing tip if the plant is received with naked roots and to place the plant firmly in a trench if the site is not ready.
- The roots should be spread as they grow, not to twist or crowd or interlock. This is a very common mistake as spreading out the roots in their natural formation and then gently filling up is more time and energy consuming.
- Ideal condition of the soil to uproot or receive a plant is that it should be moist but not wet or soggy. In a wet or soggy soil, firming up a plant is difficult and air pockets are likely to be left.
- Fill up the soil gradually first firming it up around the roots and then gradually around the whole plant. And finally firm it up with foot and the heel for a bigger plant.
- The depth of planting should normally be the original level.
- Label the plant immediately, if required.
- Must check for firmness of planting on the next day and regularly thereafter till established.

Labeling
There is uniformity and accuracy in identification with a scientific name in Latin or Latinized language. Such a name consists of two or three parts. The first component is the name of genus which begins with a capital letter. The second one is the species which begins with a small letter. The third one, where applicable is the detailed variety which begins with a capital letter in quotes or the word ‘var.’ is added between the species and the variety and the first letter of the variety is then given in small letters. in common usage, the word ‘var.’ is often dropped when a name is described with the sign x between the genus and the species, it indicates that it is a manmade hybrid of two or more species. As an example, Punica granatum ‘Florepleno’, Punica stands for genus, granatum is species and ‘Florepleno’ is the variety. Magnolia x soulangeana is a Magnolia which a hybrid of M. obovata and M. denudate.

Propagation
Plant propagation is by seeds or vegetative methods. The vegetative methods include cuttings, leaf, stem or root; root division including suckers and runners, bulbs in general to include corms, tubes, rhizomes etc. layering – air and ground, to-type plants. Vegetative methods are more reliable. While layering, budding and grafting will require some skill, the other methods are simpler. Of them root division is the simplest. Any plant which can be propagated by cuttings can be propagated by layering but some plants like magnolias which are propagated by air-layering do not succeed generally from cuttings.
Propagation from cuttings is not difficult, if its essentials, like the essentials of planting are followed. They are:
- When to take cutting;
- How to take a cutting and to plant it; and
- After care
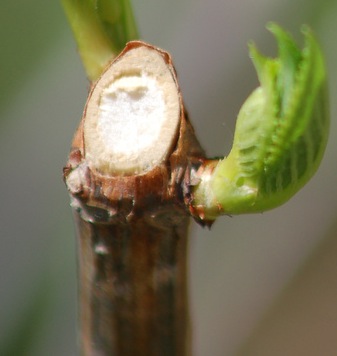
A cutting should be taken when the sap is rising in the plant. This happens immediately after flowering when it is actively developing or after its period of dormancy when it is ready to commence its new growth. A soft wood cutting is taken after flowering and the semi-hardwood or hardwood cutting is taken when it is ready for its new growth. When a plant forms fresh growth on old wood, hardwood cutting is required. The cutting should be mature in either case. A rough and ready guide is pencil thickness for cutting.
A cut should be made just below a leaf joint or from the leaf junction. The cuttings should be planted in a sheltered place, protected from hot or cold wind, hot sunshine or heavy rain preferably with only morning light. The soil should be light and porous with a little well rotted mould, but no manure. Sand is one of the best media, but it needs frequent watering. The cuttings should be planted close, otherwise they may suffer from ‘isolation syndrome’. During the initial period, they should be firmed up from time to time, nor become soggy. A cutting is ready to be shifted only after a good growth of leaves has developed, 4 pairs or so. A mere appearance of a few leaves axillary or on the top can be misleading and may prove disastrous on transfer.

Pruning
Pruning means cutting of a part of a plant to help it to improve its health, or vigor or shape. The plant diverts its sap to the part where a cut is made. It may be for improving fruiting or flowering, or for shape or size or removal of dead, diseased or damaged parts.
Certain guidelines for pruning are as follows:
- Evergreen shrubs do not need much pruning except for size and shape. This should be immediately after flowering and if they flower in flushes, the pruning can be between two flushes.
- Amongst the deciduous ones, the one which flowers on wood should be pruned immediately after flowering to promote new growth to become old enough for the new blooms next year. This includes the shrubs which generally flower in winter and spring.
- The one which flowers on new wood should be pruned in early spring as the growth signs appear. These generally include the shrubs flowering summer to autumn. In either case, the older wood which would not promote flowering should be removed.
These are general guidelines which need to be modified based on the behavior of plants. Magnolias, camellias, azaleas, rhodendrons practically need no pruning. When one is in doubt whether to prune or not and no advice is available, it is safer not to prune.
A sharp clean cut with a pair of scissors or knife, just above an eye and sloping towards is necessary. A cut much above will lead to shoot dieback and away from eye will take away the concentrates necessary for promoting growth from the eye.
After-care
This includes regular (1) Watering and feeding, (2) Staking and labeling where required, (3) Hoeing and weeding, (4) Controlling pests and diseases, (5) Stopping, (6) Disbudding and dead heading. Items (1) and (3) are self explanatory. The requirement of water and feed varies with the plants. It is, therefore, better to understand it and avoid it uniformity. In general, watering and feeding should be done in the morning or evening or preferably in the morning in winter and in the evening in summer. During the period of frost specially, the soil around the plants should not be allowed to become too dry and after heavy frost it is helpful to water the plants to wash off the frost. In summer, some plants need watering twice a day. Excess watering in some plants like bougainvilleas may lead to more leaves, while some plants like gardenias hate dry roots. We have already seen how to control pests and diseases earlier.
Stopping means pinching 1 to 2 cm of a growing shoot of a plant. It is done to prevent a plant from becoming leggy and to promote its bushy and compact growth. The Pelargonium is one of the popular examples where it is often practiced.
Disbudding means removal of excess buds in a flower head or on a stem. It is done to promote bigger and more compact blooms and for a longer period.
Dead heading is removal of withered flowers from a plant to prevent the plant from seeding as the plant comes to rest after seeding and stops flowering. It is also the removal of any dead part improves the health.


