- HubPages»
- Home and Garden»
- Gardening»
- Planting Vegetables
Planting Peanuts

Varieties
There are many commercial viable varieties of peanuts. The plant can either be a bush, a runner or a hybrid of both. The pods of the bush variety contain one or two kernels in a thin shell. The runners have one to three kernels in a thicker shelled pod.
Soil and Climate
Peanuts thrive in loose, well-fertilized sandy soil or porous soil that does not retain water. Peanuts plants like warm climate and an even rainfall throughout the year. Summer is a more favorable planting season because wet weather results in plenty of leaves but few fruits. A dry season crop, planted from October to January, yields more beans of better quality than a rainy season crop (May or June). If irrigation is available, peanuts can be planted in February for a bountiful yield.
Inter-cropping
Inter-cropping peanut with sugarcane or other annual crops such as monggo, soybean or upland rice is highly profitable. Peanuts may also be inter-cropped with cassava, okra and planted between roes of coffee. In some countries, peanut is planted between rows of corn space at 100 cm apart to produce the highest grain yield. However, one row of peanut in between 2 rows of corn spaced at 75 cm is found to be the best inter-cropping combination.
Land Preparation
The field must be completely prepped before planting. Peanut requires a well-prepared field for proper development and effective weed control. Alternately plow and harrow the field two times at 7-day intervals. Each harrowing consists of two passes. well-cultivated soil is essential for seedling growth and development of pods. Plow up to 15-20 cm deep to completely cover plant residues and reduce future incidence of stem and pod disease.
For dry season planting, make straight furrows spaced at 50cm apart, running from the higher part of the field to the lower elevation. If soil drainage is not good, plant the peanut on hills. Spacing rows at 60cm apart makes the field convenient for weeding, cultivation and spraying without significantly affecting yield. If other crops will be planted together with the peanuts, make the distance one meter apart.
Planting
Before planting, peanuts can be treated with rhizobium, available at your lcoal Bureau of Soils or Bureau of Plant Industry office. This nitriogen-fixing bacteria culture ensures that the treated seeds will grow nodules that produce nitrogen in the roots. In a container, prepare a paste-like mix of rhizobium with a little water. Put the peanuts in the container and make sure all are coated with the mix.If the field has been planted to other legumes that have been applied with rhizobium in the past three years, it is not necessary to apply rhizobium this time.
Treat the field initially with 25-30 kilos per hectare of nitrogenfertilizer before planting. It soil is poor and lacking in potassium and phosphorus, apply about 4 bags/200kg of 14-14-14 before planting. Cover with soil so as not to harm seedlings.
plant the peanuts as soon as the furrows are made, preferably early in the morning or late in the afternoon. Planting shelled peanuts is the standard practice but some farmers use the old practice of planting unshelled pods. A hectare of land requires 90 to 120 kilos of seeds. Put 2 to 3 seeds per hole about 20cm apart.
Irrigation
Peanut plants can tolerate drought relatively well. When
the crops is planted during the rainy season, irrigation may no longer be needed. Those planted in early October, in particular, do not need irrigation until December, since the soil retains enough moisture from the rains in t6he previous months to support vegetative growth.
A crop planted late in the dry season, such as in February, needs supplemental irrigation. Three to four times should be enough. If the soil is very dry before planting time, irrigate before planting or water soon after planting to speed up germination. Water againwhen the grains begin to form. When irrigating, wet the soil until about 30 cm deep.
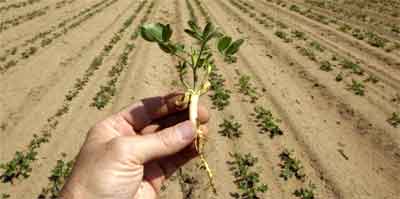
Peanuts sprout 15 days after planting. Three weeks after the first leaves appear, pull up a plant to see if the rhizobium has been effective. Cut the grain at the root; it should appear pinkish. If it is pale or gray, the rhizobium was not effective. If the plants are thriving even without nodules in the biggest root, the soil has adequate nitrogen. If the roots at the side have nodules, the rizobium was not sufficient and the soil needs more nitrogen. If the peanuts still do not bear good grains, then the soil is not suitable.
Nutrient Management
Peanuts need plenty of nutrients for proper growth and grain formation. The first important nutrient components is nitrogen, which the plants need to sprout. If the soil is sandy, phosphorus must be applied. Potassium, on the other hand, increases the production of grains and their oil content. Finally, calcium is needed for the plants to form full grains.
In general, you can apply a 30-40-40 fertilizer application which is equivalent to 1.33 bags of urea (4-0-0) or 3 bags of ammonium sulfate (21-0-0), 4 bags of solophos or super phosphate (0-20-0) and 1.33 bags of muriate of potash (0-6-0). If rhizobium was used, only one-half of the recommended fertilizer application is needed.
Pests and Disease Control
Aflatoxin is one of the most serious problems affecting peanuts. This is caused by the fungus, Aspergillus flavus - a common mold in the environment that can cause diseases in plants, animals and humans alike. Ingesting foods affected by aflatoxin can lead to serious illness and even death.
Peanuts can be contaminated by aflatoxin before or after harvest, if the nuts are not dried sufficiently. The recommended moisture level should be less than 10 percent. Once the peanuts or plants become infected, there is no way that the aflatoxin can be remove and the peanut becomes dangerous for consumption. Aflatoxin infection can sometimes be visible as mould, but in other cases, laboratory tests need to be carried out to confirm the presence of aflatoxin.
Pests/Symtoms
| Management
|
|---|---|
Weeds
| Apply herbicides 2-3 weeks before planting
|
Reddish brown or black spots on the leaves or stalk
| Fungitox: 1-2 spoonfuls in 5 gallons water or Benlate: 1/2 teaspoon in one gal water
|
Peanuts rust-dark orange or brown blisters under the leaves at the latter part of growth
| dithane M-45: 2 tsps for every gal of water or plant vax: 1/2 tsps for every gal of water Spray 3 times starting from time of growth at 10-to 14-day intervals.
|
Wilting of leaves, stalk and sometimes the whole plant
| Vitigran Blue 35 WP: 3tbsps in 5 gal at first sign of infection. Repeat 1-2 weeks; remove diseased parts.
|
Harvesting
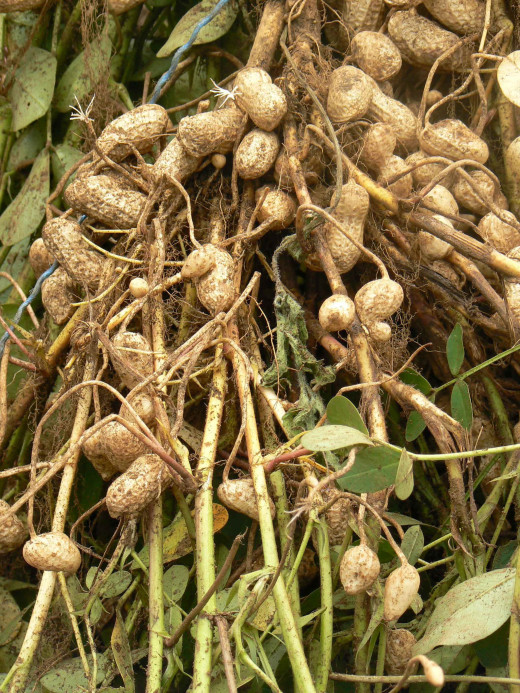
Peanuts mature within four months after planting. If you planted your crop in summer, it will be ready for harvest when the leaves wilt and turn yellow. You can also check if the shell of the peanut has hardened. Pull up about 10 plants with the aid of a spade or fork. If there are dark veins or roots inside the shell, the peanuts are ready for harvest. Immature pods have wrinkled shells; while overly mature pods have started to grow into the soil.
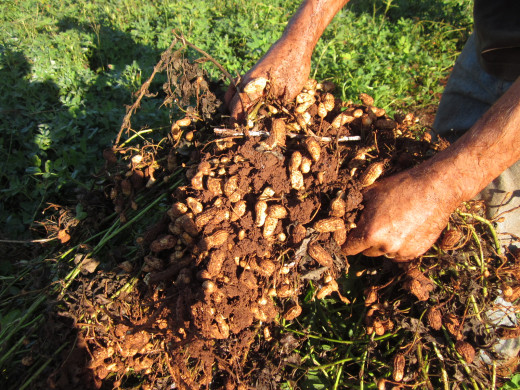
Harvesting is a very manual labor intensive activity that takes from 6 to 20 man-days per hectare. Start by plowing both sides of a row of plants to loosen the soil. Then, with the help of a spade or fork, lift out the plants one by one.
Air-dry newly harvested plants in the field; then beat the pods against a hard surface to separate them from the plant. For rainy days harvests, wash the pods and separate the immature and inferior pods. Stack the harvested plants in a dry, airy place.
Post-harvest Handling and Storage
It is better to store peanuts with their shell on to avoid pest destruction. The shell acts as a natural protective covering of the seeds against mechanical damage and insect infestation. These are stored in sacks, bamboo baskets, or in open concrete pits under the farmhouse.
For sheltered peanuts, traders use bags piled to a maximum of 7-8 layers only. Shelled peanuts can usually be stored for up to 2 months, while the unshelled nuts can be stored for six months.
Shelling
Traditionally, peanuts are shelled manually. Avoid scratching or splitting the seed coat, breaking the cotyledon, or separating the two-halves of the nut. Carefully remove the kernels from the shell; do not allow them to be broken or their seed cover by bruised. This will be the start of rotting. Sort and discard the moldy, split, or otherwise defective peanuts before storage.


")