How to Repair or Install New Shower Valves


Fixing or Repairing Shower Sets
Tools Needed
Pliers
Utility Knife
Various Wrenches
Philip Screwdriver
Straight Screwdriver
Pipe Cutters
Pipe seal
Fittings as needed
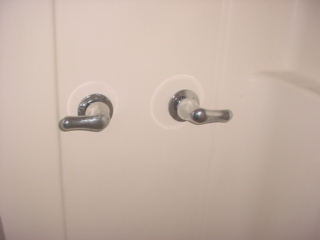
This is a Bank Repossessed House that was bought by a customer of mine. He has owned it for about 4 years. He has never had his shower area working because the handles would not turn and could use the shower in the other bath that had a tub. He called me up and decided to get the other shower in the Master Bedroom working. So I grabbed my tools and went over to look at it. The first thing I did was tried to turn the Handles. They both just spun in the Stems. So I removed the handles and put a pair of pliers on each and turned them on and off. See Photo A. A lot of time if you know what make of valve stem they are you can go to a hardware store and by replacements. The trouble is in this case is there was no way of telling. So it is usually easier to just buy new ones and install.
The next thing I did was try to figure out how to get to the back of it. It looked like it was behind the medicine cabinet in the other Bath. So I removed the medicine cabinet. Then I had a good view of what was going on. See Photo B. Shows the pipe going up to the shower head. When you look down you can see the valves. So I then removed the drywall in a nice Square so it would be easy to repair the hole and low enough to expose the Valves to make it easier to work on. See Photo C. The pipes are crossed over because on the wall I am working on has a sink and they wanted to keep the cold and hot water valve in the correct place. See Figure D.
Before you start removing always make sure that you have all the part and enough time to finish the job before you turn the water off. So you want to go and get the parts first before you go farther.
We went out and got the Faucet set and various pieces of elbow and connectors. Most of this type of valve Sets can be used for either a tub or a Shower. So if it is only for a shower then also buy a plug for the bottom of the Valve set. It is threaded. I also like to use Teflon type paste for plumbing. I don’t like using the tape this is a personal preference. So I put on the Plug and installed the fitting. I also used Shark Bite Fittings on this because of the close working room and you don’t have to soldier pipes. See Photo E. Then connecting one pipe at a time, I reconnected the pipes to the new Valve set. See Photo F. I then went over to the other side and following the manufactures direction installed the new handles.
Next I turned back on the water and checked for leaks in the water lines. After checking that we had no water leaks I put in a new piece of Drywall and replaced the Medicine Cabinet. See Photo G
Now here is the Bad part. I went home thinking everything was good. He calls me an hour later rather upset. His Daughter decided to take a shower now Remember in the beginning I told you this was a Repossesse house. Well there was one problem. I started home and on my way there the customer calls me up all upset. His Daughter stepped into the shower and decided to try it out. There was water pouring through the ceiling. The Drain pipes are broken in the shower. As near as I can tell they had gotten frozen when it was not occupied and the P trap had broken.
 to Repair Your Wheelbarrow")


")

