Repurposing Ideas for Kid's Tables

Before and After Picture of the Table
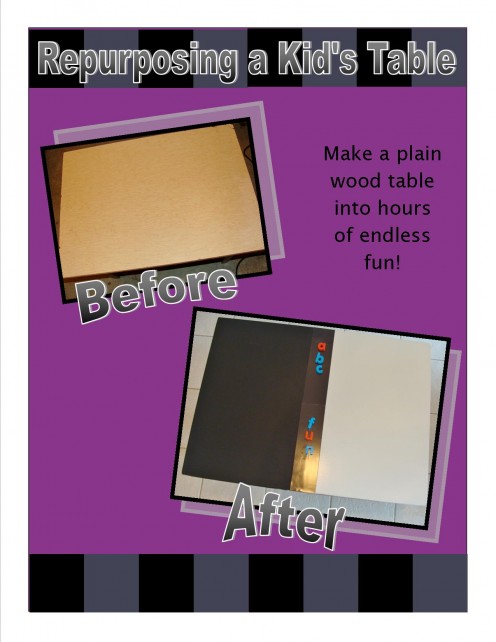
Wooden Kids Table
A friend of mine was recently cleaning out her basement and was getting rid of some of her kids' toys and furniture. She had a beautiful wooden kids table that was a little worn with love but still sturdy and in excellent condition. When she asked me if I wanted it I didn't give her a second chance to change her mind and quickly snatched it up. As we continued to talk, we shared ideas about how the table could be spruced up a bit to look like new. So after much thought and conversation, I decided to create a table that was a combination of a chalk board table and dry erase table. Here is a step by step guide of how I did it.
Pictures of Preparing the Wood Surface
Click thumbnail to view full-size


Preparing the Surface to Refinish a Wooden Table
In order for the new paint to stick to the surface, the table to needs to be clean and slightly rough. First remove any pieces of tape or other items that may be stuck to the table top. *Then using the sanding attachment on a multipurpose tool, sand the table to remove the clear coat finish as well as giving the surface a slightly rough feel. Wipe with a damp cloth to remove all of the dust. Allow the surface to dry before proceeding.
If there are any chips or cracks in the surface of the table, fill them with wood filler. Using a putty knife, apply the wood filler and then smooth it out to create a flat and even surface. Allow to dry according to the directions on the container. Once the filler is dry, a quick sand of the filler will create an even working surface. If you find that the holes still need some additional filler, repeat the process a second time. After the filler dries, take a damp cloth and wipe the dust off of the table. Allow table to dry before applying the primer.
*Be sure to wear a mask while sanding the table to protect yourself from the dust that will be created from the sanding of the table.
Applying Primer to the Table
The addition of primer to the table has an important purpose. If you have ever painted anything, from wooden furniture to walls, you know that primer is the base in which your paint will adhere best to. If you choose to omit the primer, you will most likely need to apply several coats of paint for the paint to show its strongest colors without the surface beneath showing.
Since we were applying a black colored paint on one half and white on the other, we chose to use two different colored primers. A gray was used for the chalkboard paint and white was used for under the dry erase paint. Remember to always paint in a well ventilated area. If you cannot paint outdoors, open windows to allow the paint fumes to escape and fresh air to come in.
Photos of Applying the Chalkboard and Dry Erase Paint
Click thumbnail to view full-size


Applying Chalkboad Paint to a Wooden Table
Using the chalkboard paint was a new experience for us. My husband started out using a foam roller but quickly decided that he did not prefer it. When I researched what the best tools would be for this project, there were a few recommendations for this type of roller. He used the roller for the first coat of chalkboard paint. He felt as though it was smearing the paint which led to the need for a second coat of paint. He decided to finish the second coat of paint with a regular paint brush. Use the painting tool that you are most comfortable with. Be sure that you allow each coat to dry completely before adding any additional coats.
Dry Erase and Chalkboard Paint

Applying Dry Erase Finish to a Wooden Table
Be sure to read the directions for this paint completely. You will receive two cans in the box for this paint. You will mix the cans together just before you are ready to paint. Be very cautious of your time constraints. After a certain period of time, the paint will no longer be usable.
Apply one to two coats of dry erase paint to the other half of the table. Remember that the surface will have a glossy shine to it. Although the paint may be dry to the touch, do not use the markers on the surface until the paint has had sufficient time to cure, usually 2-3 days.
Additional Embelishments
In order to have a clean appearance, I wanted to cover the line between the dry erase paint and the chalkboard paint. I decided to make this both appealing and purposeful, to add a magnetic strip to this section. I did not want to have a thick strip but to have the magnet be as flush to the table as possible. In order to accomplish this, I used magnet sheets that you might use for business cards or signs for the side of a car for advertisement. I thought that the magnet sheets that I purchased had an adhesive backing but they did not. I decided to use double sided tape to make it a smooth, mess free way to stick the magnets to the table.
We realized while we were painting that it would have been a good idea for us to attach a draw on rollers under the table to hold all of the magnet letters, markers, chalk, and erasers. This would make it easy for the kids to keep track of their materials and for everything to be in one place. We may go back and add this at a later time. If this sounds like something that you would like to add, do it BEFORE you paint! Our kids are very excited to give their new table a try!
Related

30+ Creative DIY Pallet Furniture Ideas for Your Home

Refinishing Ideas or Redoing Antiques and diy Old Furniture Repair

How to Estimate Painting for Walls, Roofs, and Wood Surfaces

A fabulous new floor could be hiding right underfoot, when you consider terrazzo restoration.

How to Faux Paint your Wooden Table Top to Look Like Granite


